19 Whimsical Painted Furniture Ideas For A Beautifully Creative And Joyfully Personal Home
My home—and honestly, my sanity—has always benefited from a bit of creative flair. When I look around, I want to see pieces that spark joy, not just fill a space. That’s why I’m so drawn to whimsical painted furniture. It’s more than just a fresh coat of paint; it’s an invitation to transform forgotten finds into truly personal treasures. This approach celebrates imagination and gives everyday items a unique story. I’ve found these projects are often the most rewarding.
Why These Whimsical Painted Furniture Ideas Are Worth Trying
These colorful makeovers infuse a home with personality on a budget, turning thrifted pieces into cherished focal points. It’s a creative way to give old items a second life and avoid buying new, mass-produced furniture.
Table of Contents
1. The Secret Garden Bureau
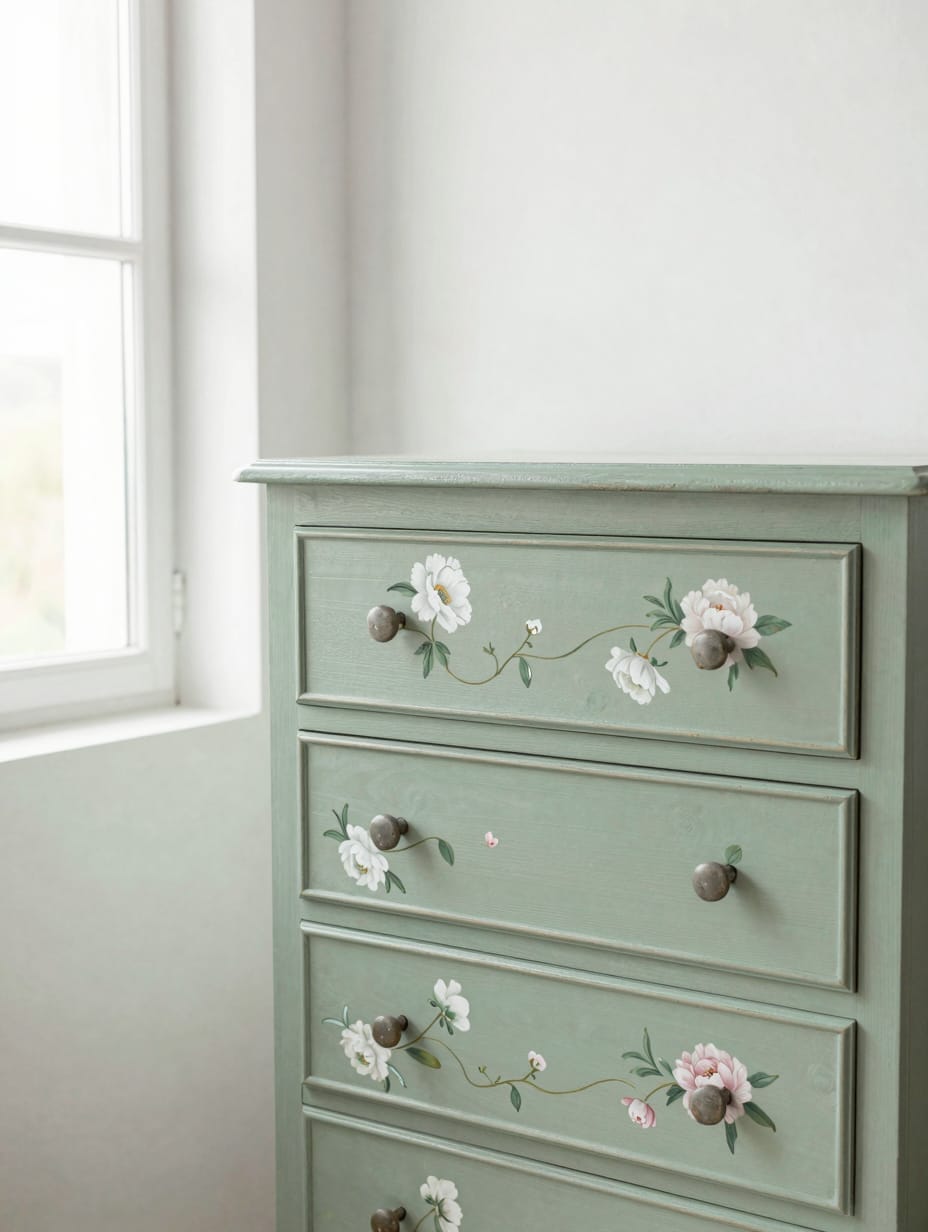
This antique wooden bureau, painted a soft sage green, truly feels like a secret garden moment in my bedroom. Delicate hand-painted white and pink peonies cascade across the drawer fronts, illuminated by natural light, highlighting the subtle sheen of the chalk paint finish. The texture is gently matte, inviting a soft touch.
I remember thinking the chalk paint would be simple, but getting the right consistency for the floral work took practice. It’s not a quick project, but the character it adds is worthwhile.
How to Get This Look
- Apply two coats of sage green chalk paint over the prepped surface, ensuring full coverage for a uniform base.
- Chalk Paint, $15-$30 USD, choose a brand known for good adhesion.
- Finish with a clear wax, bringing out the soft sage green and enhancing the floral details.
- Use acrylic craft paint for flowers, $2-$5 USD, for a cheaper alternative to specialized furniture paint.
2. Dotty Dreamland Bedside Table
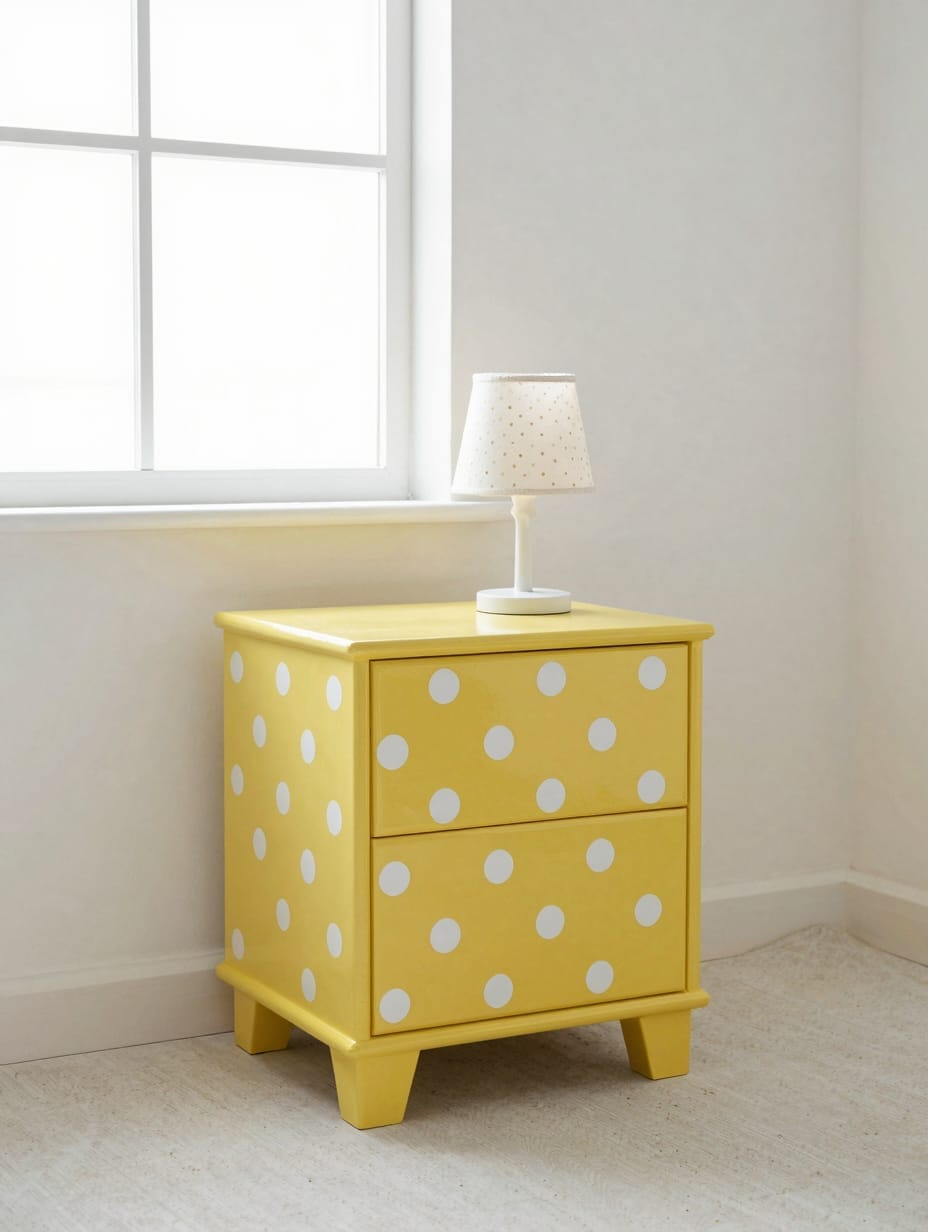
I saw this charming nightstand in a friend’s child’s room; it was painted a bright, sunny yellow with perfectly spaced, contrasting white polka dots. The polished, glossy finish reflected the morning light, captured under airy lighting, which really made the colors pop. A small, quirky lamp sat atop it, adding to the cheerful atmosphere.
My friend mentioned how crucial the painter’s tape was for getting those crisp edges. Any bleed-through would have ruined the clean look of the dots. It definitely needs patience.
How to Get This Look
- Mark out a precise grid for polka dot placement, ensuring even spacing before taping.
- High-Gloss Acrylic Paint, $10-$25 USD, select for durability and vibrant color payoff.
- Use a white satin paint for the dots against the yellow, for a playful, crisp contrast.
- Repurpose old circular stickers, $1-$3 USD, as stencils for precise, budget-friendly dots.
3. Seaside Serenity Ombre Cabinet
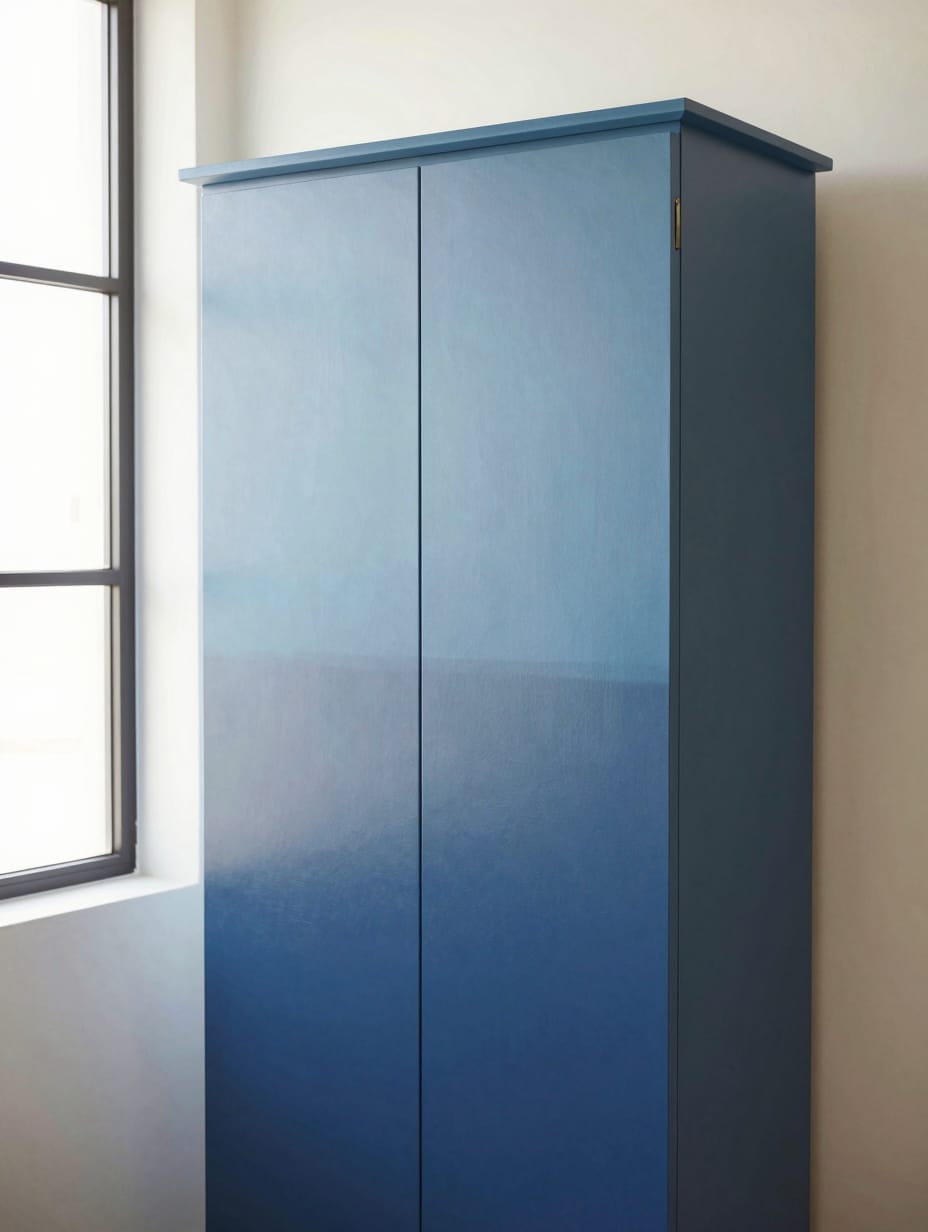
This tall, slender cabinet in my living room transitions seamlessly from a deep ocean blue at the bottom to a calming sky blue at the top. It mimics a calm seascape, just as I’d hoped. The painted surface has a gentle, brushed texture, softened by a matte topcoat; I really focused on blending to avoid harsh lines.
Honestly, achieving a smooth ombre blend without visible lines was more frustrating than I anticipated. I had to work incredibly fast, re-wetting edges constantly, and it still took three attempts to get it right. But the effect is so worth the effort.
How to Get This Look
- Apply base color at the bottom, then gradually lighten the shade as you move upwards, overlapping slightly.
- Ombre Paint Kit, $30-$60 USD, ensuring colors are pre-selected for smooth transitions.
- Layer light and dark blues, blending softly with a wide, damp brush for a gradual effect.
- Mix your own colors from basic blue and white paints, $10-$20 USD total, for custom shades and savings.
4. Art Deco Inspired Gem Table
I saw this vintage coffee table in a design showroom, meticulously painted with a geometric pattern of emerald green, sapphire blue, and gold metallic accents. The lines were sharp and precise, creating a modern yet whimsical feel. The metallic paint caught the showroom lights, sparkling against the dark wood floor.
The designer told me they used incredibly thin painter’s tape and a laser level to achieve the perfect symmetry on the intricate pattern. It definitely seemed like a project requiring a steady hand and a lot of prep work.
How to Get This Look
- Tape off geometric designs using fine-line painter’s tape, pressing down firmly to prevent bleeds.
- Metallic Gold Paint, $8-$20 USD, choose one with high pigment for a rich shimmer.
- Combine emerald green, sapphire blue, and gold for an opulent, jewel-toned palette.
- Use gold spray paint, $5-$10 USD, for metallic accents, applying in thin, even coats for a smooth finish.
5. Whimsical Woodland Chest of Drawers
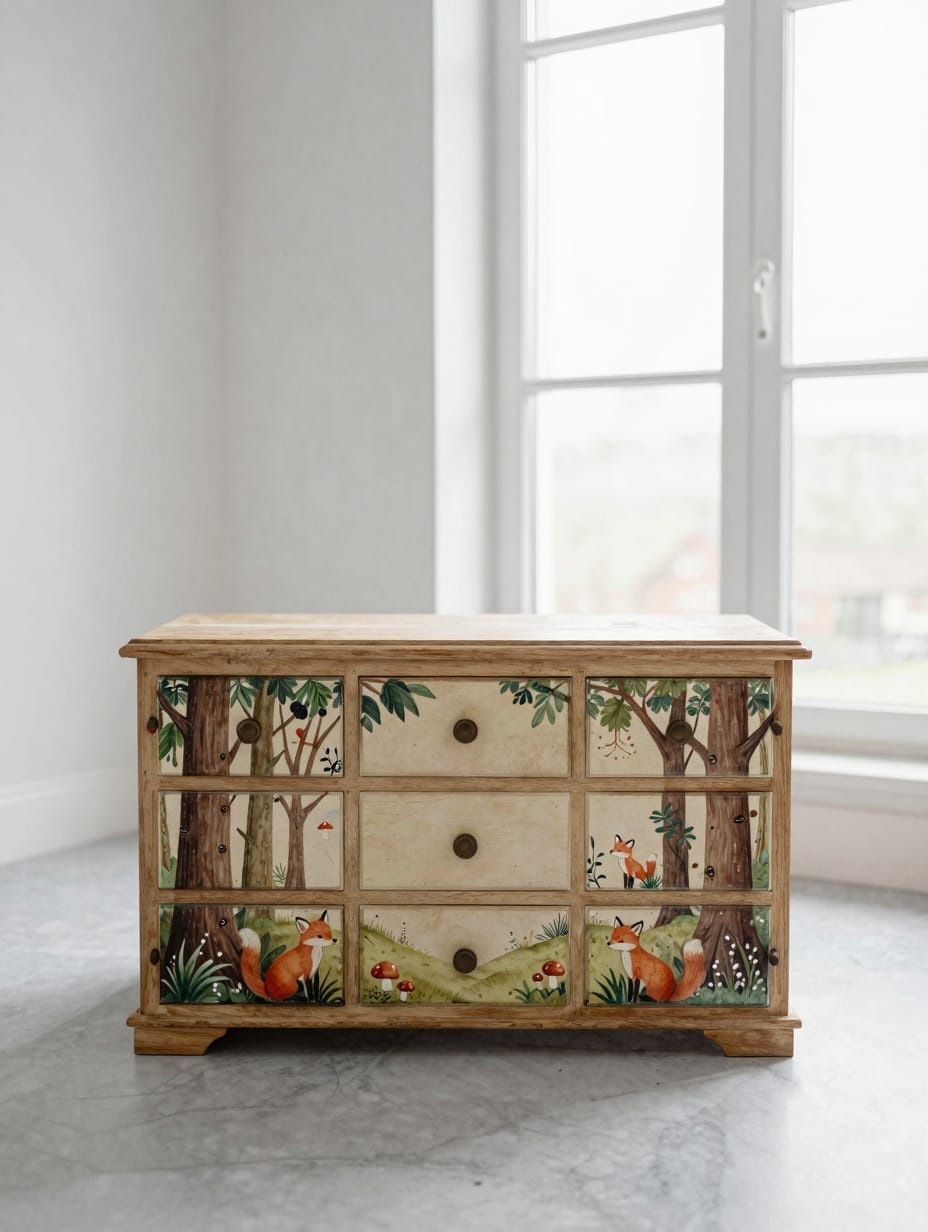
An old wooden chest, transformed into a forest wonderland, caught my eye at a craft fair. Hand-painted trees, friendly foxes, and tiny mushrooms adorned the drawer fronts against a soft cream background. The style was illustrative and charming, with a slightly textured, matte finish that seemed to invite curiosity.
The artist explained sketching the entire scene in pencil first was key to getting the composition right. It avoided repainting errors and ensured all the elements fit together naturally on each drawer.
How to Get This Look
- Lightly sketch the woodland scene directly onto the prepared furniture surface using a soft pencil.
- Acrylic Craft Paints, $15-$30 USD for a set, selecting non-toxic options for children’s furniture.
- Use a cream background for the main chest, allowing the woodland creatures to stand out vividly.
- Gather small paint brushes from an art store, $5-$15 USD, instead of full artist sets for detailed work.
6. Vibrant Vertical Rainbow Shelf
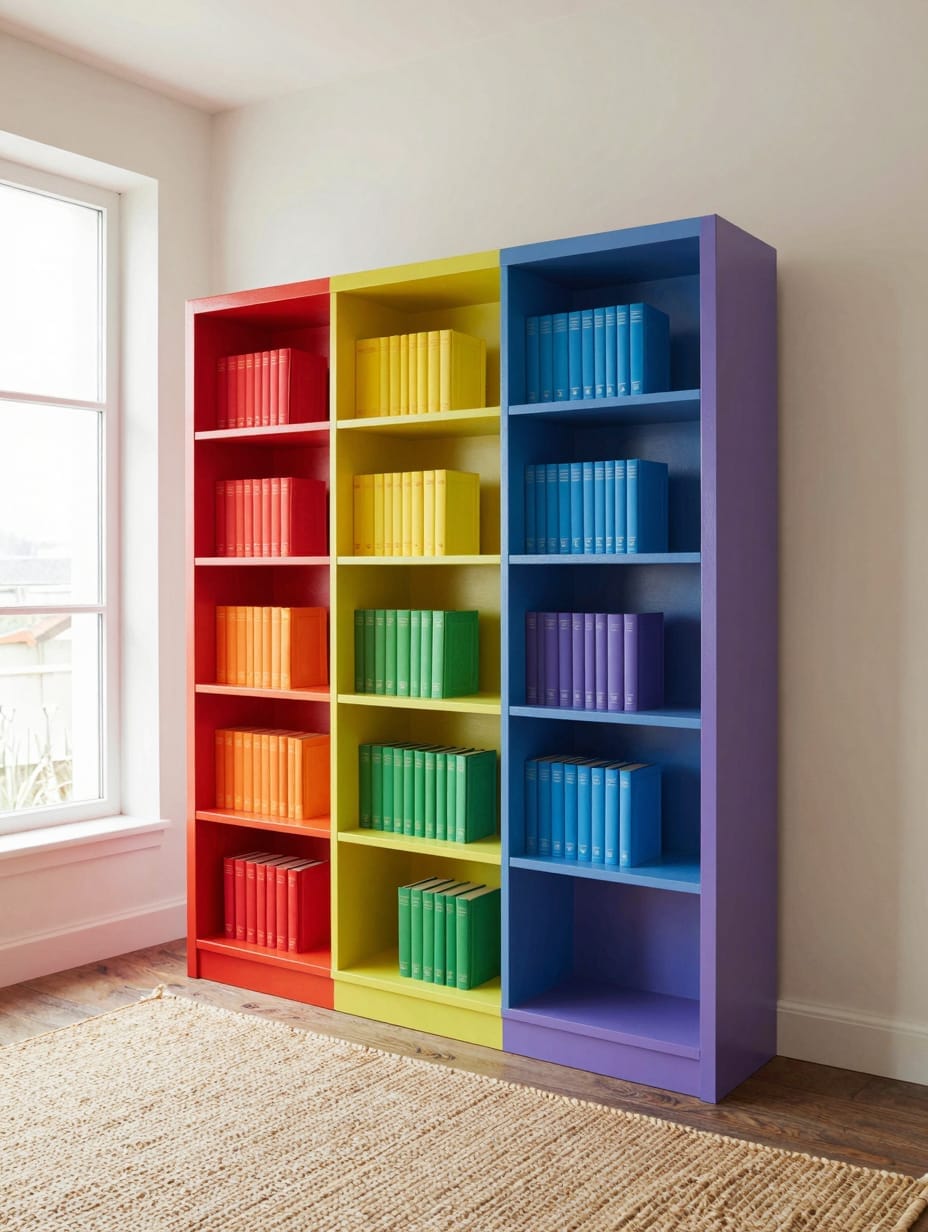
I remember seeing this tall, open bookshelf in a home office, and each shelf was painted a different bright color of the rainbow—red, orange, yellow, green, blue, purple. The edges were crisp, and the semi-gloss finish made the colors pop under the bright overhead light. It felt so joyful.
The homeowner mentioned painting one color at a time and allowing full drying between coats was crucial for avoiding smudges and keeping the lines sharp. Patience was definitely a virtue for this project.
How to Get This Look
- Paint each shelf a distinct color of the rainbow, ensuring a clean transition at the edges.
- Acrylic Paints (various colors), $20-$40 USD for a range, prioritizing vivid pigments.
- Opt for a semi-gloss finish to enhance the vibrancy of the rainbow colors.
- Purchase small sample pots of house paint, $3-$7 USD each, for individual colors instead of large cans.
7. Free-Spirited Folk Art Sideboard
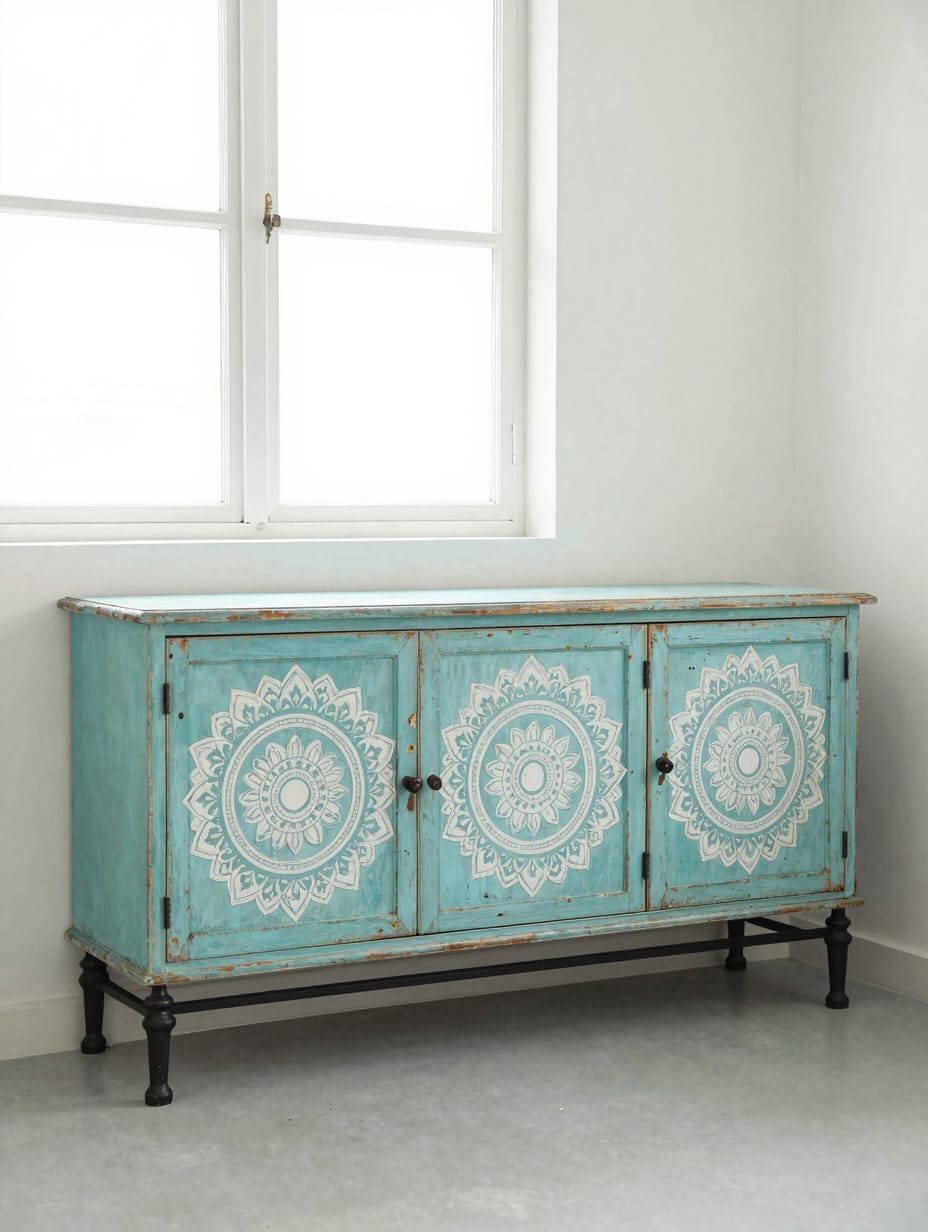
I saw this weathered sideboard in a boutique, painted in a faded turquoise with intricate, white mandala-inspired patterns subtly stenciled across the doors. The paint was intentionally distressed, revealing hints of the original wood beneath. Diffuse light enhanced its aged, global aesthetic.
The boutique owner explained that the light distressing wax was essential. It protected the chalk paint while allowing the darker undercoat to peek through, creating an authentic, worn look without being messy.
How to Get This Look
- Apply mandala stencils with white paint over the turquoise base, allowing for slight imperfections.
- Chalk Paint (Turquoise), $20-$40 USD, chosen for its matte finish and ease of distressing.
- Distress edges lightly with sandpaper, then apply a clear antiquing wax for an aged appearance.
- Create your own mandala stencils from cardstock, $1-$2 USD, by tracing and cutting designs.
8. Cosmic Dreamscape Dresser
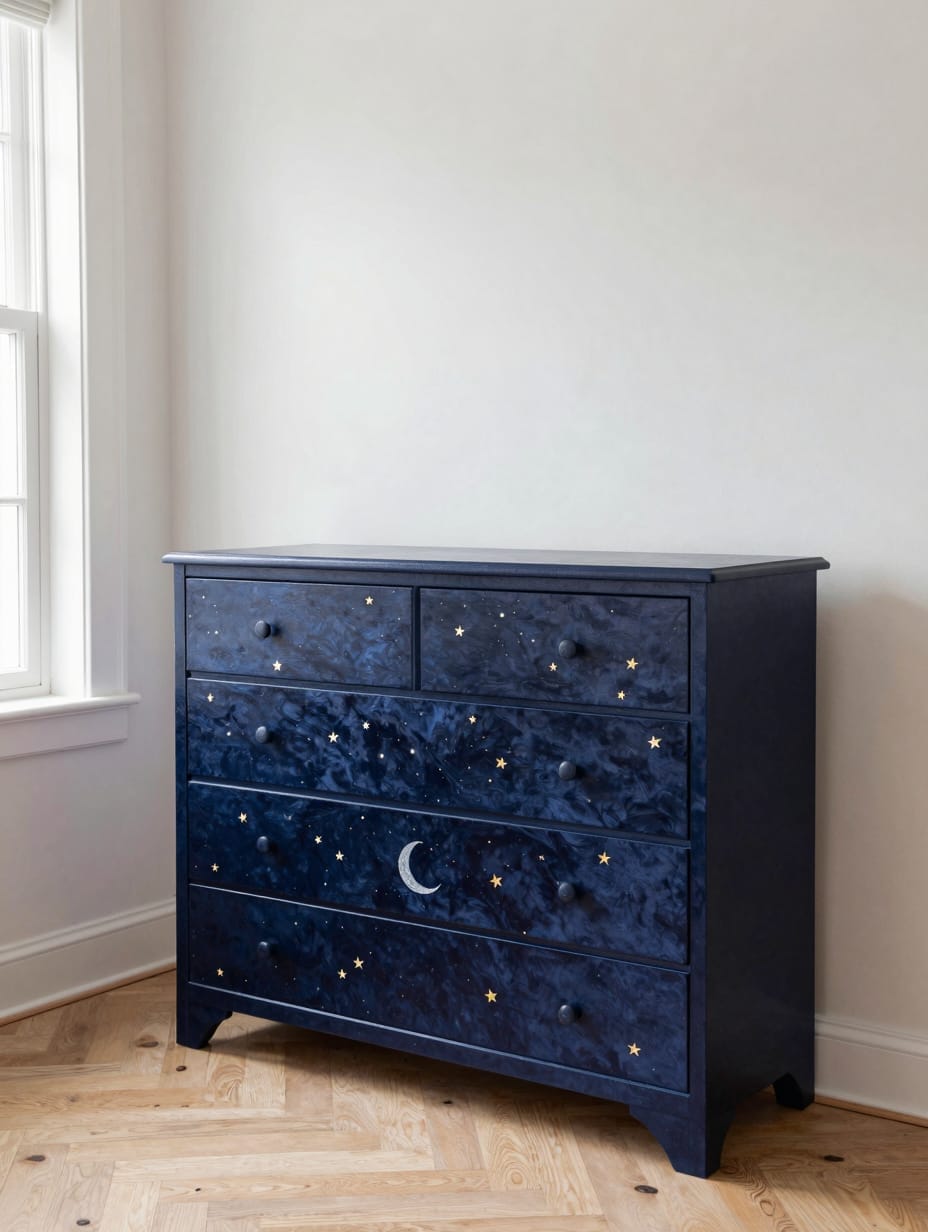
A bedroom dresser I spotted online was painted a deep, velvety navy blue, adorned with countless small, shimmering gold stars and a delicate silver crescent moon. The surface had an even, satin finish that subtly reflected ambient light, creating a celestial glow. It looked so peaceful.
The creator suggested that applying several thin coats of the navy paint was better than one thick one. This ensured an even, deep base color for the starry details, preventing patchiness.
How to Get This Look
- Use small star stencils in various sizes to create a dynamic, realistic star field effect.
- Midnight Blue Satin Paint, $25-$50 USD, chosen for its deep hue and soft sheen.
- Combine metallic gold and silver details against the dark navy for a cosmic contrast.
- Use a fine-tip white paint marker, $3-$6 USD, for individual stars and constellations.
9. Country Chic Gingham Cabinet
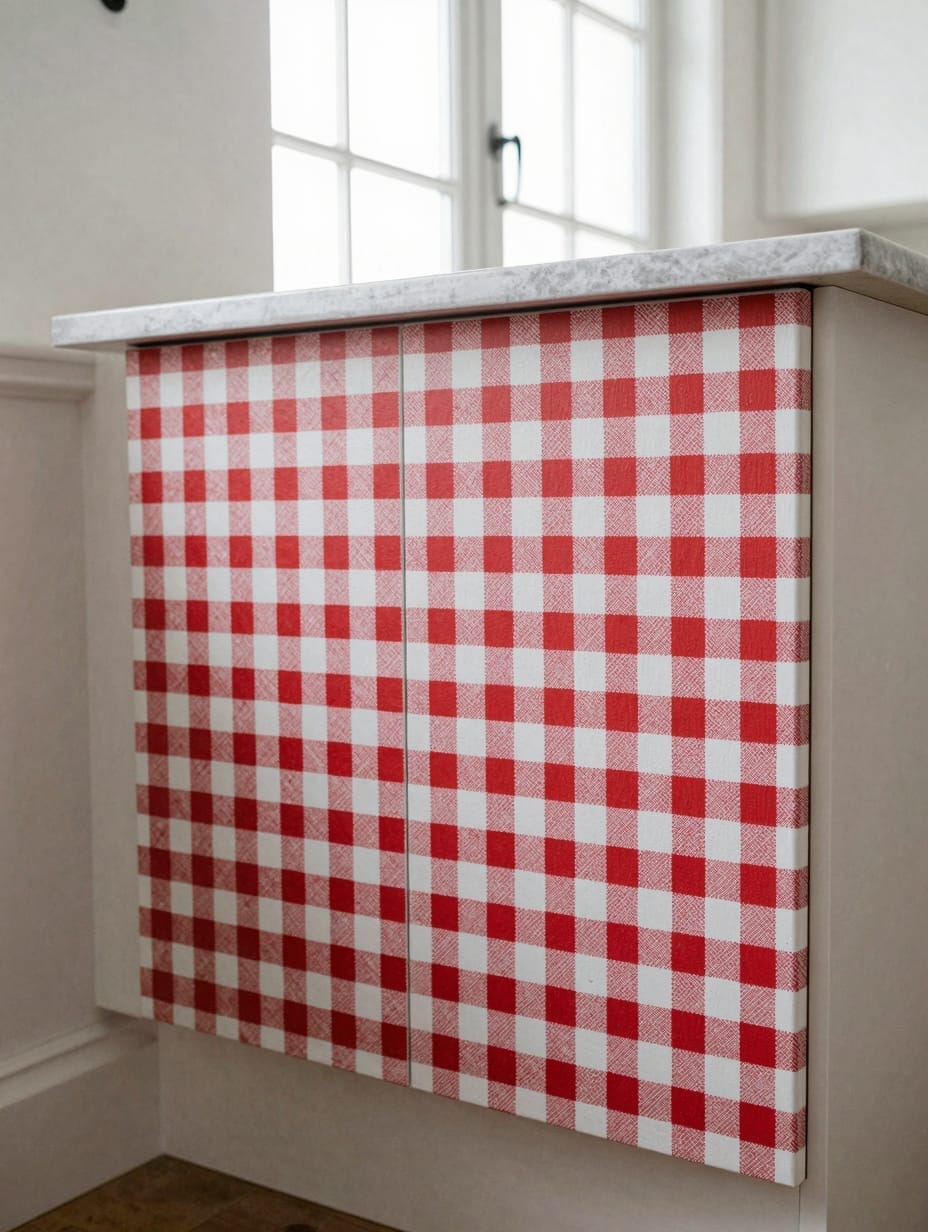
I put a classic red and white gingham pattern on my kitchen cabinet door; it just felt so comforting. The lines are neat and even, which took some serious effort, and the paint has a slightly matte, farmhouse-style finish. Bright, natural light highlights the homely pattern, emphasizing its crisp, woven-like appearance.
Full disclosure: achieving those perfectly crisp gingham lines was a test of my patience. I painted the red vertical stripes, let them cure completely for 24 hours, then taped and painted the horizontal white stripes. Any shortcuts led to bleeding, so I learned to wait.
How to Get This Look
- Paint vertical red stripes first, let dry completely, then tape off and paint horizontal white stripes.
- Red & White Acrylic Paint, $15-$30 USD, ensuring good coverage for bold colors.
- Use a matte sealer to give the gingham a true farmhouse, textile-like appearance.
- Cut your own thin tape strips from wider painter’s tape, $4-$8 USD, for a precise grid without buying specialized sizes.
10. Flourishing Foliage Workspace
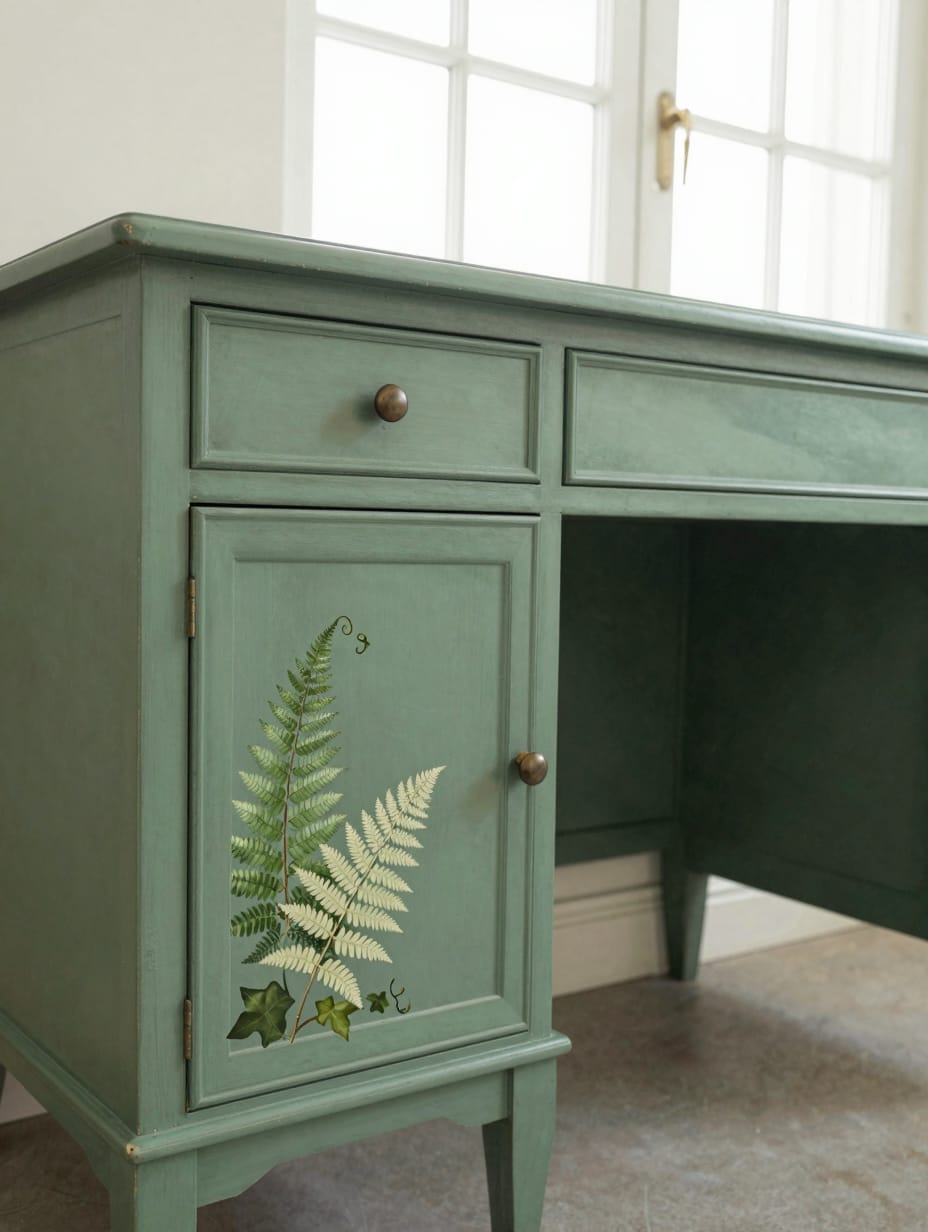
This vintage writing desk, painted a calming forest green, belongs to a friend. One corner features a beautifully hand-painted botanical illustration of ferns and ivy in contrasting lighter greens and creams. The sleek, low-sheen finish reflects a scholarly tranquility under soft, focused lighting, highlighting the intricate leaf textures.
My friend found that practicing the delicate brushstrokes on scrap wood beforehand was invaluable. It helped her get a feel for the paint flow and the intricacy of the botanical designs before committing to the desk itself.
How to Get This Look
- Outline botanical designs in pencil on one corner of the desk before applying paint details.
- Forest Green Chalk Paint, $20-$40 USD, chosen for its earthy tone and smooth application.
- Paint ferns and ivy in lighter green and cream shades against the dark forest green for contrast.
- Use an old fine-tipped brush, $2-$5 USD, rather than buying a new one for small detail work.
11. Mediterranean Mosaic Console
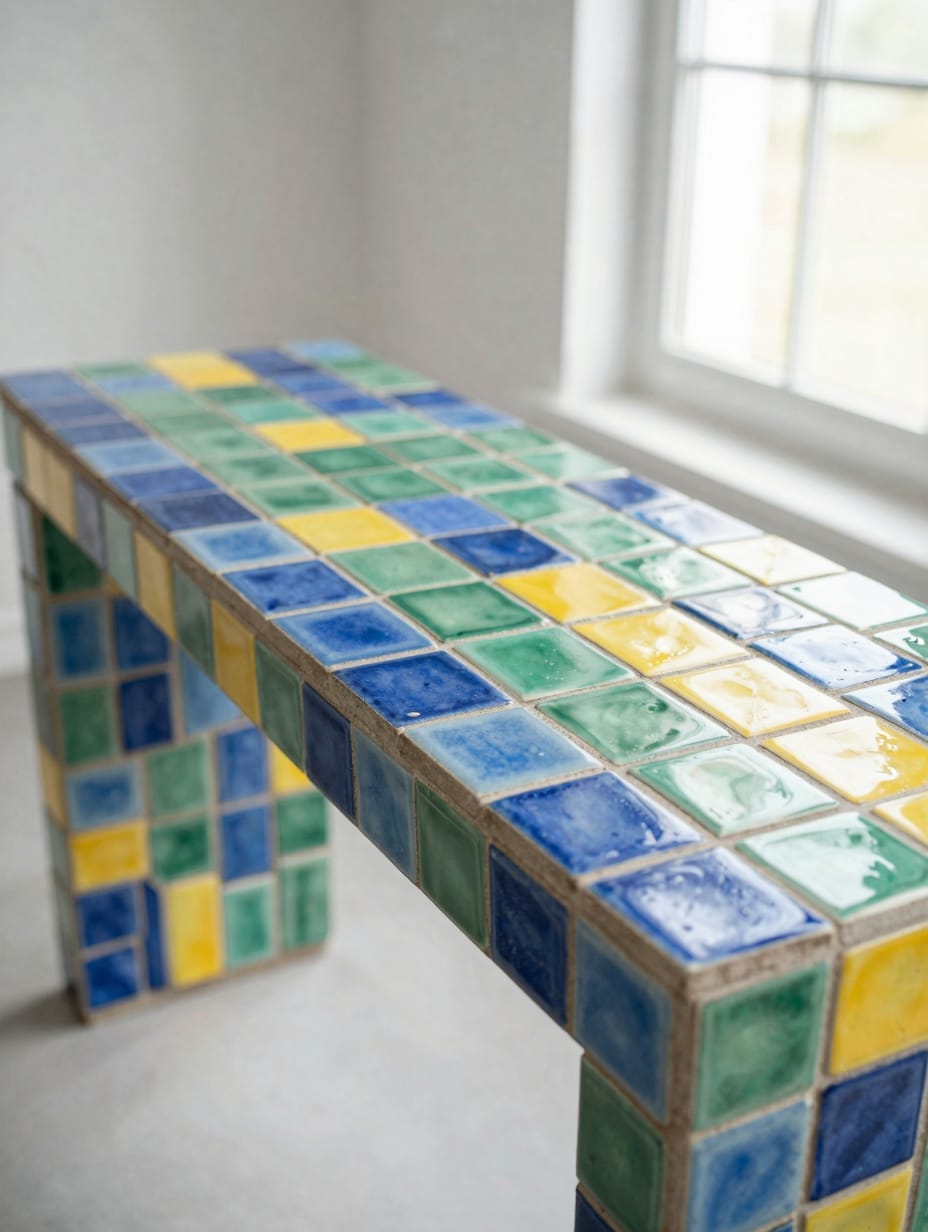
I admired a long console table with its top painted to resemble a mosaic of brightly colored, irregularly shaped ’tiles’ in blues, greens, and yellows, separated by thin black ‘grout’ lines. The finish was a level, protective high gloss, creating the illusion of actual tiles under direct light. It looked like a genuine art piece.
The artist explained drawing the “grout” lines first with a paint pen allowed for clean separation between colors. Trying to freehand the shapes without the outlines would have been far more challenging and less precise.
How to Get This Look
- Draw ‘grout’ lines with a black paint pen to define irregular mosaic shapes on the tabletop.
- Acrylic Paints (various colors), $25-$50 USD for a diverse set, ensuring quick-drying properties.
- Apply a high-gloss polyurethane topcoat to mimic the look and durability of real mosaic tiles.
- Use leftover house paint samples, $3-$7 USD per color, for a varied palette of ’tile’ colors.
12. Heavenly Cloudscape Armoire
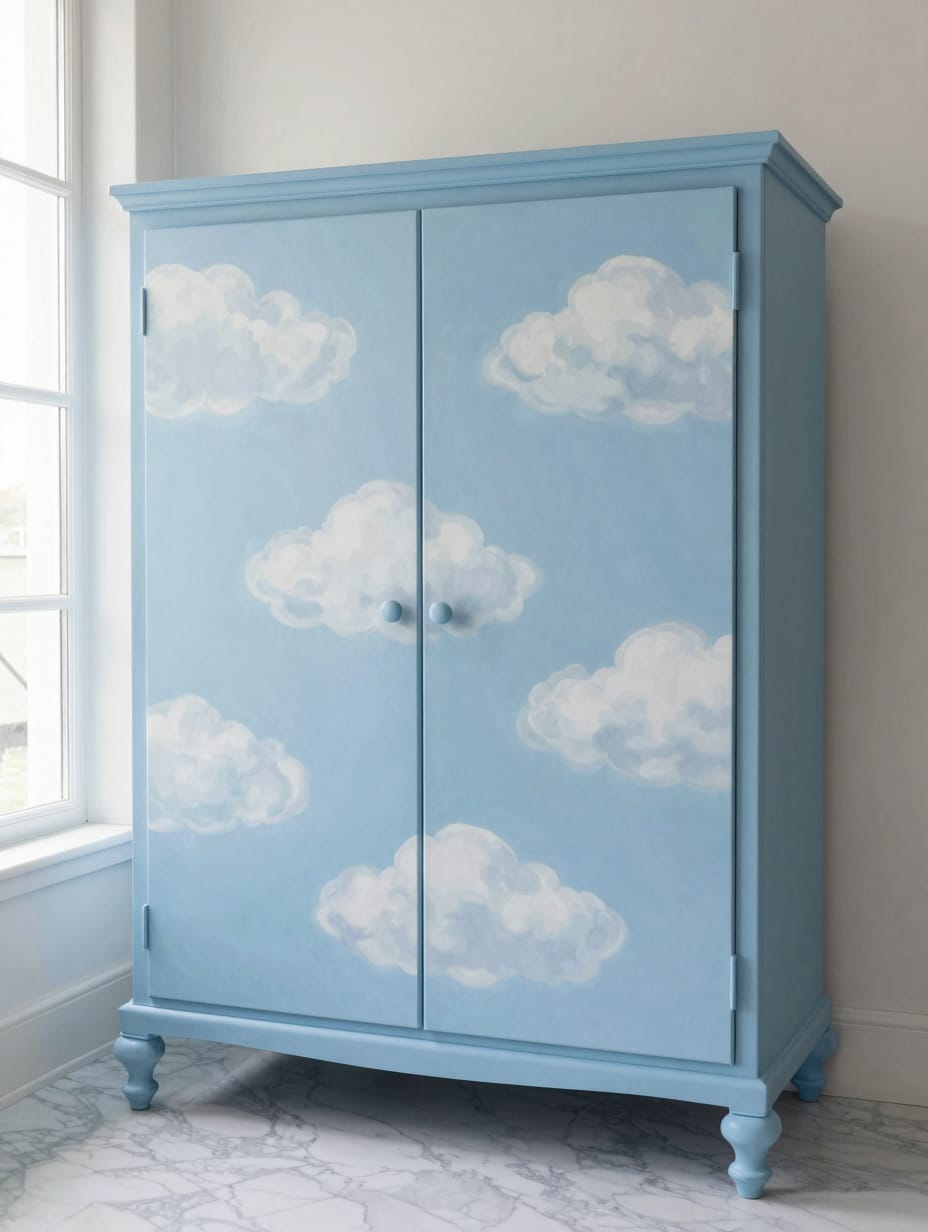
A large, antique armoire in a decorator’s portfolio was painted a serene sky blue, with soft, fluffy white clouds gently drifting across its doors and sides. The clouds were blended seamlessly, giving a dreamy, ethereal feel. The soft satin finish reflected the gentle ambient light, emphasizing its serene surface.
The key, according to the decorator, was using a very damp sponge for the white paint and continuously dabbing and blending rather than brushing. This created the soft, indistinct edges crucial for a realistic cloud effect.
How to Get This Look
- Dab and blend white paint onto the sky blue base using a damp sea sponge to form soft clouds.
- Sky Blue Satin Paint, $30-$60 USD, selecting a brand known for smooth, even coverage.
- Maintain a soft, satin finish on the armoire to enhance the gentle, ethereal cloudscape.
- Use old kitchen sponges, $0-$1 USD, cut into irregular shapes for unique cloud textures.
13. Playful Patterned Dining Seats
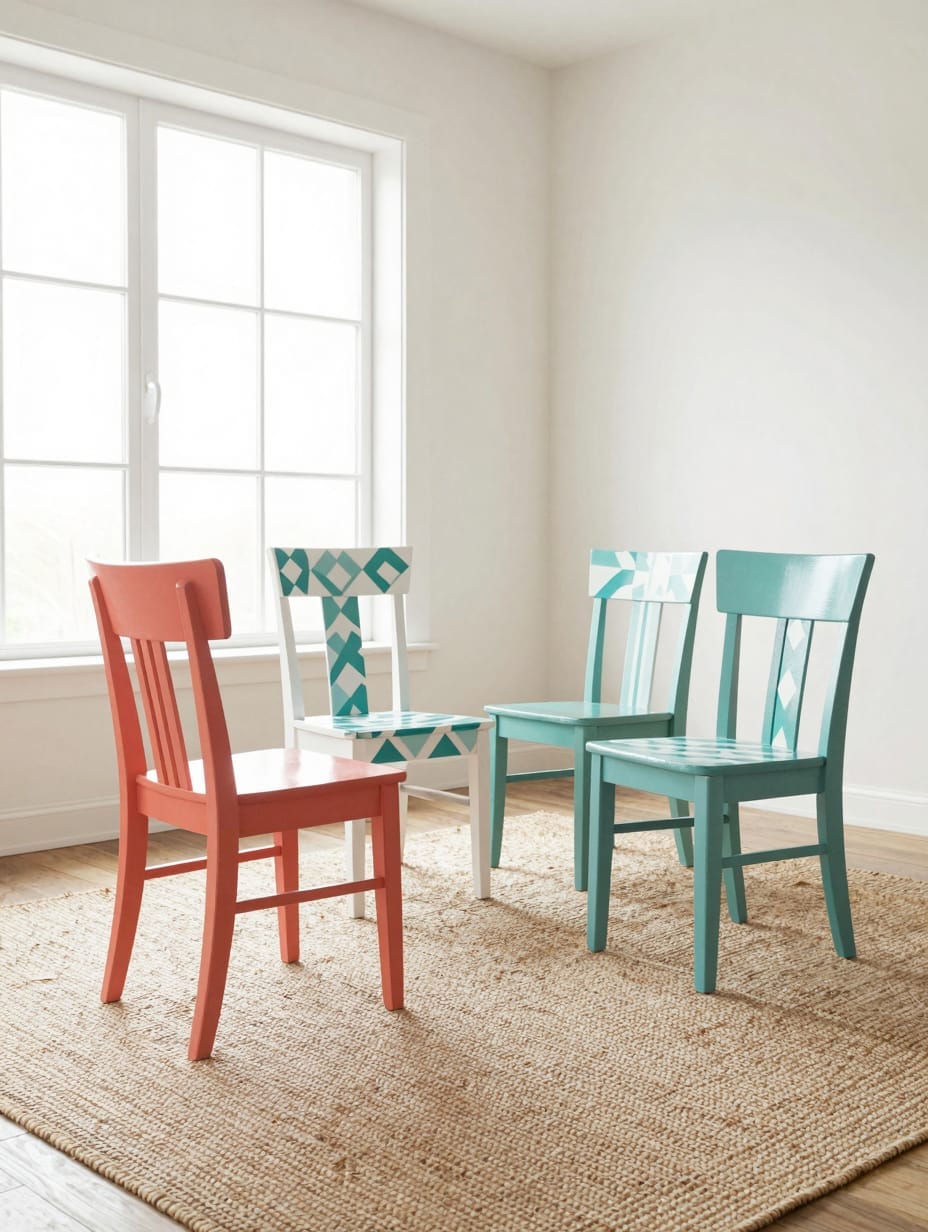
I once saw a set of four wooden dining chairs, each painted in a unique, bold geometric pattern—zigzags, triangles, checkerboard—using coral, teal, and white. The finish was a durable, semi-gloss, inviting playful use and reflecting the bright lighting. It felt so creative and cohesive despite the variations.
The owner admitted that painting chairs is tedious due to all the angles and nooks. Focusing on solid legs first, then adding patterns to the larger back and seat areas, helped simplify the process without overwhelming the eye.
How to Get This Look
- Mask off chair backs and seats to apply geometric patterns, leaving legs a solid coordinating color.
- Durable Furniture Paint, $20-$40 USD per color, choosing options resistant to chipping.
- Use coral, teal, and white in various geometric designs for a cohesive yet playful look.
- Buy basic wooden chairs from a second-hand store, $10-$20 USD each, to keep costs low.
14. Rustic Charm Faux Bois Table
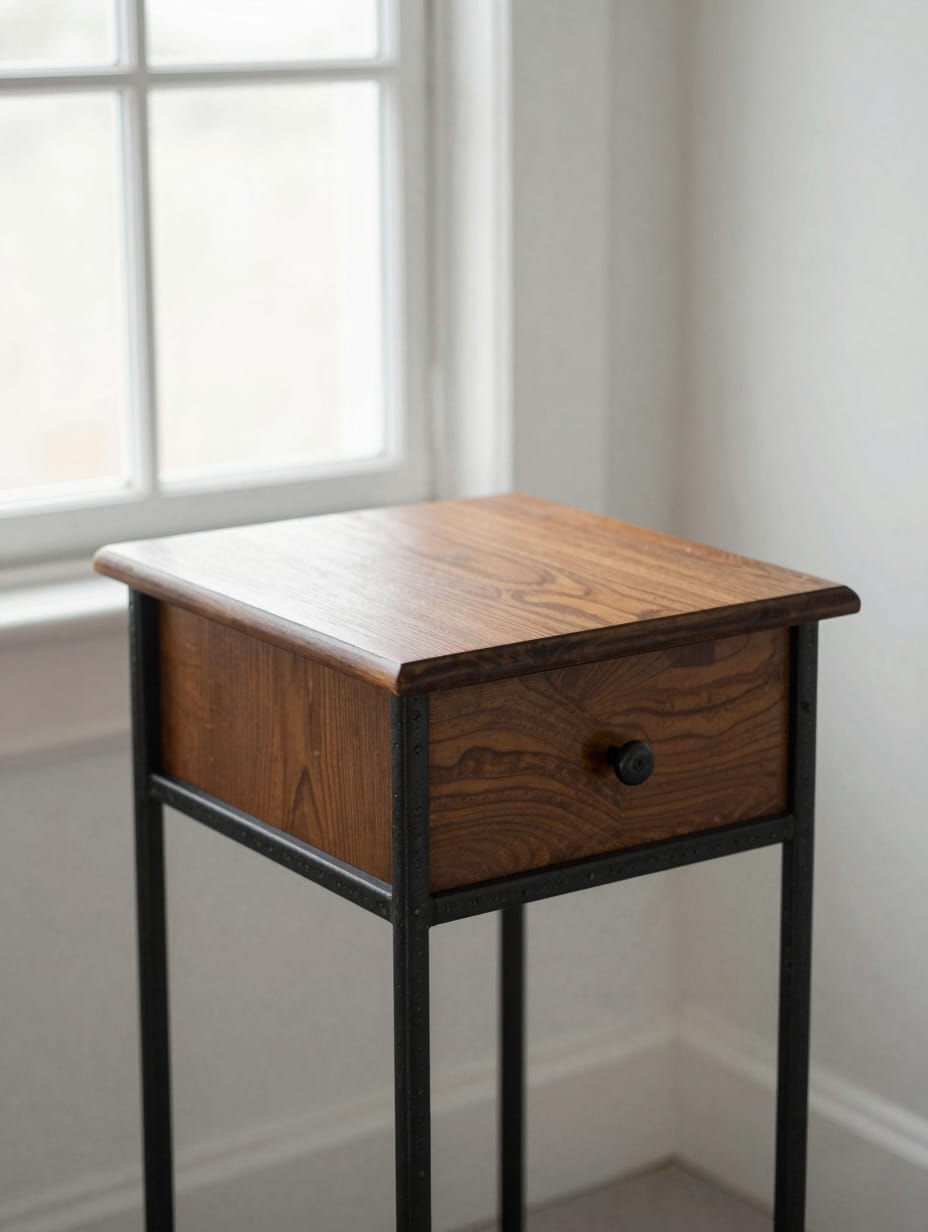
A small, simple end table in a friend’s cabin had been painted a deep, warm brown. Its top was expertly painted with a faux bois technique, mimicking the intricate grain of natural wood. The surface was uniform and sealed with a subtle satin finish, offering a sophisticated, natural look under the soft lamp light.
My friend spent hours practicing the faux bois tool on scrap wood, which she said was essential. She figured out the right pressure and movement to create convincing grain patterns, avoiding a blotchy or artificial look.
How to Get This Look
- Apply the faux bois tool smoothly over wet brown paint, dragging it to create wood grain patterns.
- Wood Grain Tool, $5-$15 USD, choosing one with adjustable patterns for versatility.
- Use dark and light browns to create depth and realistic variation in the faux bois texture.
- Blend craft acrylics, $10-$20 USD for a set, to achieve different brown tones instead of buying specialized faux finish paints.
15. Globetrotter’s Map Dresser
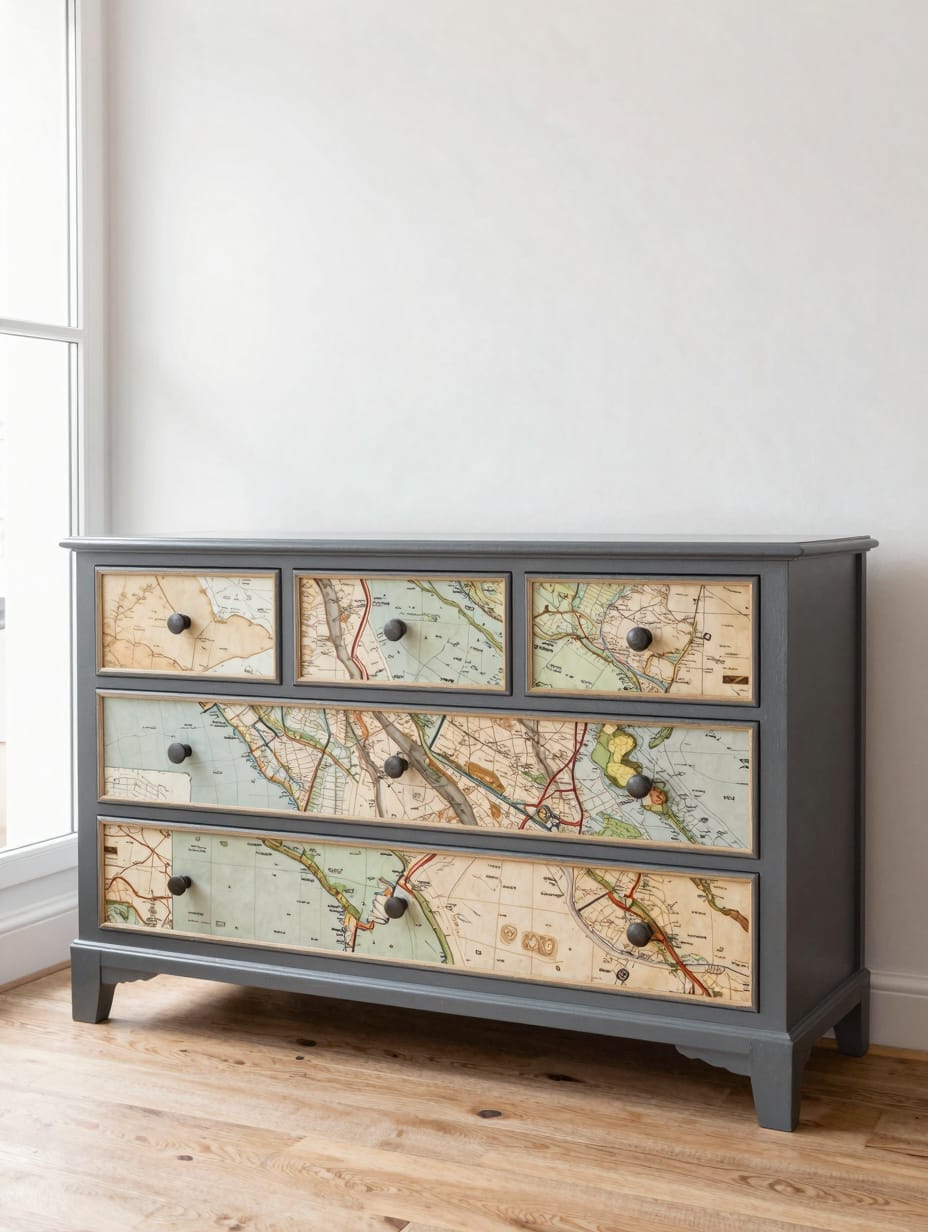
This wide, low dresser with its drawer fronts decoupaged with antique map sections was a project I helped a friend with, and it turned out beautifully. It created such a rich, textural collage. The surrounding frame is painted a deep, coordinating charcoal grey. The surface has a slightly textured feel from the paper, sealed with a satin finish.
Working with the map sections for the decoupage was tricky; battling air bubbles was a constant challenge. Using a brayer and working slowly from the center outward made a huge difference, but it was a frustrating learning curve to get it smooth.
How to Get This Look
- Cut map sections to size for each drawer front, ensuring patterns align for a continuous look.
- Decoupage Glue, $10-$20 USD, choosing a matte finish for a less glossy paper texture.
- Frame the decoupaged sections with a deep charcoal grey paint, providing a sophisticated border.
- Print historical maps from public domain archives, $0-$5 USD for paper and ink, as a budget-friendly source for imagery.
16. Energetic Abstract Swirl Bench

I painted this sturdy entryway bench with flowing, organic abstract swirls in a vibrant mix of fuchsia, orange, and lime green against a clean white background. My brushstrokes are definitely visible, adding to the dynamic texture. A high-gloss finish makes the colors truly pop under bright, inviting light, reflecting a cheerful energy.
I’ll admit, because I used such vibrant colors and a high-gloss finish, every little fingerprint or scuff mark shows up like crazy. It means I wipe it down more often than I expected, which is a minor tradeoff for the visual impact it makes.
How to Get This Look
- Apply vibrant abstract swirls with broad brushstrokes across the bench, varying direction for movement.
- Vibrant Acrylic Paints, $20-$40 USD for a multi-color set, prioritizing high pigment concentration.
- Seal with a high-gloss clear coat to intensify the colors and provide a durable, shiny finish.
- Use an old brush, $0-$3 USD, for the abstract design to embrace an unrefined, spontaneous look.
17. Soft Pastel Checkerboard Bedside
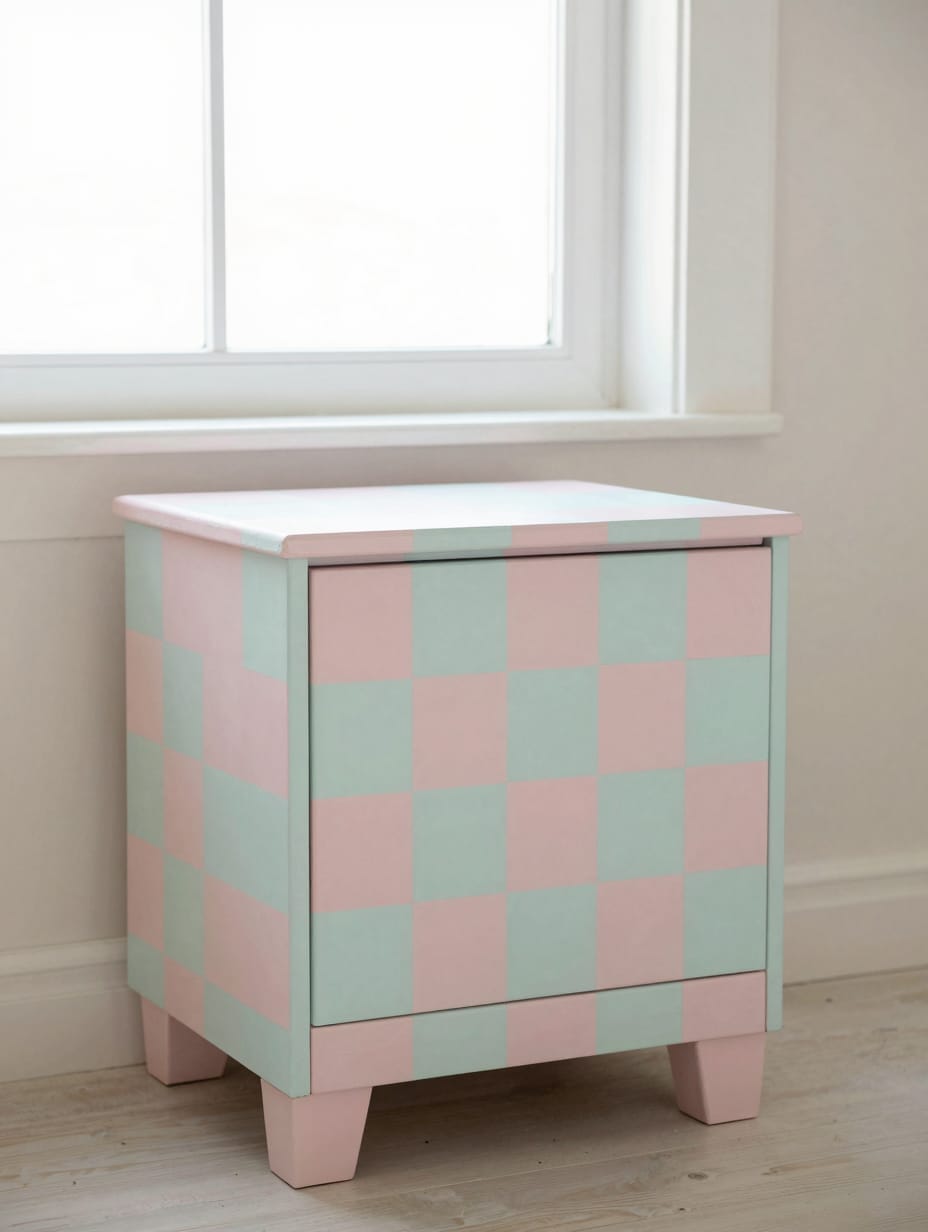
This petite nightstand, featuring a gentle checkerboard pattern using soft pastel pink and mint green, caught my eye in a friend’s guest bedroom. The paint finish was flawless and matte, exuding a calming, sweet aesthetic. Soft, diffused morning light highlighted the delicate color palette, creating a serene surface.
My friend mentioned how crucial careful measurement and crisp painter’s tape were. Even a slightly crooked line would ruin the precision of the checkerboard, so she spent a lot of time on the setup.
How to Get This Look
- Measure and tape a precise grid for the checkerboard pattern, ensuring square sizes are even.
- Pastel Acrylic Paints, $15-$30 USD for a set, choosing shades with good opacity.
- Finish with a matte sealing wax to enhance the soft, understated pastel colors.
- Use a ruler and pencil, $1-$5 USD, to draw the grid instead of relying solely on tape for accuracy.
18. Wildly Chic Animal Print Chair
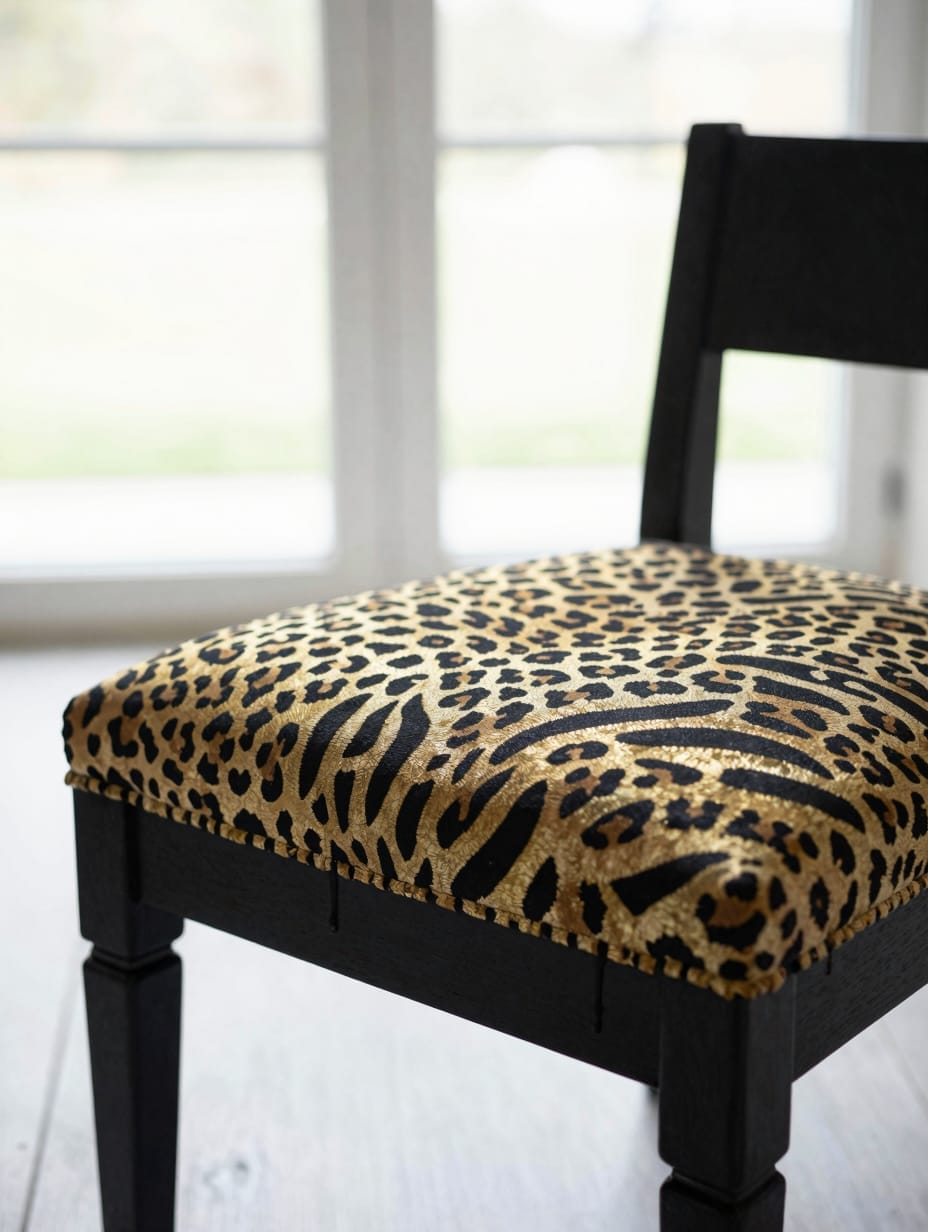
I saw this small accent chair—a vanity stool, actually—with its wooden frame painted a rich black. The padded seat was upholstered in a fabric with a hand-painted leopard print in metallic gold and black. The metallic elements subtly caught the light, adding a touch of sophisticated wildness. It looked surprisingly elegant.
The designer stressed that if you’re painting on fabric, using textile-specific paint and proper heat setting is non-negotiable. Otherwise, the design will crack and fade quickly with use. It’s an extra step but necessary for durability.
How to Get This Look
- Paint the wooden frame black, allowing it to dry completely before upholstering the seat.
- Fabric Paint (Gold & Black), $10-$25 USD, ensuring it’s suitable for upholstery.
- Combine black paint for the chair frame with metallic gold fabric paint for a luxurious animal print.
- Use a small sponge or cotton swab, $1-$2 USD, for dabbing on animal print spots rather than a brush for organic shapes.
19. Inspiring Calligraphy Display Shelf
A simple floating shelf, painted a crisp white, held a few small plants in a small shop. Along its front edge, elegant hand-painted calligraphy spelled out an uplifting phrase in contrasting metallic silver. The lettering caught the ambient light beautifully, adding a touch of sophisticated whimsy.
The shop owner mentioned practicing the lettering on paper until it felt natural. Freehanding complex script directly onto the shelf is incredibly risky, so stencils or a pencil guide are almost always better for clean results.
How to Get This Look
- Lightly pencil in your chosen word or phrase onto the shelf edge before applying paint.
- Metallic Silver Paint Pen, $5-$10 USD, choosing one with a fine, consistent tip.
- Paint the shelf a crisp white to make the metallic silver calligraphy stand out prominently.
- Print out a calligraphy font template, $0-$2 USD for ink and paper, to trace for perfect letter forms.
Loved these ideas? Save this post to Pinterest so you can come back to it later.
Simple Ways to Bring These Ideas to Life in Your Home
To really bring these ideas to life, I always recommend starting with a smaller piece, like a side table or a stool, to build confidence. Always prep your furniture correctly: clean, sand, and then prime it – this step is critical for paint adhesion and durability. Don’t be afraid to experiment with color swatches on scrap wood or even the back of your piece; what you see online isn’t always what you get in person. Investing in quality brushes and painter’s tape makes a noticeable difference in the finish and can save frustration. Finally, always seal your work properly with a durable topcoat to protect your artistic masterpiece from daily wear.
Frequently Asked Questions
What’s the best paint for whimsical furniture?
Chalk paint ($20-$40 USD for a quart) is forgiving and dries quickly, perfect for distressed or matte finishes. Acrylic latex ($15-$30 USD for a quart) is durable for high-traffic pieces, offering a smoother finish. For detailed work, small artist’s acrylics ($2-$5 USD per tube) provide vibrant colors and precision. The “best” depends on your desired look and budget.
How do I prepare furniture for painting?
Start by cleaning thoroughly with a degreaser ($5-$10 USD). Lightly sand the surface with 120-220 grit sandpaper ($5-$15 USD for a pack) to create a ‘tooth’ for the paint to adhere. For glossy or laminate pieces, a good primer ($10-$25 USD for a can) is essential to prevent chipping and ensure color vibrancy.
Can I paint over existing finishes?
Yes, you absolutely can! While thorough prep is always recommended, some paints, like chalk paint ($20-$40 USD), are designed to adhere well to most surfaces with minimal sanding or priming. For a factory-smooth finish, however, a proper sanding and priming routine ($15-$30 USD for supplies) will yield the most durable and professional-looking results.
How do I seal painted furniture for durability?
A good topcoat is key for protecting your whimsical painted furniture. For matte finishes, a clear wax ($15-$30 USD for a can) offers a soft feel. For more durability, especially on high-use items, a water-based polyurethane ($20-$40 USD for a quart) provides a hard, protective layer. Choose matte, satin, or gloss based on your desired sheen.
Common Myths About Whimsical Painted Furniture
Myth: Painted furniture looks cheap.
This is simply untrue. High-quality paint ($20-$40 USD for a good brand) and thoughtful application techniques elevate a piece. I’ve seen thrift store finds, like a $30 plain dresser, become stunning statement pieces worth hundreds through careful painting and creative designs, surpassing the quality of many mass-produced items.
Myth: You need to strip all old paint first.
Not necessarily. While stripping ensures a pristine canvas, many modern paints, especially chalk paints or all-in-one furniture paints ($25-$50 USD), are formulated to adhere over existing finishes with just a good cleaning and light sanding. I’ve transformed many pieces this way, saving hours of effort without compromising the final look.
Myth: Whimsical painted furniture is only for kids’ rooms.
I often hear this, but it’s a misconception. A strategically placed Art Deco-inspired console or a subtly stenciled sideboard, like the one I saw at a boutique, adds character to any adult space. Choosing sophisticated color palettes and intricate patterns can bring playful elegance to a living room, bedroom, or entryway, far beyond a child’s domain.
Whimsical Painted Furniture: Final Thoughts
Whimsical painted furniture offers such a personal way to inject charm and creativity into your living space. It doesn’t have to be perfect; the joy is in the process and the unique story each piece tells. From a bold splash of color to delicate hand-painted details, these makeovers give older items new life, making your home truly reflect you. Save this post to Pinterest 📌 and start building the apartment you actually want to come home to.