17 Living Room Wall Designs Your Guests Will Literally Photograph
I recently sat in a friend’s living room where the walls felt like an afterthought, and it hit me how much a flat surface can drain the energy from a room. Bold living room wall designs act as the architectural backbone of a home, turning a standard box into a curated sanctuary. From fluted marble to charred wood, these textures demand attention and dictate the entire mood of your living space.
Why These Living Room Wall Designs Ideas Are Worth Trying
Standard paint often fails to provide the depth needed to make a large room feel intimate or intentional. By layering textures like stone, velvet, or metal, you create a tactile environment that photographs beautifully and feels significantly more expensive than it actually is.
1. The Obsidian Fluted Marble Sanctuary
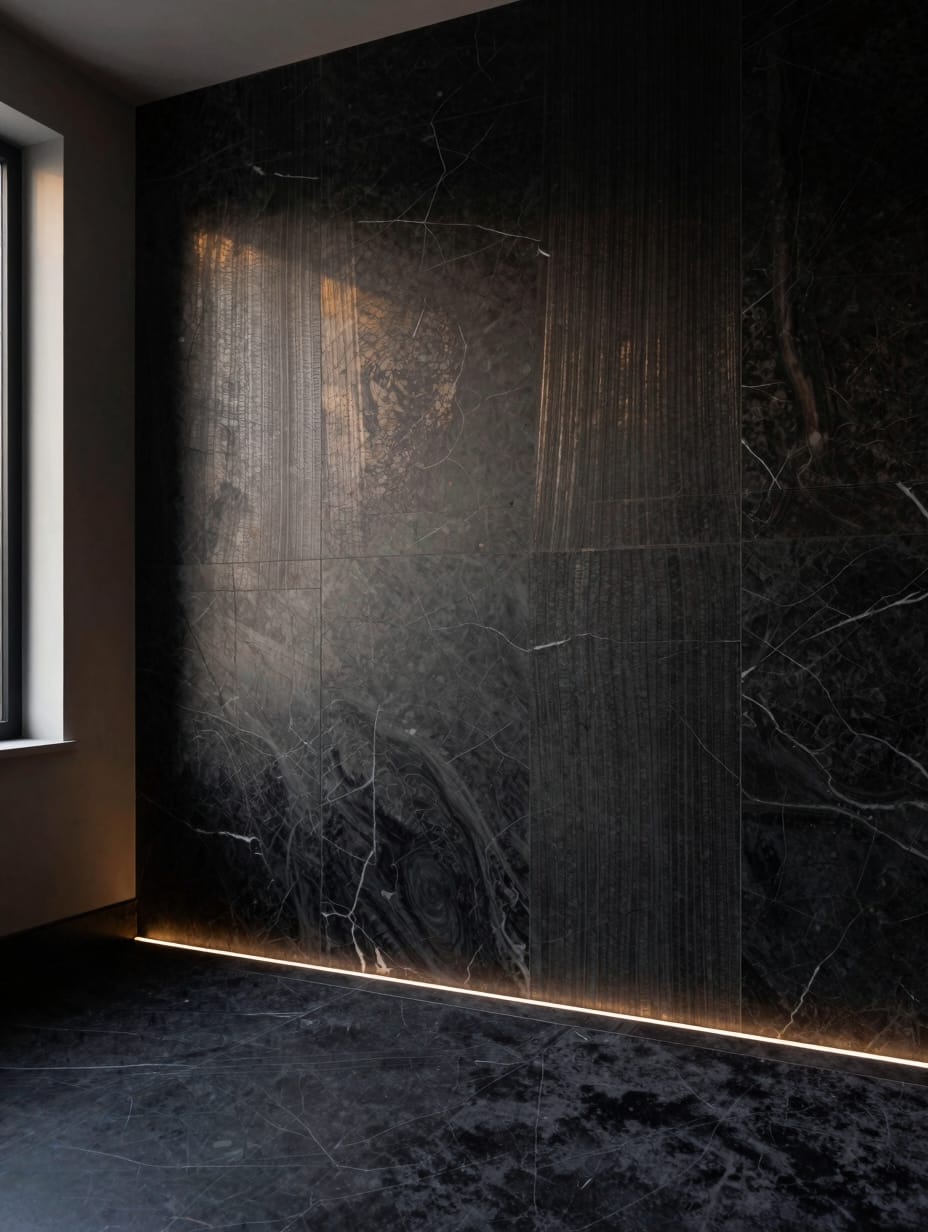
I saw this floor-to-ceiling expanse of deep obsidian marble in a downtown showroom, and the vertical fluted grooves caught the golden side-light perfectly. The natural white veining moves across the dark surface, while integrated LED strips at the base create a moody, ethereal glow against the floor.
Pairing this heavy texture with matte black hardware and a single gold sculpture emphasizes the high-contrast luxury. Be warned: the fluted crevices are a nightmare to dust if you don’t have a vacuum with a soft brush attachment.
How to Get This Look
- Mount 24-inch wide marble panels vertically to eliminate horizontal seams on your main focal wall.
- Black Marquina marble panels, $45-$90 per sq ft, chosen for high-contrast white veining.
- Style with brass accent trim and oversized sculptures to break up the dark mass.
- Peel-and-stick faux marble contact paper, $30, for a temporary visual fix.
2. Midnight Navy Shiplap with Brass Inlays
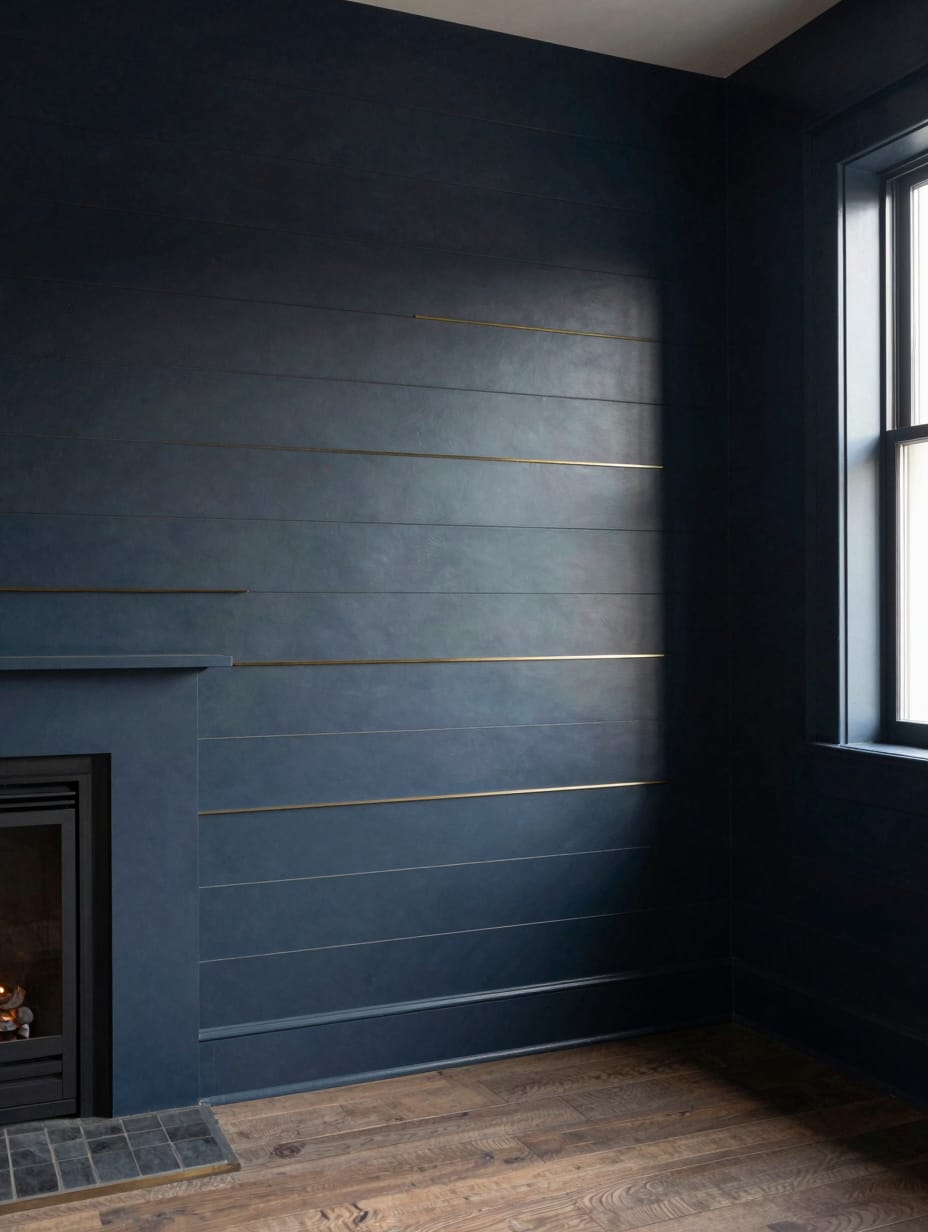
Classic horizontal shiplap feels tired until you see it reimagined in a saturated midnight navy matte finish. I helped a neighbor install thin, hand-brushed brass strips between every third board, which reflects the flicker of her fireplace and adds a sharp, metallic rhythm.
Running the boards horizontally visually widens the room, especially in narrower floor plans. I’ll admit, getting those brass strips to sit flush requires a steady hand and a very sharp chisel.
How to Get This Look
- Space horizontal planks exactly 1/8 inch apart to accommodate the metal inlay strips.
- Solid brass inlay strips, $12-$25 per 4-foot section, selected for a hand-brushed finish.
- Use a satin finish navy paint to ensure the color retains depth in evening light.
- Gold metallic paint pens, $8, can mimic the inlay look for a fraction of the cost.
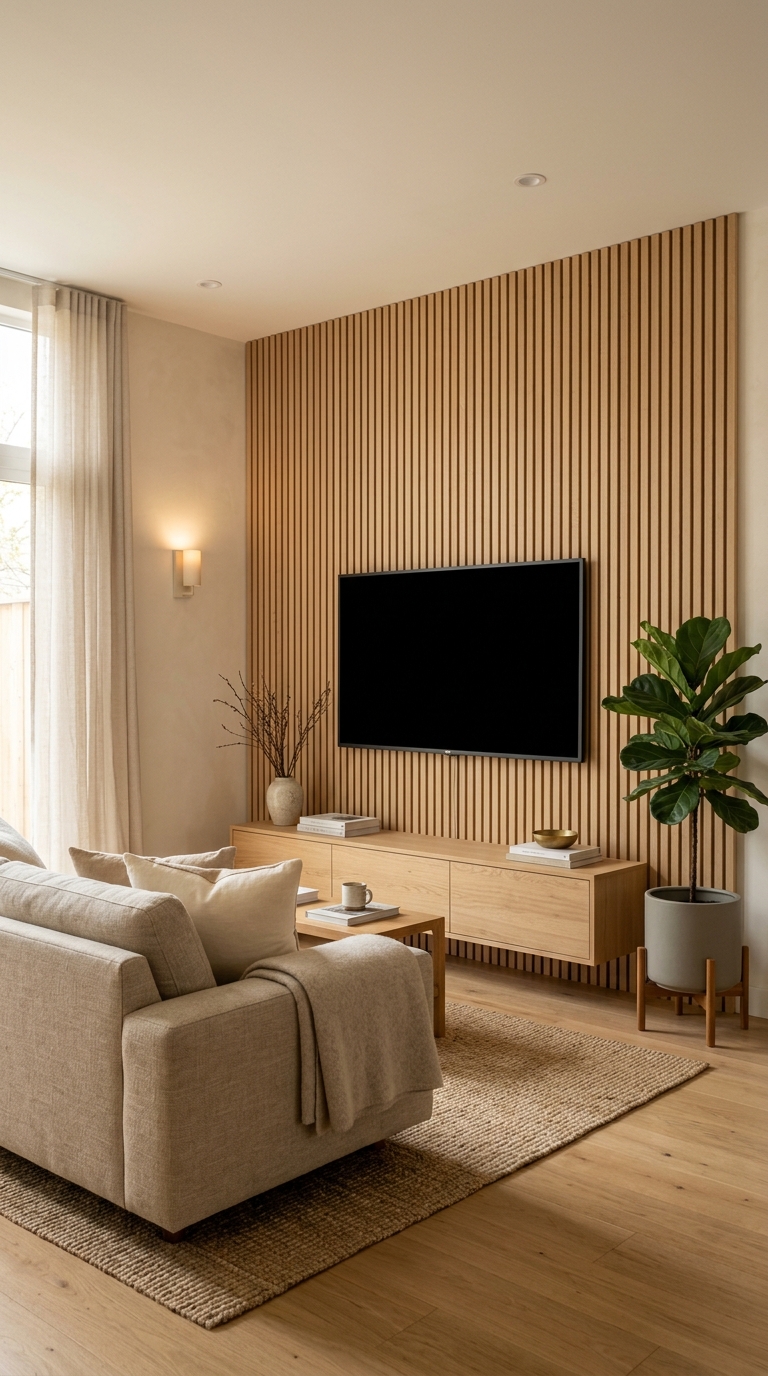
3. Cascading Vertical Walnut Slat TV Wall
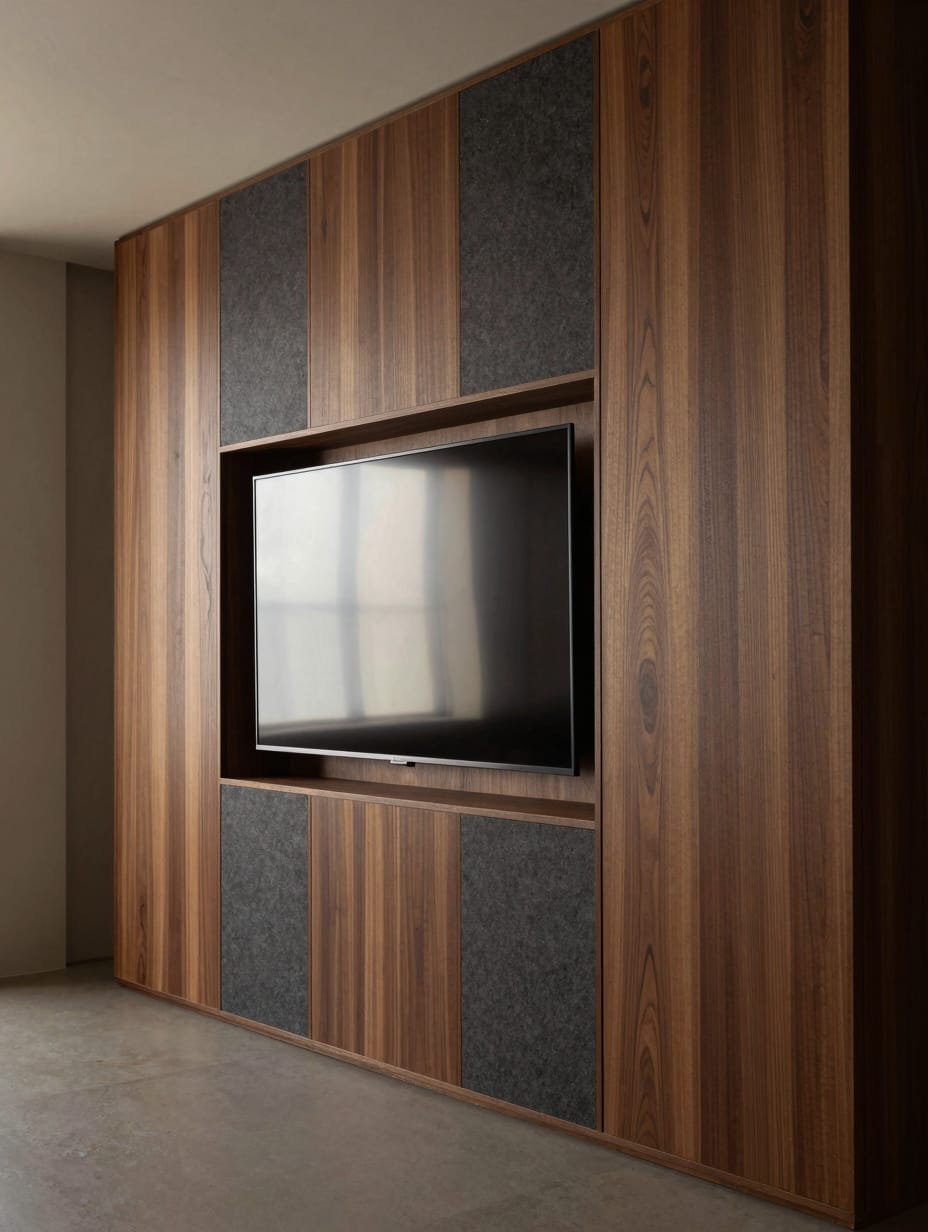
My own TV surround features these slim, precision-cut walnut slats installed over a charcoal felt backing. The wood grain creates an organic movement, and my recessed television is framed by hidden cove lighting that eliminates shadows and highlights the architectural depth.
Ensuring the slats continue all the way to the ceiling creates an illusion of height that draws the eye upward immediately. The felt backing is a lifesaver for dampening the echo in my minimalist living room.
How to Get This Look
- Install slats at 1-inch intervals to allow the dark felt backing to provide visual depth.
- Walnut wood acoustic panels, $150-$300 per panel, chosen for clear, knot-free grain.
- Add a recessed TV wall mount to keep the screen flush with the wood surface.
- Pine slats stained in “Dark Walnut,” $60, saves money but requires more labor.
4. Oxidized Copper Patina Statement Mural
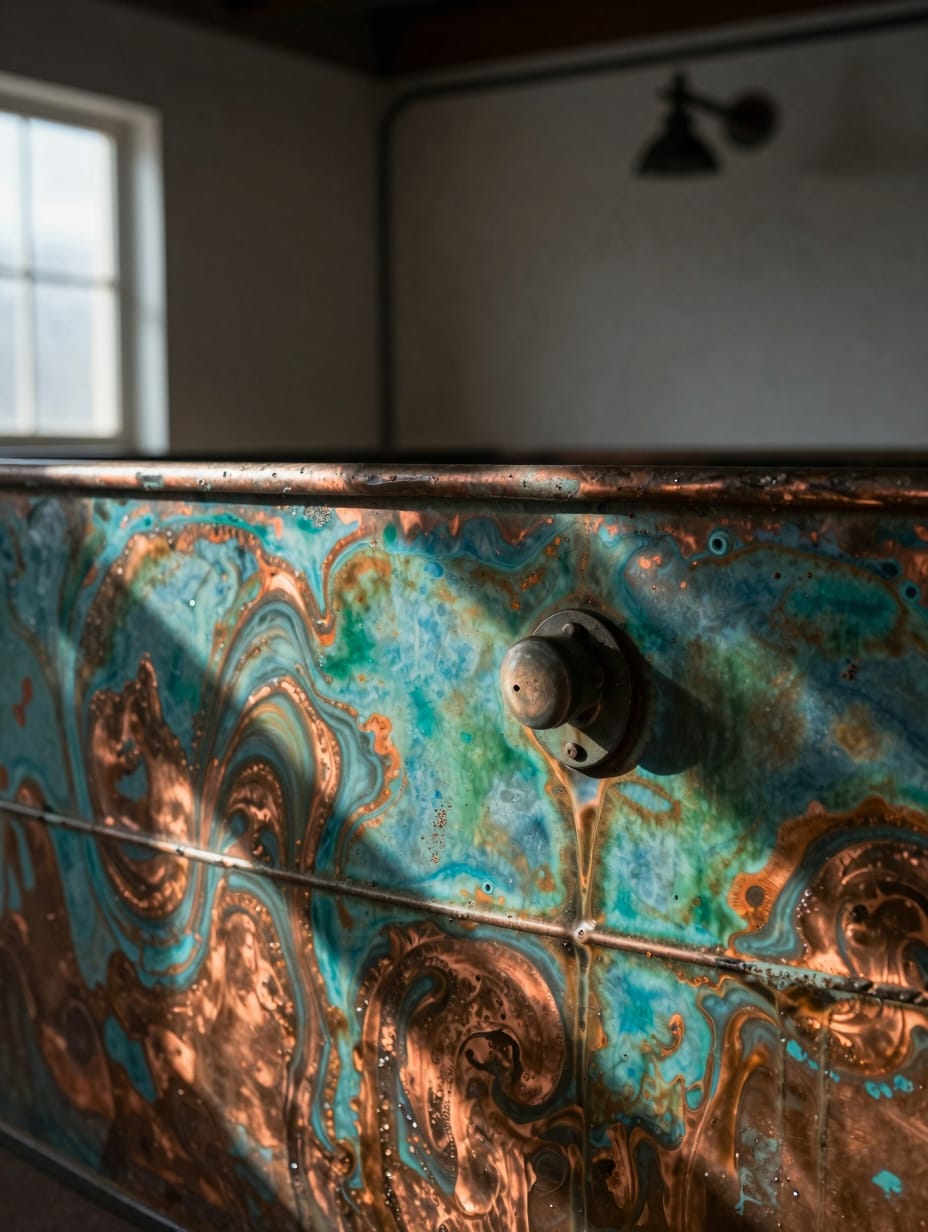
This industrial masterpiece shows swirling eddies of turquoise, emerald, and burnt orange oxidation. The texture is gritty and metallic, resembling aged copper plates salvaged from a ship, illuminated by industrial swing-arm sconces that cast shadows across the variegated surface.
Keep the surrounding furniture neutral and minimalist to allow the vibrant colors of the copper to remain the focal point. This finish can feel quite cold to the touch, so I’d avoid it right behind a sofa.
How to Get This Look
- Apply the reactive solution in circular motions to create “storms” of color on the wall.
- Copper patina reactive paint kit, $65-$120, selected for its high metal flake content.
- Install black industrial swing-arm sconces to provide directional light.
- Copper-toned metallic wallpaper, $45 per roll, offers a similar palette without the chemical reaction.
5. The Sculptural White Plaster Dune Wall
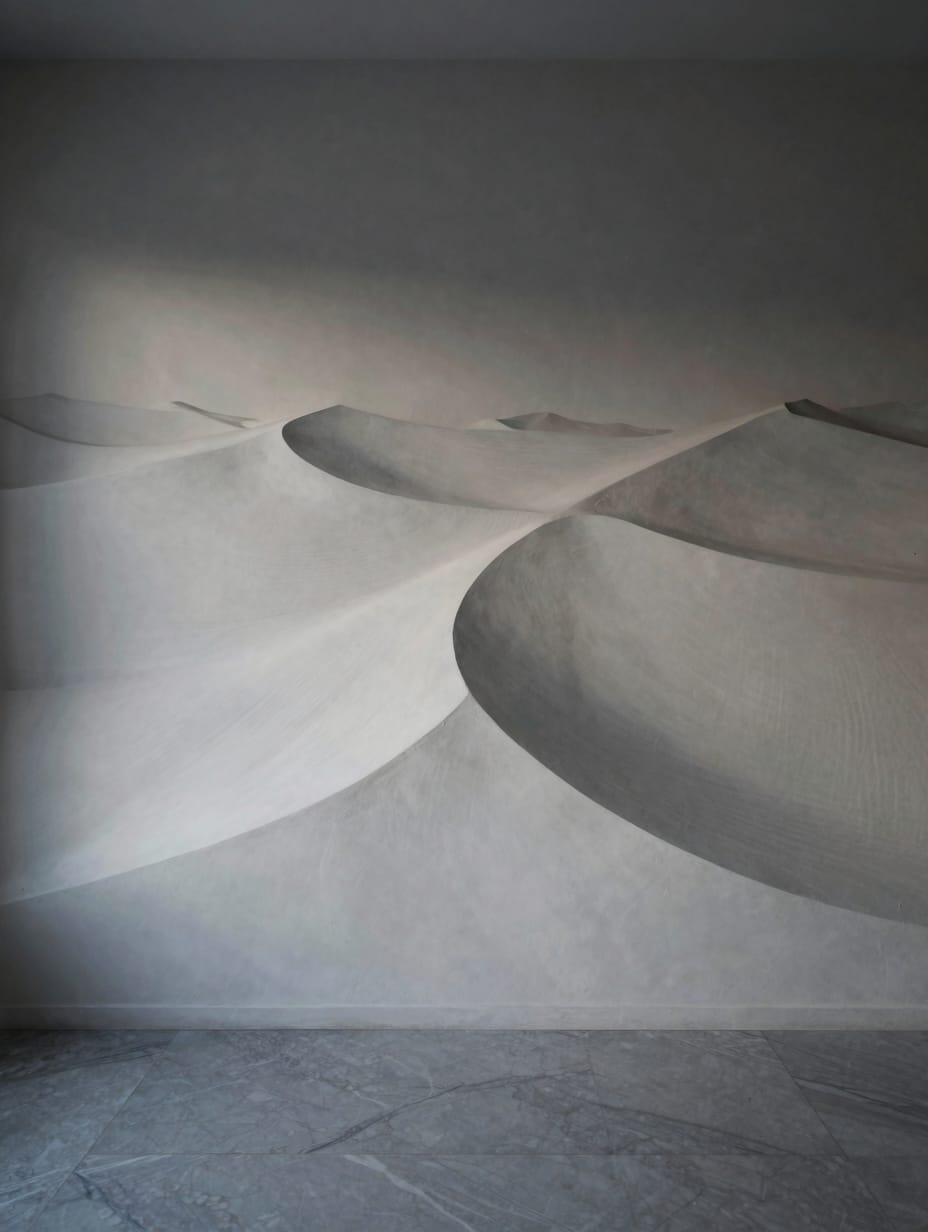
Hand-carved plaster waves mimic the rolling dunes of a desert, finished in a pristine, chalky white. The 3D relief creates a play of light that changes throughout the day, looking like a piece of gallery art built into the home’s structure.
I recommend floor-mounted up-lights to exaggerate the shadows of the plaster curves during the evening. Full disclosure: white plaster shows every single scuff from wandering hands or pets.
How to Get This Look
- Layer molding compound in 2-inch peaks to create enough depth for visible shadows.
- Venetian plaster, $80-$150 per bucket, chosen for its authentic lime-based composition.
- Pair with warm-toned floor lamps to soften the stark white aesthetic.
- Pre-made 3D wall panels, $100 for a set, provide a DIY-friendly shortcut.
6. Emerald Velvet Padded Gallery Wall
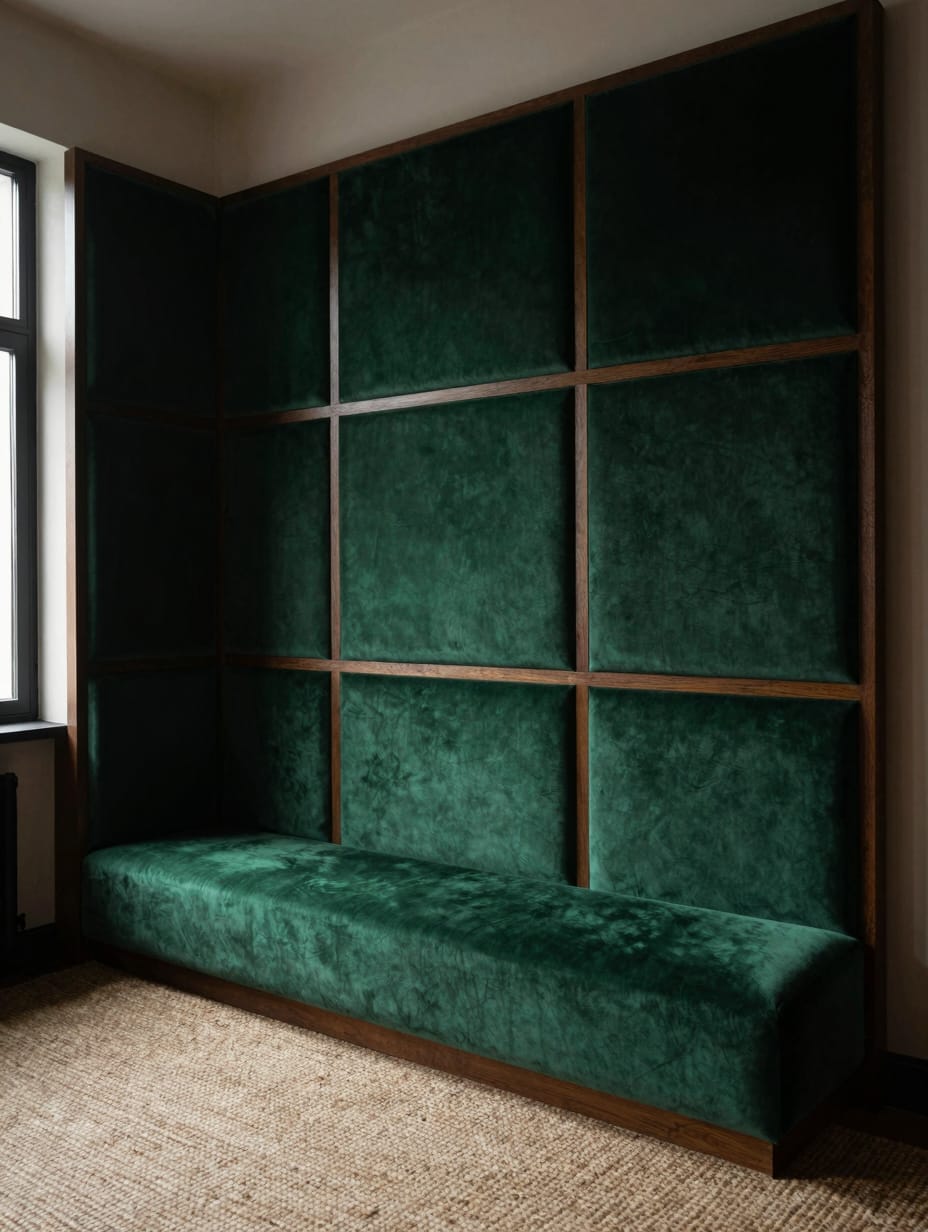
Large, rectangular upholstered panels covered in plush emerald green velvet look incredible when arranged in a tight grid. A designer friend used dark stained oak to frame each section, creating a soft surface that feels like a private lounge in a historic hotel.
Use this design behind a seating area to improve acoustics while providing a soft backdrop for conversation. It’s a bold choice that can make a small room feel slightly claustrophobic if the ceiling is low.
How to Get This Look
- Wrap 2-inch thick high-density foam over plywood boards before stapling the velvet.
- Emerald green velvet fabric, $15-$40 per yard, chosen for a heavy, durable weight.
- Frame each panel with dark oak timber for a clean, professional edge.
- Adhesive velvet wall tiles, $80 for a pack, work if you skip the custom framing.
7. Smoked Glass Mirror and Steel Grid
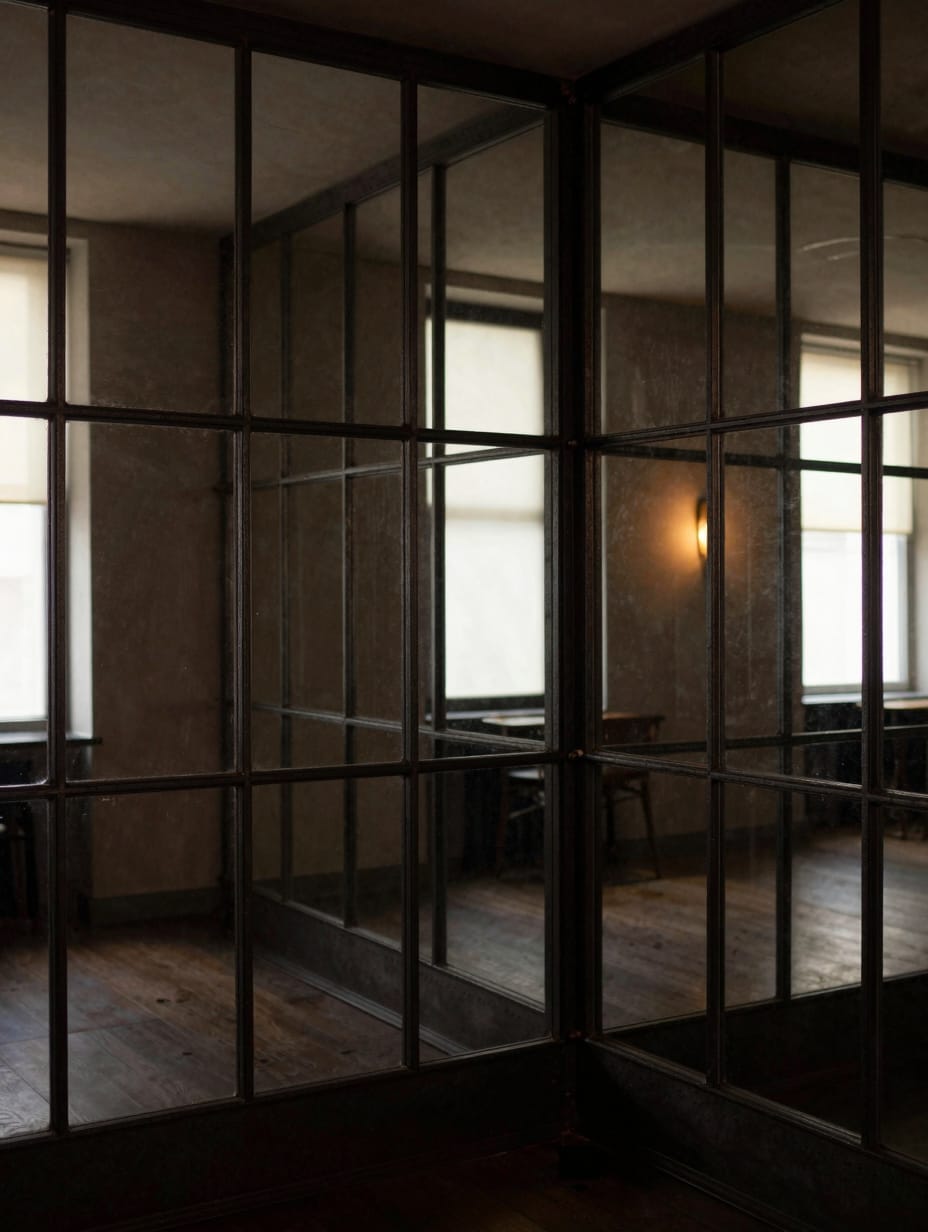
An expansive wall covered in oversized smoked glass mirror panels, segmented by a heavy industrial steel grid, is a classic high-end look. The darkened glass provides a moody reflection, doubling the perceived space while maintaining a sophisticated atmosphere for cocktail hours.
Position this wall opposite a window to capture the view while muting the glare. Honestly, keeping the glass streak-free is a part-time job, so keep the microfiber cloths handy.
How to Get This Look
- Apply mirror adhesive in a “snake” pattern to ensure even contact without air pockets.
- Smoked grey mirror sheets, $200-$500 per sheet, selected for a true charcoal tint.
- Use black powder-coated steel T-bars to create the grid overlay.
- Acrylic mirror tiles, $40, offer the reflection without the weight or cost of glass.
8. Monolithic Charcoal Slate Stone Slabs
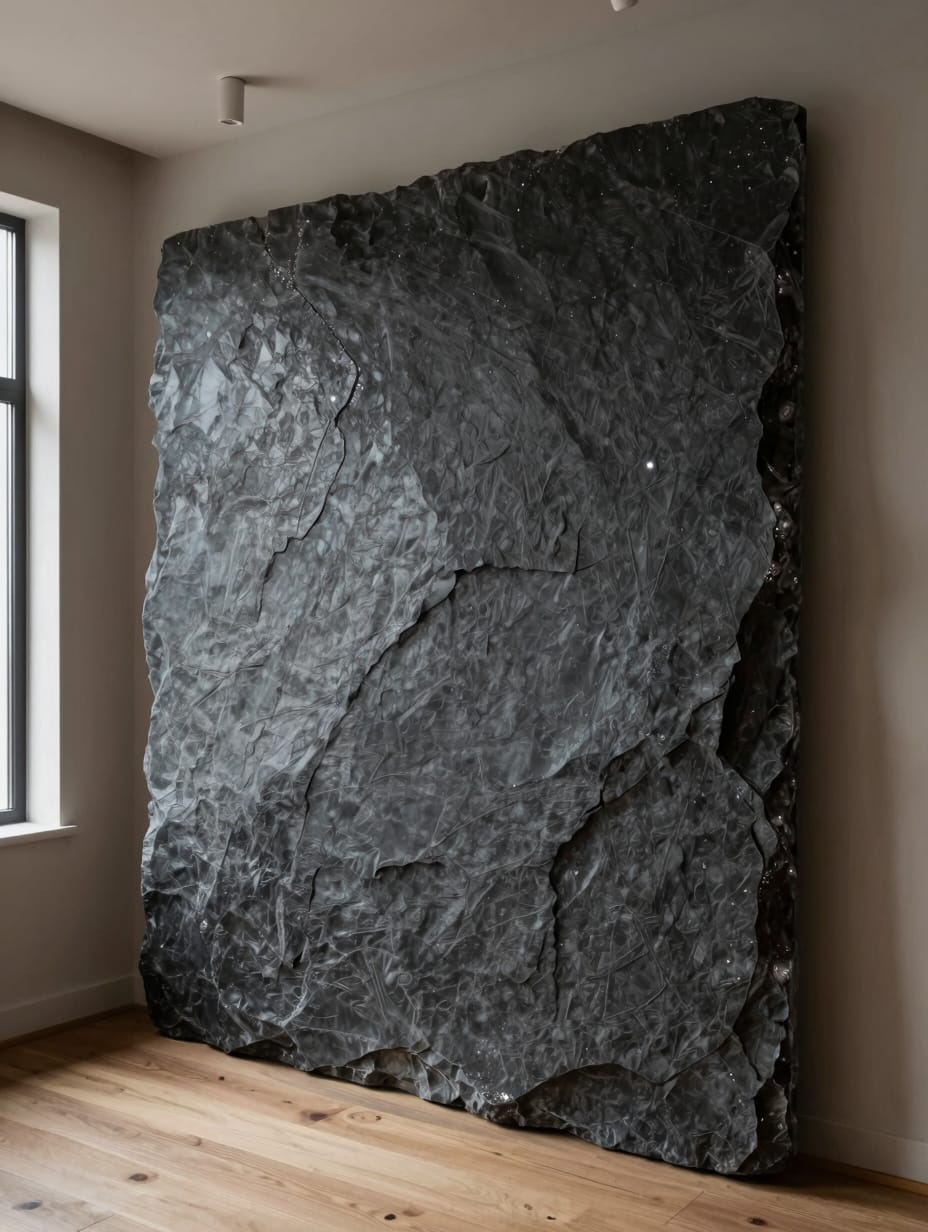
Giant, raw-edged slabs of charcoal slate stacked vertically with minimal seams create a brutalist contrast to soft furnishings. The rugged texture of the stone provides a grounded feel, while silver flecks in the slate sparkle under focused ceiling spotlights.
Vary the thickness of the slabs slightly to create a more organic, jagged profile that mimics a natural cliff face. This is a permanent commitment; once that stone is up, it isn’t coming down without a jackhammer.
How to Get This Look
- Use heavy-duty stone mortar and mechanical clips for slabs over 24 inches tall.
- Natural charcoal slate slabs, $12-$30 per sq ft, chosen for consistent color depth.
- Install directional ceiling spotlights to highlight the stone’s jagged texture.
- Slate veneer sheets, $10 per sq ft, provide the look with much less weight.
9. Golden Leaf Geometric Art Deco Mural
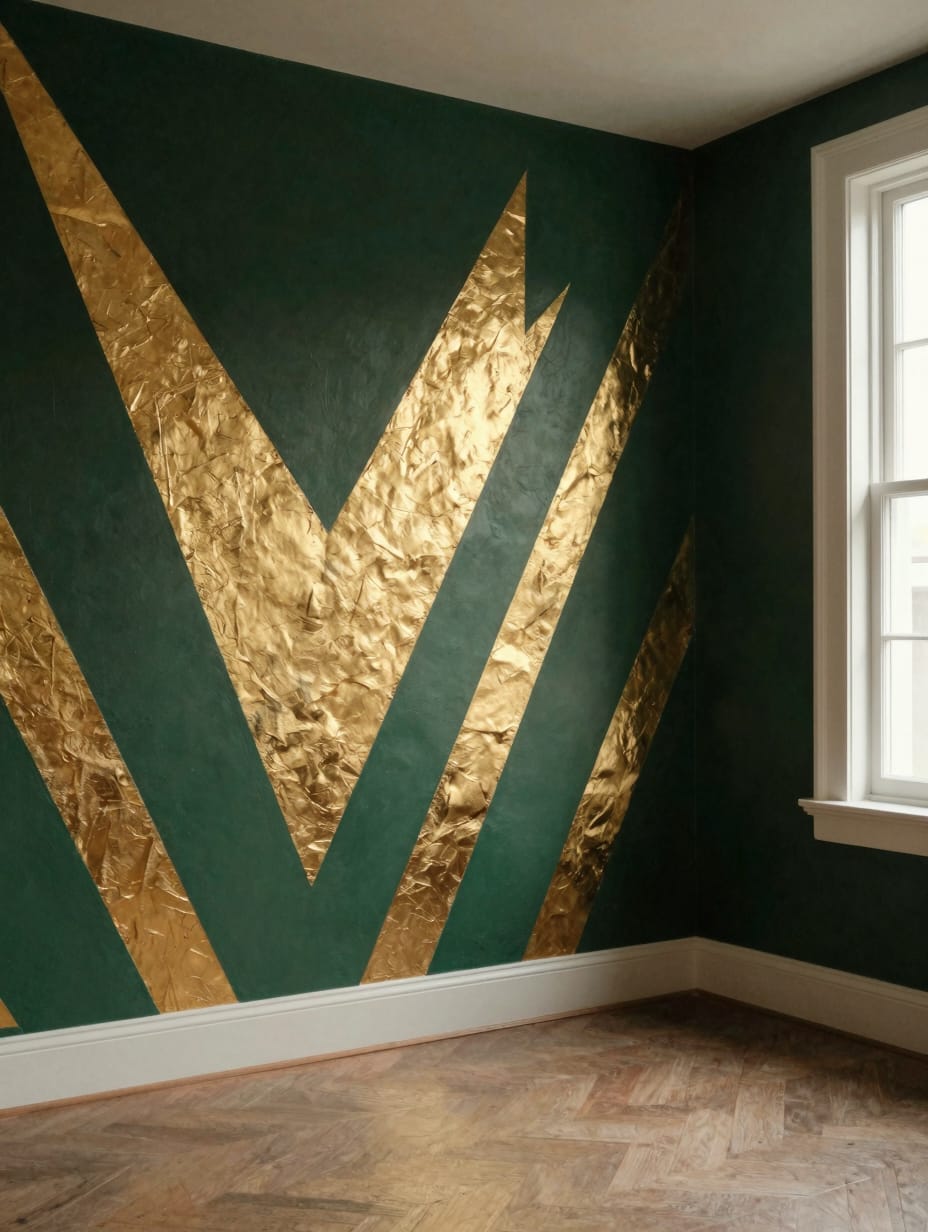
This bold geometric pattern featuring sharp triangles was hand-applied using 24k gold leaf over a matte forest green background. The gold catches every glimmer of light, creating a high-luxury aesthetic that feels like a scene from a period film set.
Apply the gold leaf with a slightly distressed technique to give the wall a storied feel rather than a flat shine. I tried this on a small scale and found the gold leaf sticks to everything, including your eyelashes.
How to Get This Look
- Map your geometric pattern with low-tack painter’s tape before applying the sizing adhesive.
- Gold leaf sheets, $25-$50 per pack, selected for 24k purity for best luster.
- Contrast the gold against a matte forest green paint for a classic look.
- Gold metallic spray paint and a stencil, $20, for a faster, less fragile result.
10. Backlit Raw Onyx Floating Panel
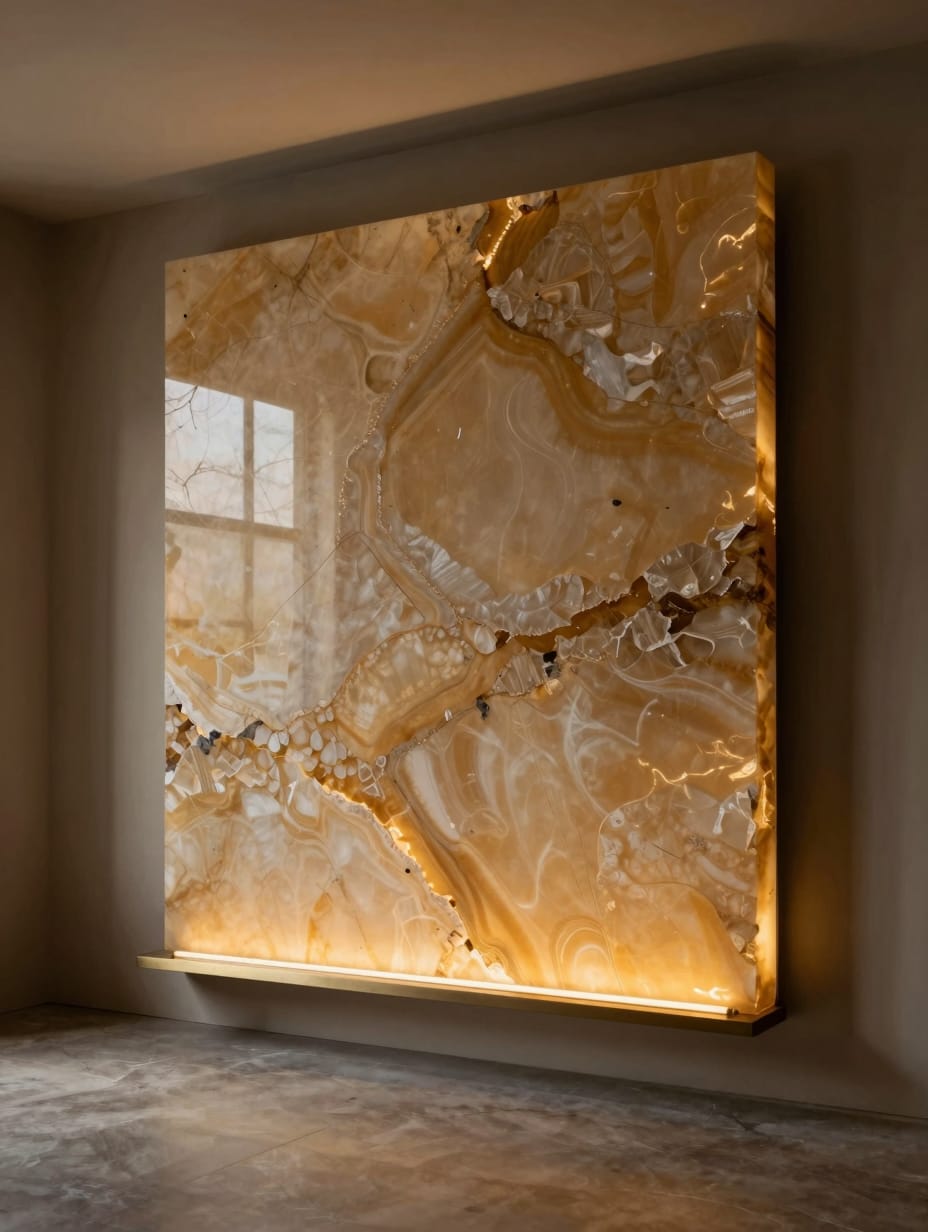
A massive, semi-translucent slab of honey-colored onyx mounted two inches away from the wall acts as a giant lamp. Internal LED panels illuminate the stone from behind, revealing the intricate crystalline structures and casting a warm, amber glow.
Set the backlighting to a dimmable circuit so you can adjust the “burn” of the onyx. The cost is high, and finding a slab without cracks that can handle the mounting is a challenge.
How to Get This Look
- Install the LED panels in a grid pattern behind the stone to prevent “hot spots.”
- Translucent onyx slab, $1,500-$4,000, chosen for a thickness under 2cm for light pass-through.
- Use a custom steel mounting bracket to support the immense weight of the stone.
- Faux onyx resin panels, $300, offer similar translucency at a lower price point.
11. Burnished Bronze Venetian Plaster
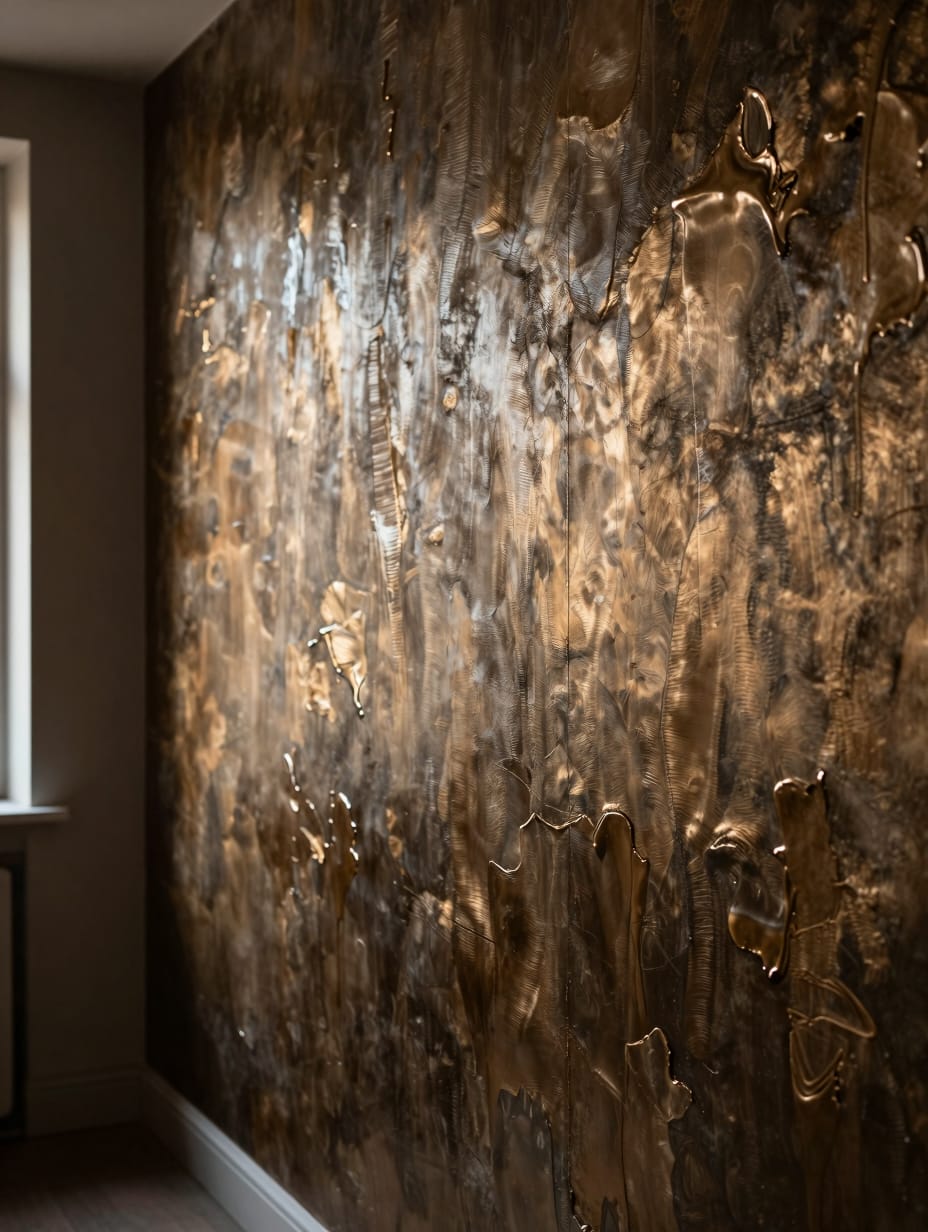
I once saw a wall treated with multiple layers of burnished bronze Venetian plaster, polished to a mirror-like sheen. The surface looks like molten metal frozen in time, with deep chocolate undertones and metallic highlights that shift as you walk past.
Use a circular buffing motion during the final wax phase to create “movement” in the metal finish. I’ll admit, the labor involved in layering and polishing is physically exhausting for a DIYer.
How to Get This Look
- Apply at least three wafer-thin coats, letting each dry fully to build the bronze depth.
- Bronze metallic plaster, $90-$160 per gallon, chosen for a high concentration of mica.
- Buff with a stainless steel trowel to achieve a high-gloss, reflective finish.
- Metallic bronze paint with a glaze topcoat, $50, gives a simpler shimmering effect.
12. Charred Yakisugi Wood Accent Wall

Traditional Japanese charred cedar planks with a “crocodile” skin texture showcase a deep, shimmering black carbonized finish. I’ve seen this installed in a herringbone pattern, adding a sophisticated architectural twist to the ancient, rustic material.
Contrast the burnt black wood with light grey stone flooring to keep the room from feeling too enclosed. Be careful during installation, as the carbonized layer can flake off and stain light-colored rugs.
How to Get This Look
- Seal the charred planks with a clear matte sealer to prevent soot transfer to furniture.
- Shou Sugi Ban cedar planks, $10-$22 per sq ft, selected for deep carbonization.
- Use black wood screws to hide the fasteners within the dark texture.
- Stained pine boards with a wire-brush finish, $5 per sq ft, mimic the texture.
13. Oversized Floral Noir Tapestry Mural
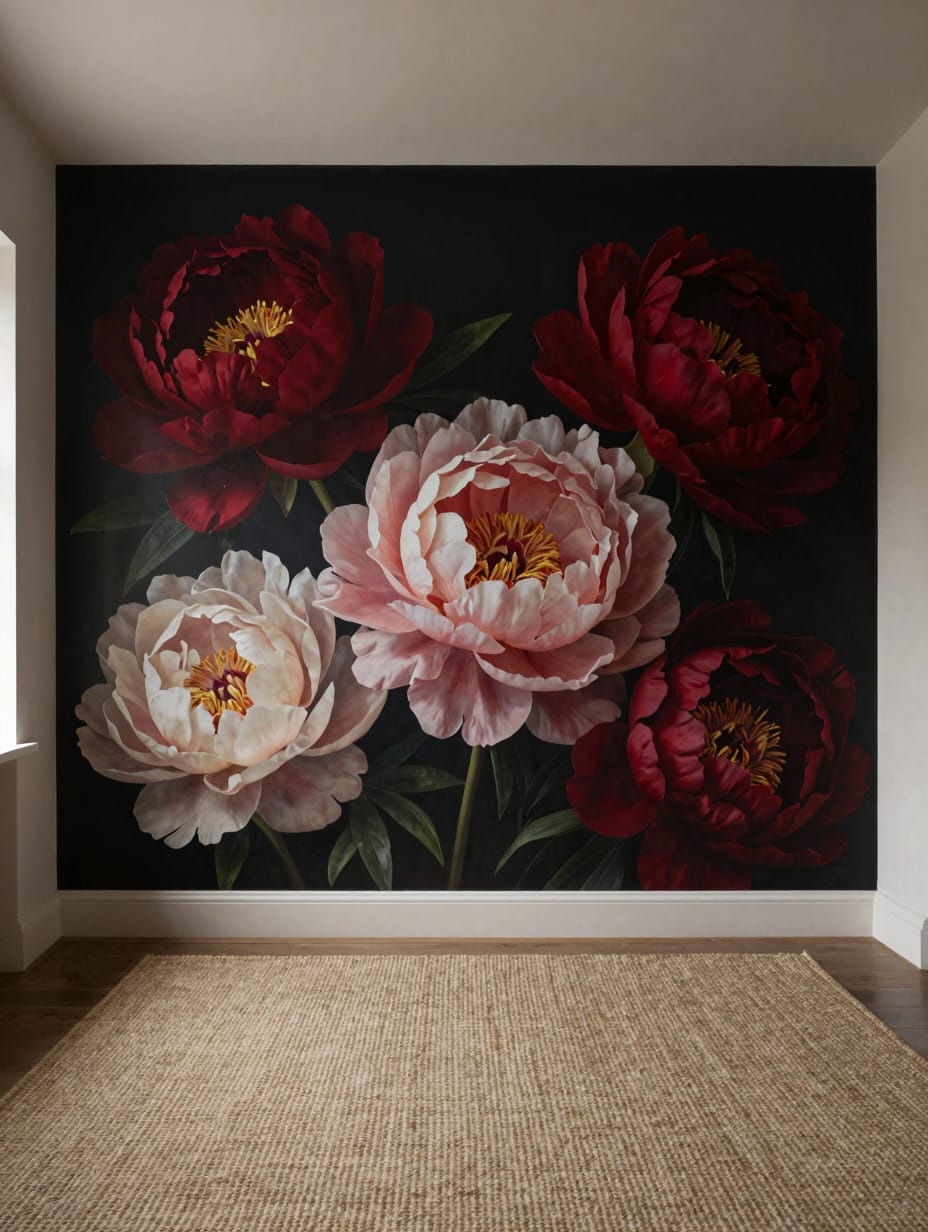
A dramatic mural featuring hyper-realistic peonies in shades of deep crimson against a pitch-black background is my favorite way to add romance. The petals appear to have a velvety texture, and the sheer scale of the blooms creates an immersive, slightly gothic atmosphere.
Furniture placed against this wall should be in solid, jewel-toned colors like ruby to complement the palette. If the mural isn’t high-resolution, the flowers will look blurry and cheap up close.
How to Get This Look
- Smooth the wall surface perfectly before application to prevent bubbles in the large petals.
- High-resolution floral mural, $150-$400, chosen for a non-woven, heavy paper stock.
- Use a seam roller to ensure the black background segments align perfectly.
- A large framed fabric tapestry, $80, offers a similar look with less permanence.
14. Geometric Concrete 3D Tiles
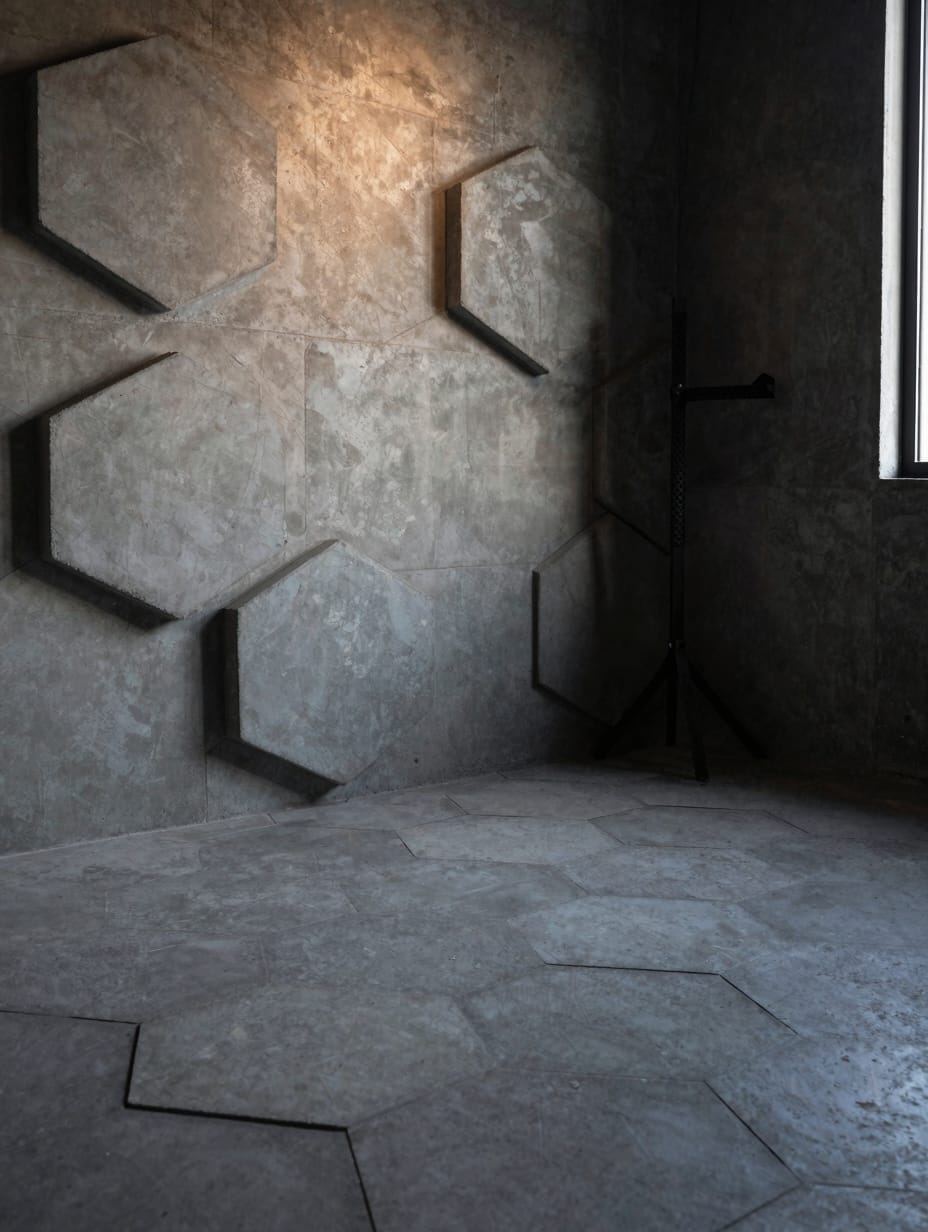
Hexagonal concrete tiles with varying depths and angles create a brutalist geometric landscape. The raw, cool grey of the concrete is softened by a single overhead wash of warm light, which emphasizes the sharp lines and architectural shadows.
Leave small gaps between some tiles to insert thin moss strips for a “reclaimed” look that softens the industrial vibe. These tiles are incredibly heavy, so ensure your drywall can actually support the load.
How to Get This Look
- Apply a high-tack tile adhesive to the back of each hexagon to prevent sliding during cure.
- 3D concrete wall tiles, $15-$35 per tile, selected for varied protrusion depths.
- Install overhead wall-wash lighting to cast long, dramatic shadows downward.
- Lightweight foam 3D panels painted grey, $60 for 12, provide a safer DIY alternative.
15. Antique Library Wrap with Integrated Ladder
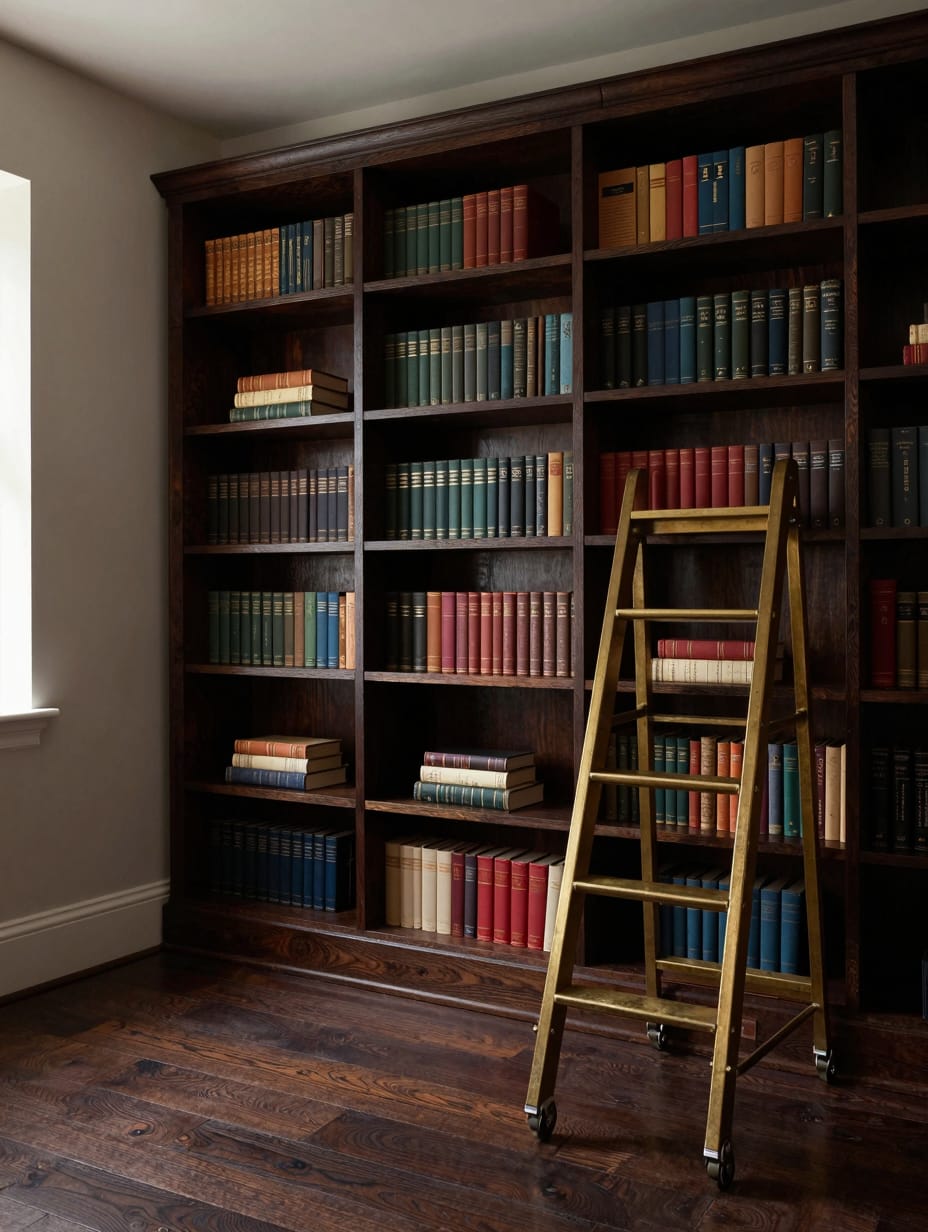
Floor-to-ceiling custom shelving in a rich, dark espresso stain transforms the living room into a sophisticated private study. My favorite feature is the rolling brass ladder on a sleek rail, providing both function and a classic scholarly aesthetic.
Incorporate small spotlights inside the shelves to highlight specific artifacts or book spines. Building this from scratch is a massive undertaking that usually requires professional carpentry for a flush fit.
How to Get This Look
- Secure the ladder rail to structural studs to support the weight of a person climbing.
- Custom oak shelving units, $2,000-$8,000, chosen for solid wood construction.
- Finish the wood in a dark espresso stain to ground the large-scale unit.
- Modified IKEA Billy bookcases with added trim, $500, can create a similar “built-in” look.
16. Silver Birch Bark Organic Texture Wall
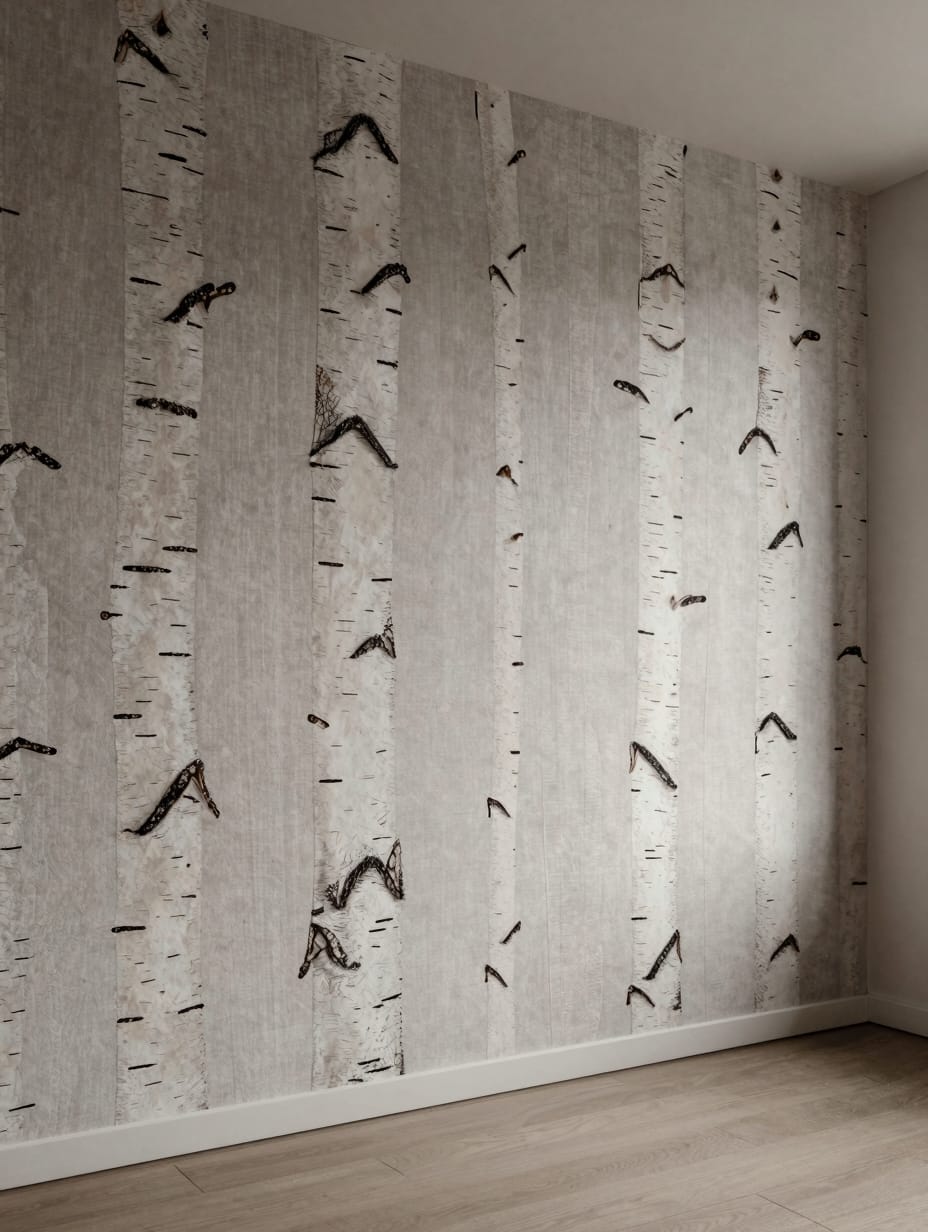
Real panels of silver birch bark applied in a seamless collage show off the natural papery white textures and dark horizontal marks. The wall feels tactile and wild, bringing a forest-luxe vibe that contrasts beautifully with modern, clean-lined furniture.
Keep the rest of the room’s textures simple—think smooth leather—to let the complex bark stand out. Expect some natural “wood smell” for the first few weeks, which isn’t always pleasant.
How to Get This Look
- Apply panels with heavy-duty contact cement and roll them flat to ensure a permanent bond.
- Natural birch bark sheets, $120-$250 per pack, chosen for consistent white coloring.
- Spray with a matte UV protectant to prevent the bark from yellowing over time.
- Birch tree pattern wallpaper, $35 per roll, offers the visual without the organic texture.
17. The Floating Backlit Art Niche
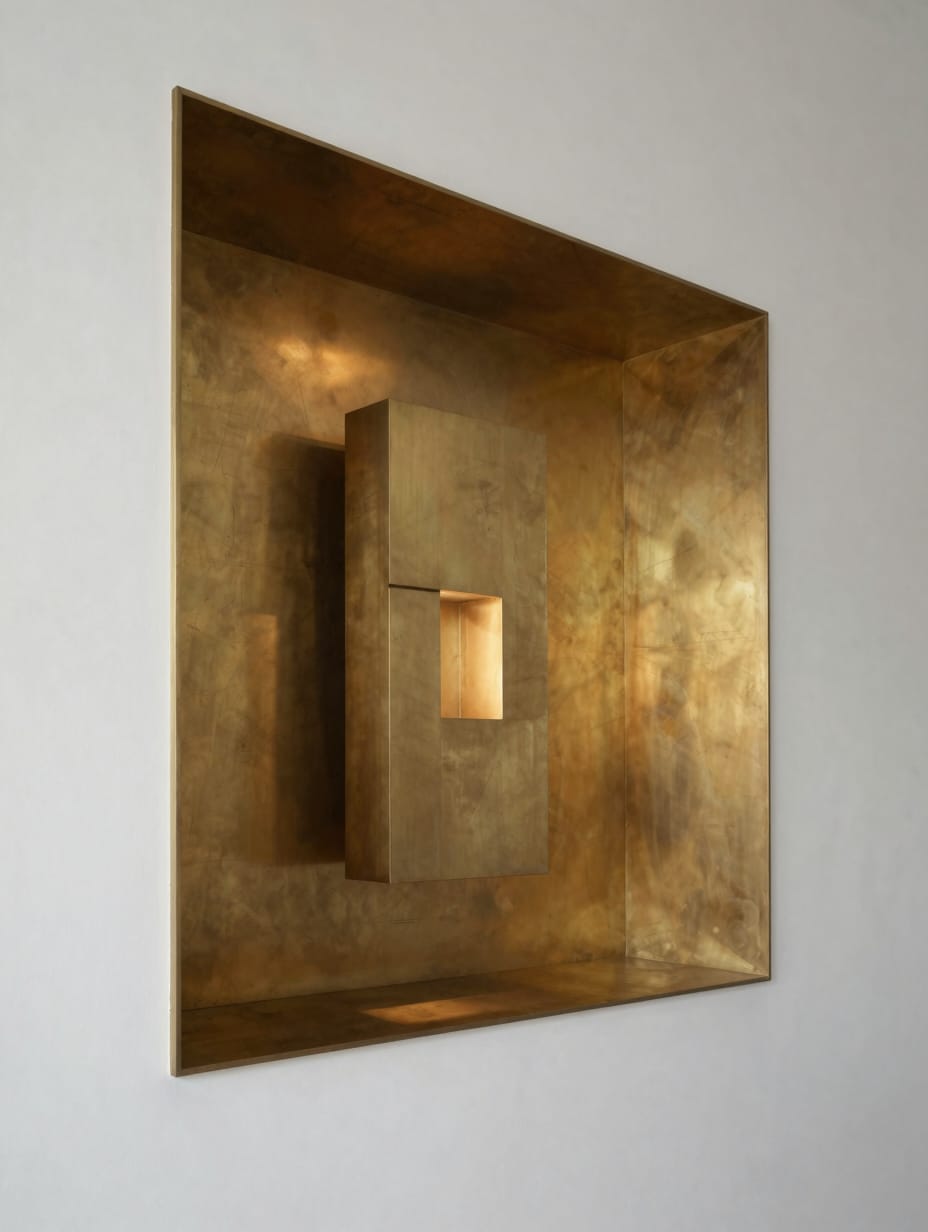
A deep, rectangular alcove carved into a stark white wall, lined with brushed champagne gold metal, is a minimalist’s dream. Inside, a single oversized piece of sculpture is illuminated by hidden perimeter lighting, making the artwork appear as if it is floating.
Paint the inner edges of the niche slightly darker than the main wall to increase the “void” effect. I’ve found that hidden LED strips can get hot, so ensure the niche has adequate ventilation.
How to Get This Look
- Frame the alcove 12 inches deep to allow room for the metal lining and light channels.
- Champagne gold metal sheets, $50-$100 per panel, selected for a soft, matte reflection.
- Use LED channel liners to diffuse the light and prevent visible “beads” of light.
- A large shadow box frame recessed into the wall, $150, achieves a similar floating effect.
Loved these ideas? Save this post to Pinterest so you can come back to it later.
Simple Ways to Bring These Ideas to Life in Your Home
- Test paint colors on a 3-foot square board rather than the wall to see how light shifts.
- Always prioritize lighting, as even the best textures fall flat in a poorly lit room.
- Mix one organic texture, like wood or stone, with one metallic element for visual balance.
- Use peel-and-stick versions of luxury materials if you are nervous about a permanent change.
- Scale your design to the wall size; oversized patterns can overwhelm small, cramped spaces.
Frequently Asked Questions
How do I choose the right wall for an accent design?
Pick the wall your eyes naturally hit when entering the room. Usually, this is the wall behind the sofa or the one housing the TV. Avoid walls with too many windows or doors, as they break up the visual impact of the texture or pattern you’re installing.
Are textured walls harder to maintain than flat paint?
Yes, significantly. Deep textures like fluted marble or 3D concrete tiles collect dust in crevices that a standard wipe won’t reach. You’ll need a soft vacuum attachment or a handheld duster to keep them looking fresh, especially if you choose dark colors that highlight debris.
Will dark wall designs make my living room look smaller?
Not necessarily. While dark colors absorb light, they also create a sense of depth that can make walls feel like they are receding. If you use integrated lighting and keep your flooring or ceiling light, a dark accent wall actually adds a sophisticated, expansive feel to the space.
Can I install these designs over existing wallpaper?
I strongly advise against it. Most heavy textures like stone slabs or wood slats require a direct bond to the drywall or a plywood substrate. Installing over wallpaper creates a weak point where the adhesive can fail, potentially causing your expensive design to peel or fall off.
Common Myths About Living Room Wall Designs
Myth: Accent walls are a passing trend from the early 2000s.
Modern wall designs have moved past simple “feature colors” into architectural textures. Today’s designs use materials like walnut, stone, and plaster to add permanent value and character. High-end interior designers still use these techniques to define luxury spaces, proving the concept has evolved rather than disappeared entirely.
Myth: You need a professional contractor for wood slat walls.
Many brands now offer pre-assembled acoustic slat panels that a DIYer can install with basic tools. I’ve seen great results using just a miter saw and construction adhesive. While custom carpentry is faster, the “panelized” versions make this high-end look accessible to anyone with a free weekend.
Myth: Real stone slabs are too heavy for standard drywall.
While heavy, standard 1/2-inch drywall can support significant weight if the stone is properly anchored to the wooden studs. Using a combination of high-strength mortar and mechanical clips ensures the weight is distributed. However, always consult a structural guide if you’re planning to cover an entire two-story wall.
Living Room Wall Designs: Thoughts
The right living room wall designs do more than just fill space; they create a vibe that makes people want to linger. Whether you go for the drama of backlit onyx or the warmth of walnut slats, your walls should tell a story. Save this post to Pinterest 📌 and start building the apartment you actually want to come home to.