17 Laundry Room Remodel Ideas For A Beautifully Functional And Surprisingly Stylish Utility Space
There’s a subtle hum, the gentle scent of fresh linen, and the quiet satisfaction of a job well done; that’s the feeling I chase in my laundry space. Often relegated to a dark corner or a cramped closet, this hardworking room deserves a thoughtful refresh. I’ve discovered that with a few smart moves and a touch of creativity, transforming it doesn’t have to break the bank.
Today, I’m sharing 17 budget-friendly laundry room remodel ideas that will elevate your utility space from purely functional to genuinely inviting, making laundry day less of a chore and more of a calm ritual.
Why These laundry room remodel Ideas Are Worth Trying
I know the struggle of a disorganized laundry area; mine used to be a chaos of half-empty bottles and forgotten socks. These ideas aren’t just about aesthetics; they’re about reclaiming valuable real estate and streamlining your routine, especially if you’re looking for clever laundry room storage ideas for small spaces.
Each suggestion here focuses on maximizing efficiency, adding personality, and creating a brighter, more enjoyable environment without needing a full overhaul. I’ve personally experimented with many of these, finding that small changes can yield significant impact.
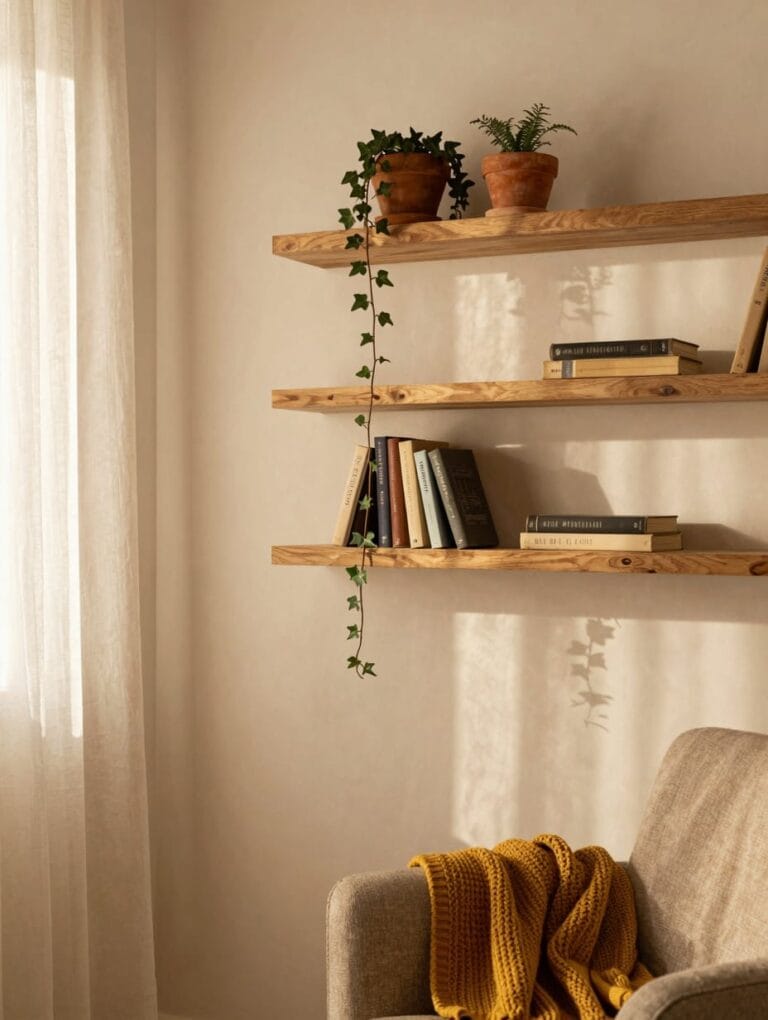
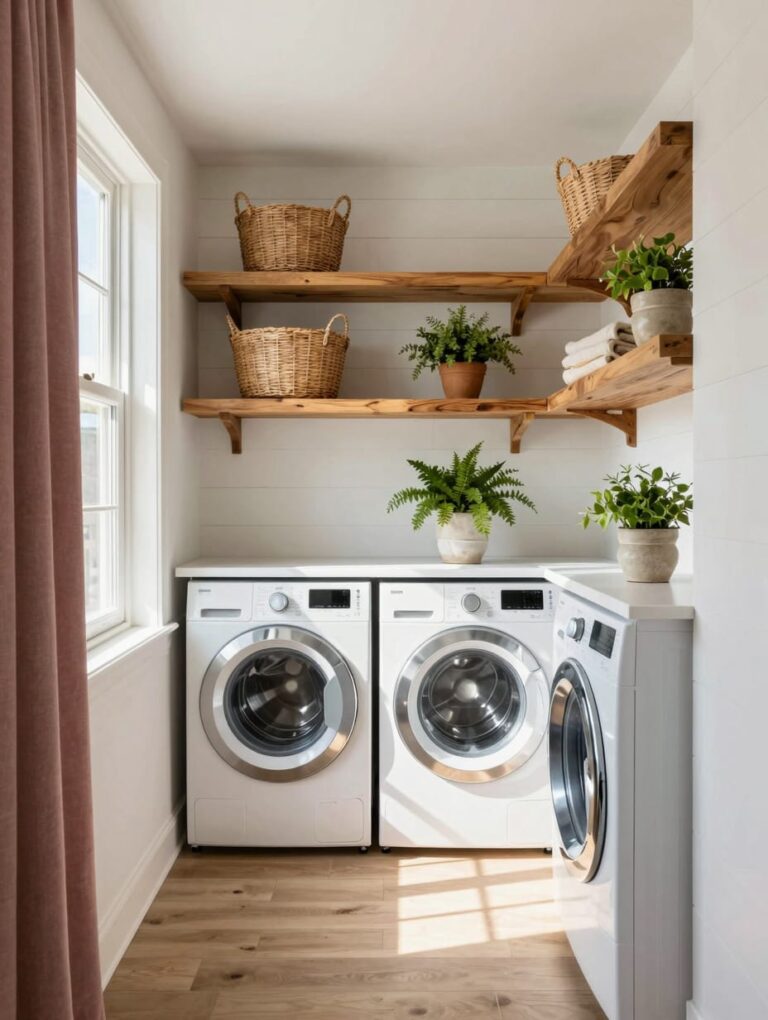
1. Cultivate Calm with Open Shelving
My laundry room felt so much more expansive once I replaced bulky cabinets with two long, raw pine floating shelves; they instantly opened up the wall above my front-loading washer and dryer, creating an airy, accessible display.
I arrange my frequently used wool dryer balls and fabric spray on the lower shelf, reserving the higher spot for bulk detergent refills, ensuring a visually calm and clutter-free look.
How to Get This Look
- Install floating shelves at least 12 inches deep for ample storage, ensuring they’re anchored securely into studs.
- Floating pine shelves, $30-$80 USD each, select for a raw, unfinished look to stain yourself.
- Fill woven storage baskets with essentials, choosing a light natural tone like my seagrass basket.
- Money-saving alternative: Repurpose old wooden planks from a local lumber yard, often available for under $10 each.
2. Instant Chic with a Peel-and-Stick Backsplash
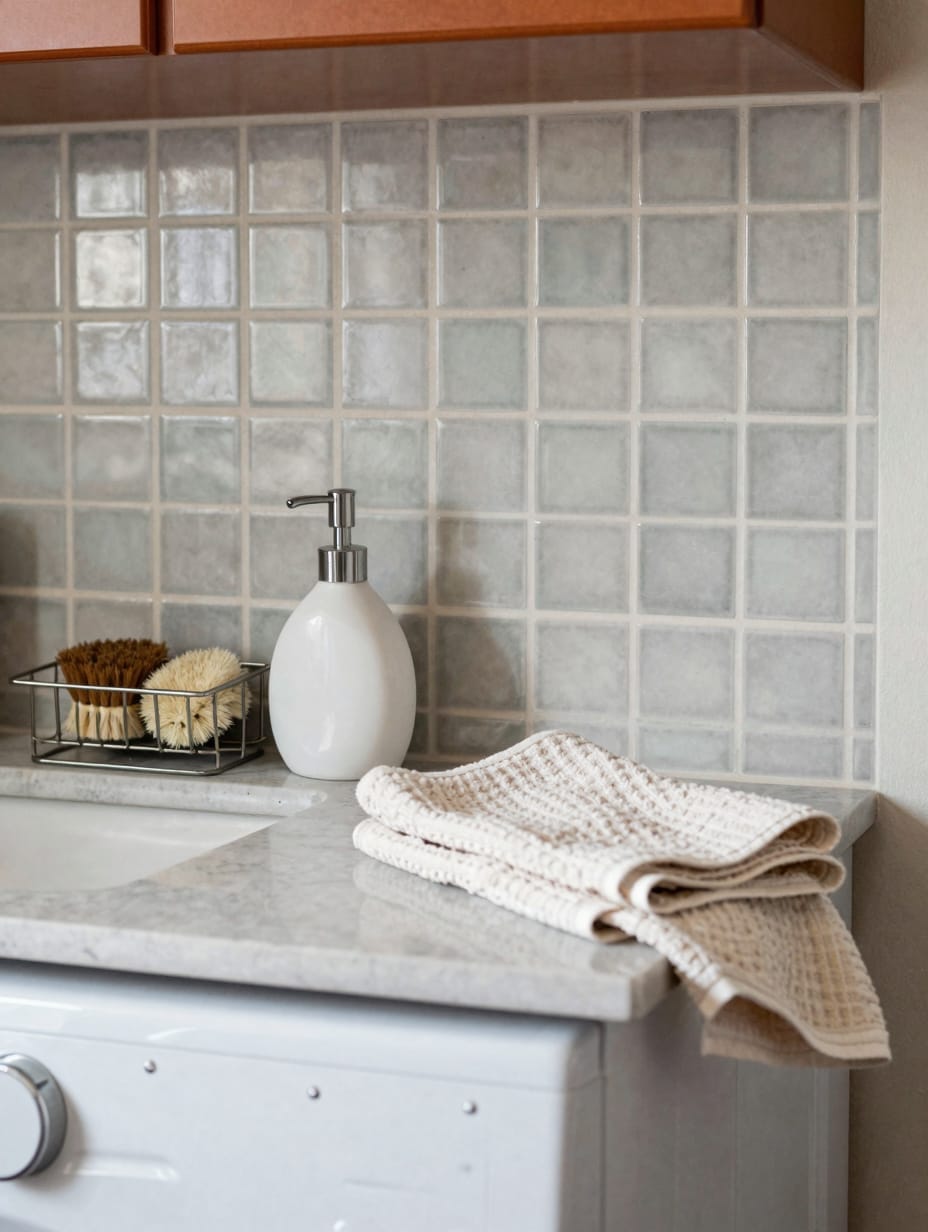
I completely transformed the vibe above my laundry counter by applying a chic, grey geometric pattern peel-and-stick tile backsplash; it gave the entire area an upscale feel for less than the cost of a fancy dinner.
To get a flawless finish like mine, take your time meticulously measuring and prepping the wall surface, ensuring every tile aligns perfectly.
How to Get This Look
- Clean and dry your wall thoroughly before application to ensure the tiles adhere properly.
- Geometric peel-and-stick tiles, $15-$40 USD per sheet, opt for a vinyl or gel finish for durability.
- Place a white ceramic soap dispenser and a small metal caddy on the counter for a clean aesthetic.
- Money-saving alternative: Use waterproof vinyl wallpaper with a tile print, typically $10-$25 per roll.
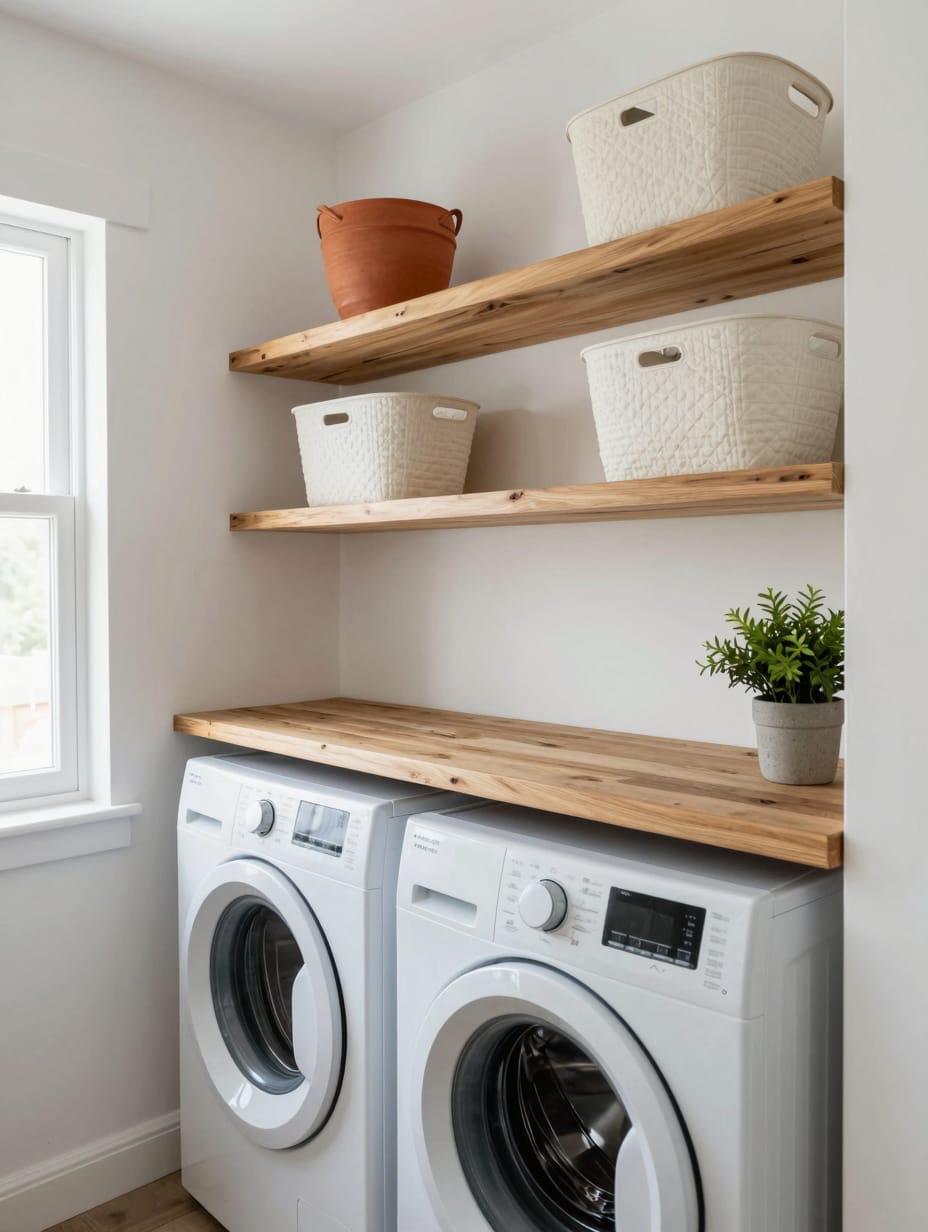
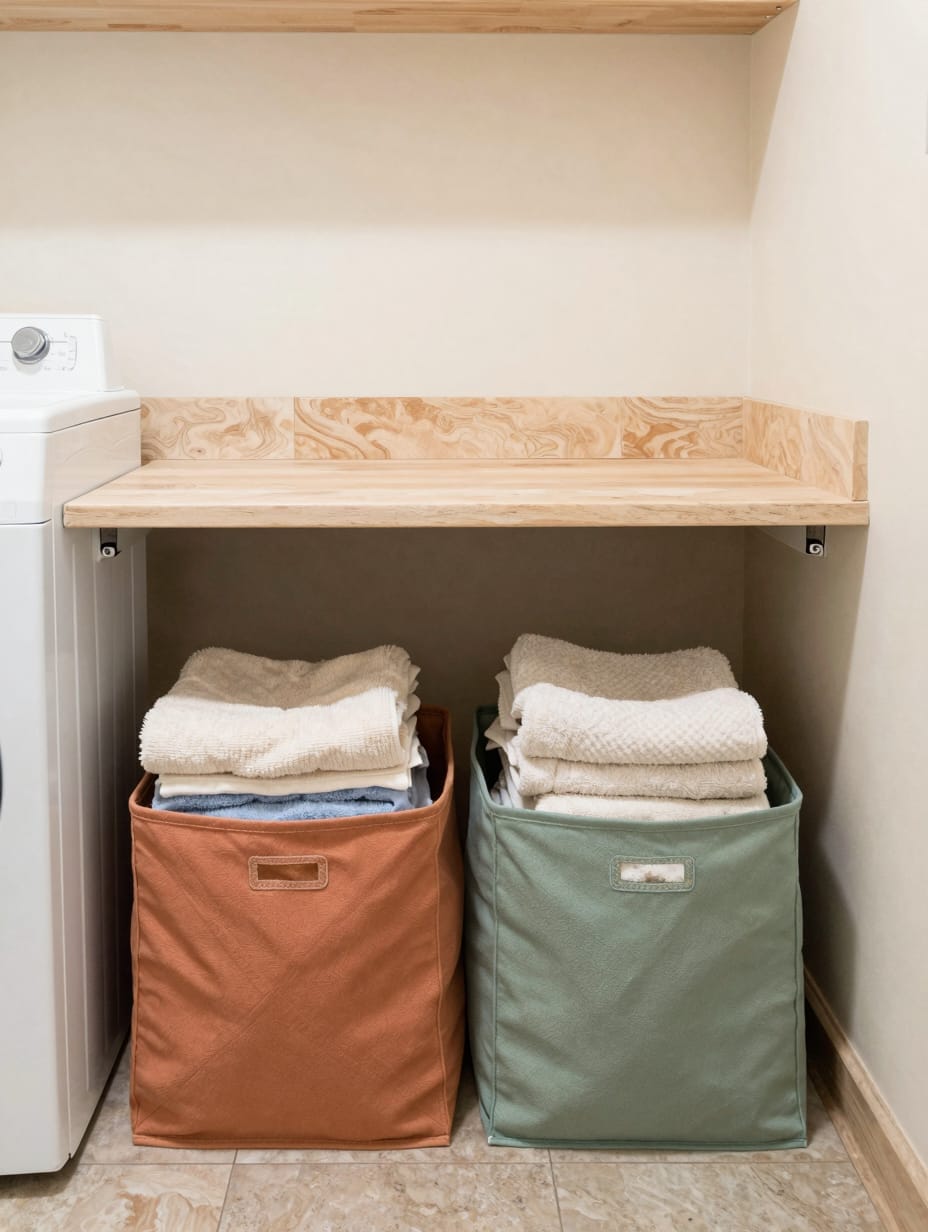
3. Personalize Your Space with a Functional Folding Counter
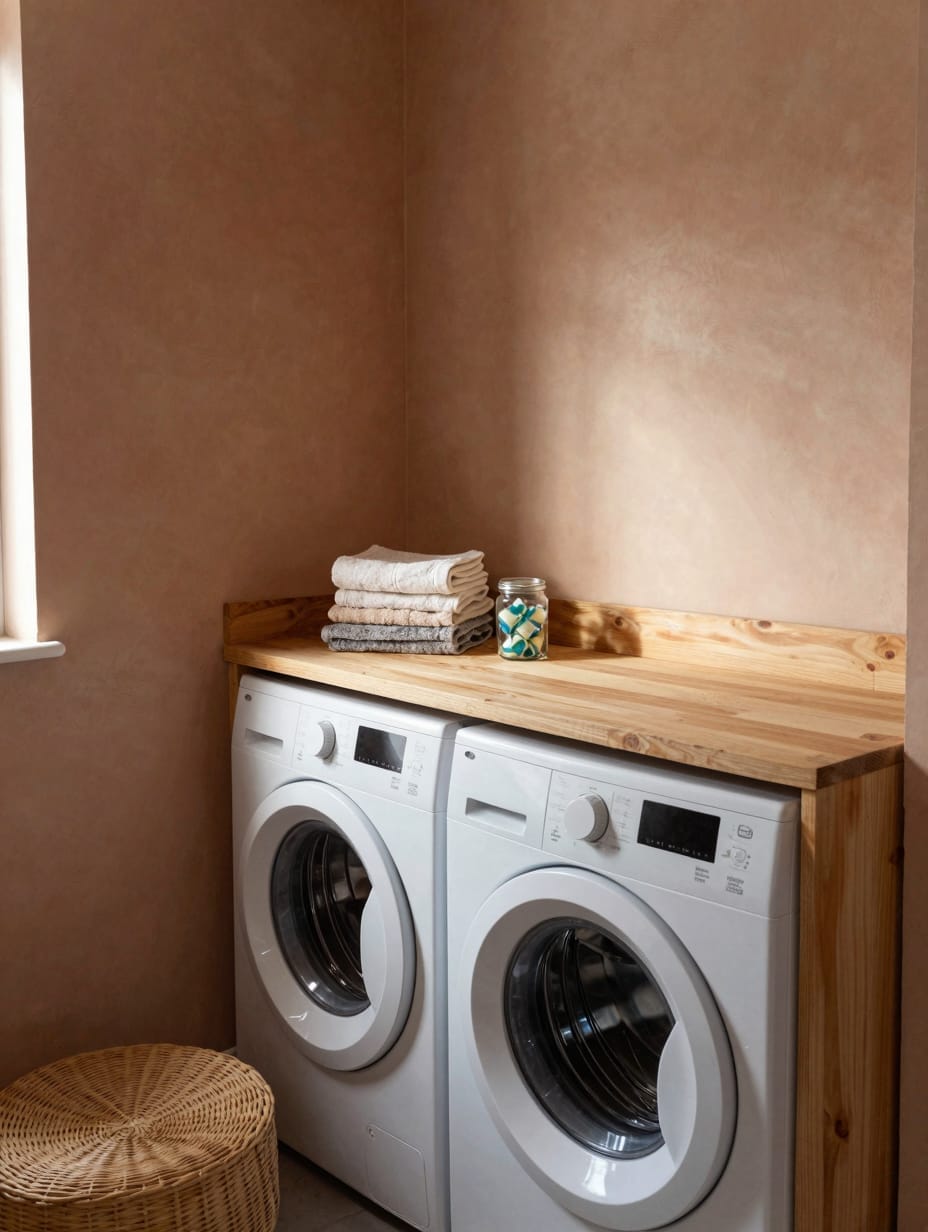
I built a smooth, light-stained plywood countertop over my front-loading appliances, creating a dedicated spot for folding that instantly made laundry day less of a back-breaking task.
I applied three coats of a clear, satin polyurethane finish, which really protects the wood from moisture and daily wear, turning an often-overlooked surface into a highly practical workspace.
How to Get This Look
- Cut a plywood sheet to span the width and depth of your appliances, leaving about 1/2 inch overhang for a custom fit.
- Plywood sheet, $25-$70 USD, choose sanded birch for a smooth, ready-to-stain surface.
- Stain the wood a warm tone, like my Danish oil finish, to enhance its natural grain.
- Money-saving alternative: Use a pre-cut MDF board and paint it with a moisture-resistant enamel, often under $20.
4. Smart Storage with a Vertical Ladder Shelf
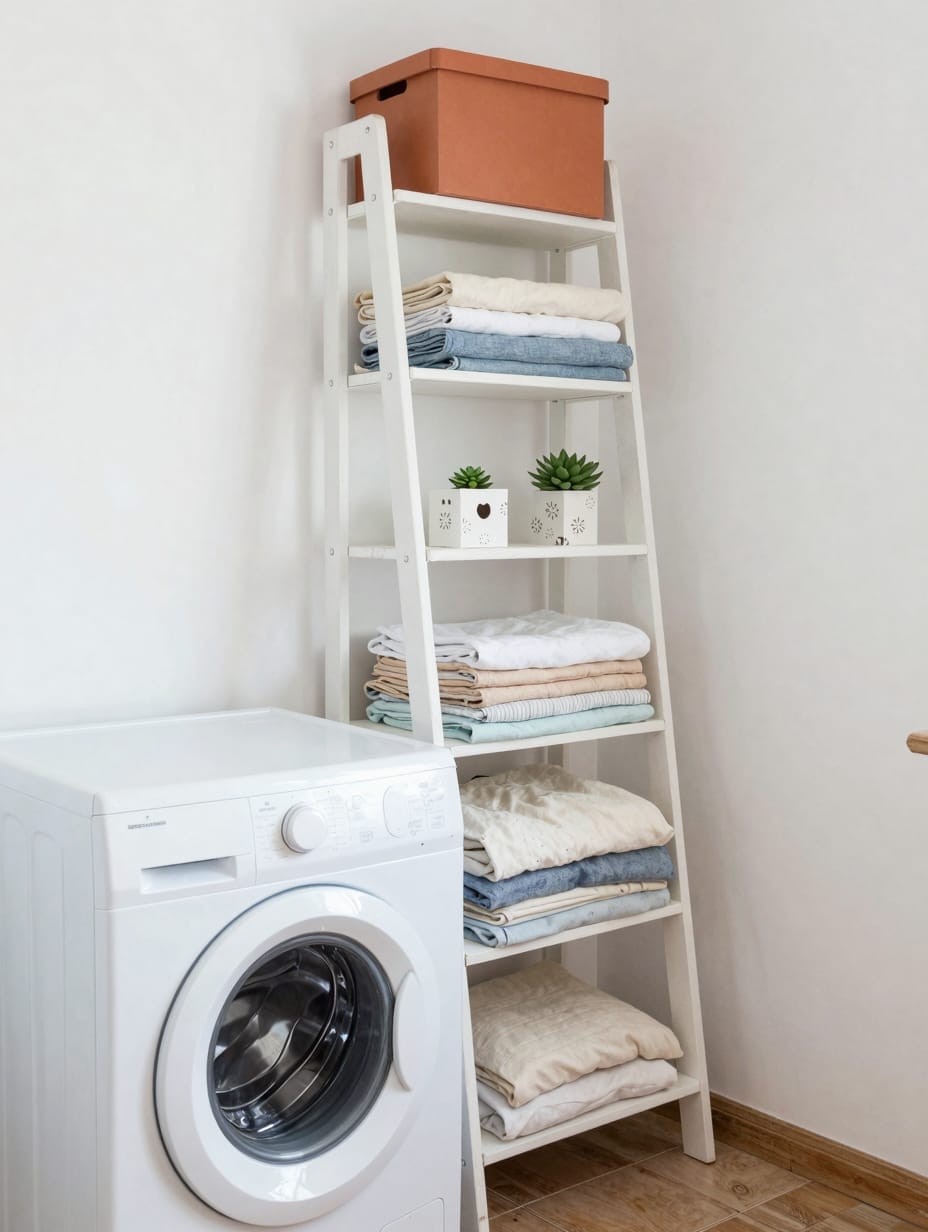
My narrow laundry nook truly benefited from a tall, white ladder-style shelving unit I tucked beside my top-loading washing machine; it’s perfect for adding storage without eating up precious floor space.
I love how each shelf holds neatly folded hand towels and small decorative storage boxes, along with a tiny succulent in a terracotta pot, adding both function and a touch of green life.
How to Get This Look
- Select a slim ladder shelf no wider than 15 inches to fit comfortably in tight spaces.
- White ladder shelf, $40-$100 USD, look for sturdy particleboard or solid wood options.
- Store fabric storage boxes on the shelves to hide clutter and maintain a tidy look.
- Money-saving alternative: Upcycle an old wooden step ladder with a fresh coat of white paint, costing less than $15.
5. Command Your Tools with a Customizable Pegboard
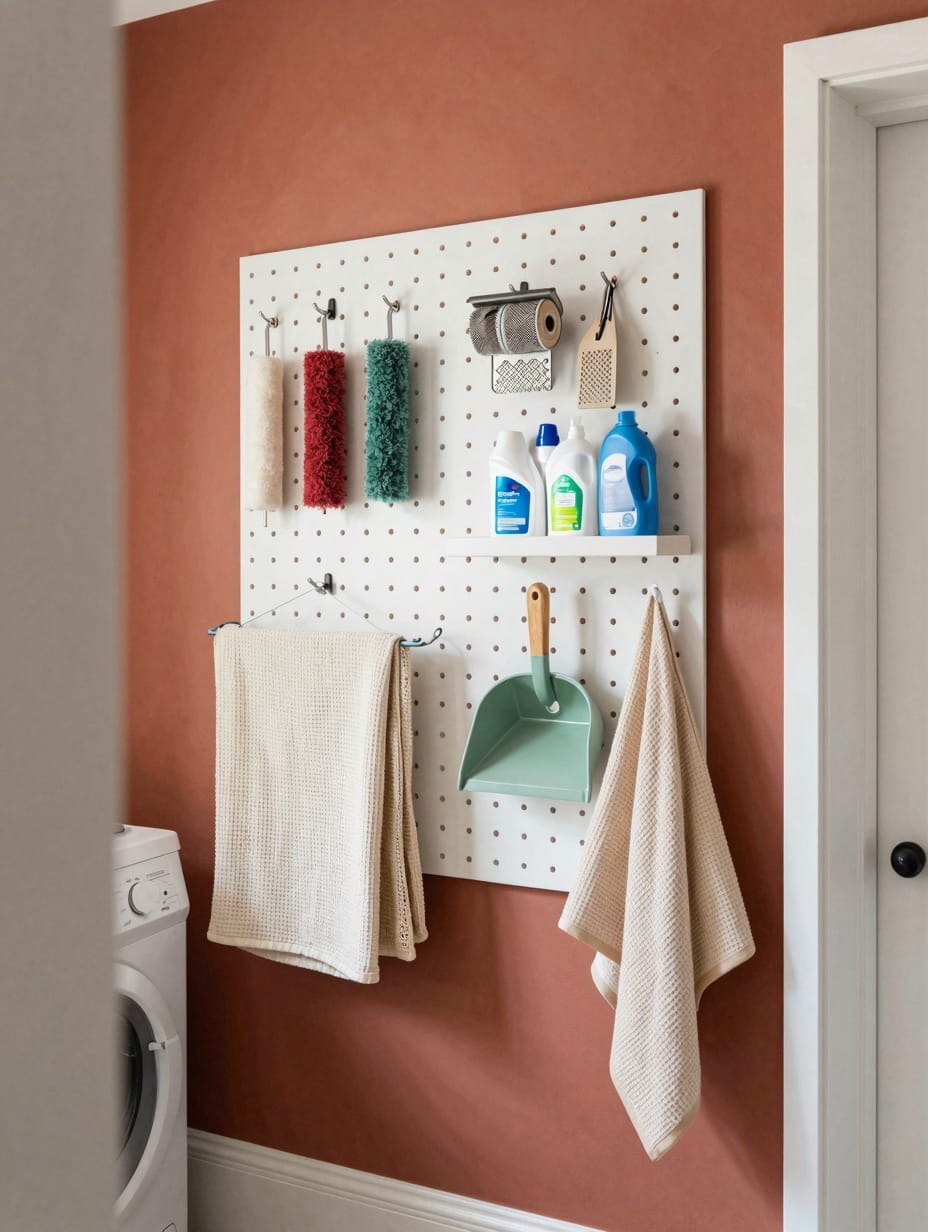
I installed a large, white pegboard on the wall above my utility sink, and it’s become my favorite way to keep all my laundry tools visible and instantly accessible.
I organized my pegboard by grouping similar items, hanging colorful lint rollers and mesh bags on S-hooks, which makes finding what I need incredibly efficient.
How to Get This Look
- Mount a 24×48 inch pegboard panel at eye level for comfortable reach to all accessories.
- White pegboard panel, $20-$50 USD, choose tempered hardboard for durability.
- Use assorted pegboard hooks and small shelves to customize storage for various tools.
- Money-saving alternative: Purchase a scrap piece of pegboard from a hardware store for under $10 and paint it white.
6. Revitalize Old Cabinets for a Refreshing Look
I inherited an old, forgotten kitchen upper cabinet that I brought back to life by painting it a soft sage green; it now provides beautiful, custom-looking storage in my laundry room.
Adding new, inexpensive brushed brass pulls made such a difference, elevating the cabinet from drab to charming and perfectly complementing the dried eucalyptus stems I placed on top.
How to Get This Look
- Thoroughly clean, sand, and prime old cabinets before applying at least two coats of a durable satin paint.
- Cabinet paint, $30-$60 USD per gallon, choose a self-leveling acrylic-alkyd blend for a smooth finish.
- Install new cabinet pulls, opting for a brushed nickel or brass finish for an updated touch.
- Money-saving alternative: Use leftover interior house paint for the cabinet, which often costs nothing extra.
7. Moveable Organization with a Sleek Laundry Cart
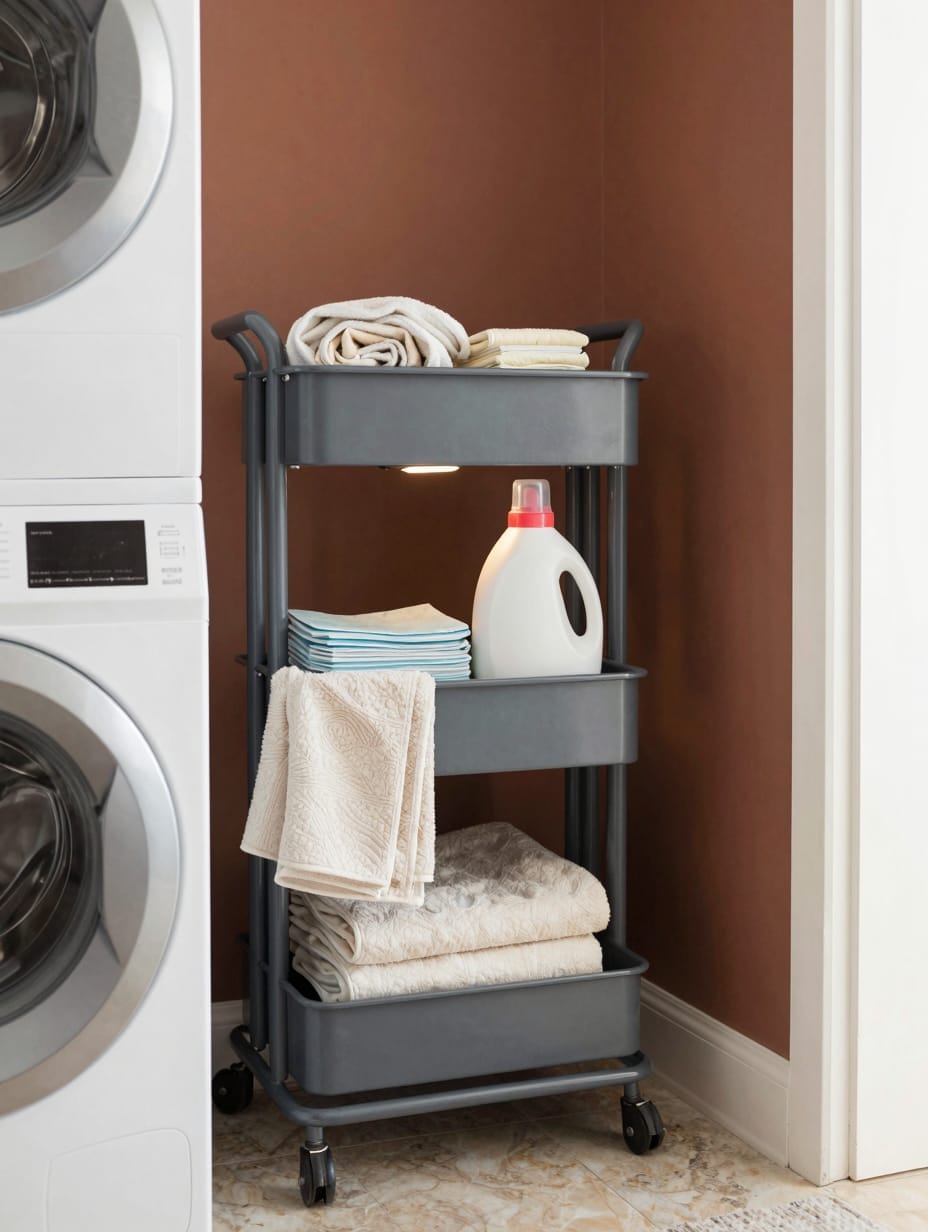
My compact laundry corner gained immense functionality with a sleek, three-tiered rolling utility cart in a charcoal grey finish, tucked right next to my stackable washer and dryer.
I find this cart indispensable for holding detergent, dryer sheets, and even a small folded laundry bag, making it easy to access items and move it aside for cleaning.
How to Get This Look
- Choose a cart with lockable wheels for stability, especially when it’s fully loaded with supplies.
- 3-tier rolling cart, $25-$75 USD, select steel construction for sturdiness and longevity.
- Transfer bulk detergents into a glass dispenser for a more organized and aesthetically pleasing look.
- Money-saving alternative: Repurpose an old kitchen utility cart or a slim bookshelf on casters, often found for under $20 at thrift stores.
8. Personalize with a Bold Wall Decal

I added a large, playful black and white ‘Wash & Dry’ script wall decal to a plain wall in my laundry room, which instantly infused personality and character without needing any paint or wallpaper.
This graphic decal really pops against the pristine white wall, making a simple statement that feels both fun and perfectly on-theme for the space.
How to Get This Look
- Ensure your wall is clean and smooth before applying the decal for optimal adhesion and a professional finish.
- “Wash & Dry” wall decal, $10-$30 USD, select high-quality vinyl for easy application and removal.
- Place matching white containers for detergent and fabric softener below the decal to tie the look together.
- Money-saving alternative: Hand-paint a simple word or phrase using a stencil and leftover wall paint for less than $5.
9. Streamline Sorting with Stackable Bins

My laundry closet feels incredibly tidy thanks to a stack of clear plastic bins I placed on a wire shelf, each clearly labeled for ‘Whites,’ ‘Colors,’ and ‘Delicates.’ This system has completely revolutionized my pre-sorting.
I find that using clear bins makes it easy to see when each category is ready for a wash cycle, ensuring nothing gets forgotten or mixed up.
How to Get This Look
- Measure your shelf depth and height before purchasing to ensure the bins fit perfectly when stacked.
- Clear stackable storage bins, $8-$20 USD each, opt for BPA-free acrylic for durability and clarity.
- Use a label maker or permanent markers for clear, concise labels on each bin.
- Money-saving alternative: Repurpose sturdy cardboard boxes, cover them with decorative contact paper, and label them for free.
10. Optimize Under-Sink Space with Pull-Out Organizers
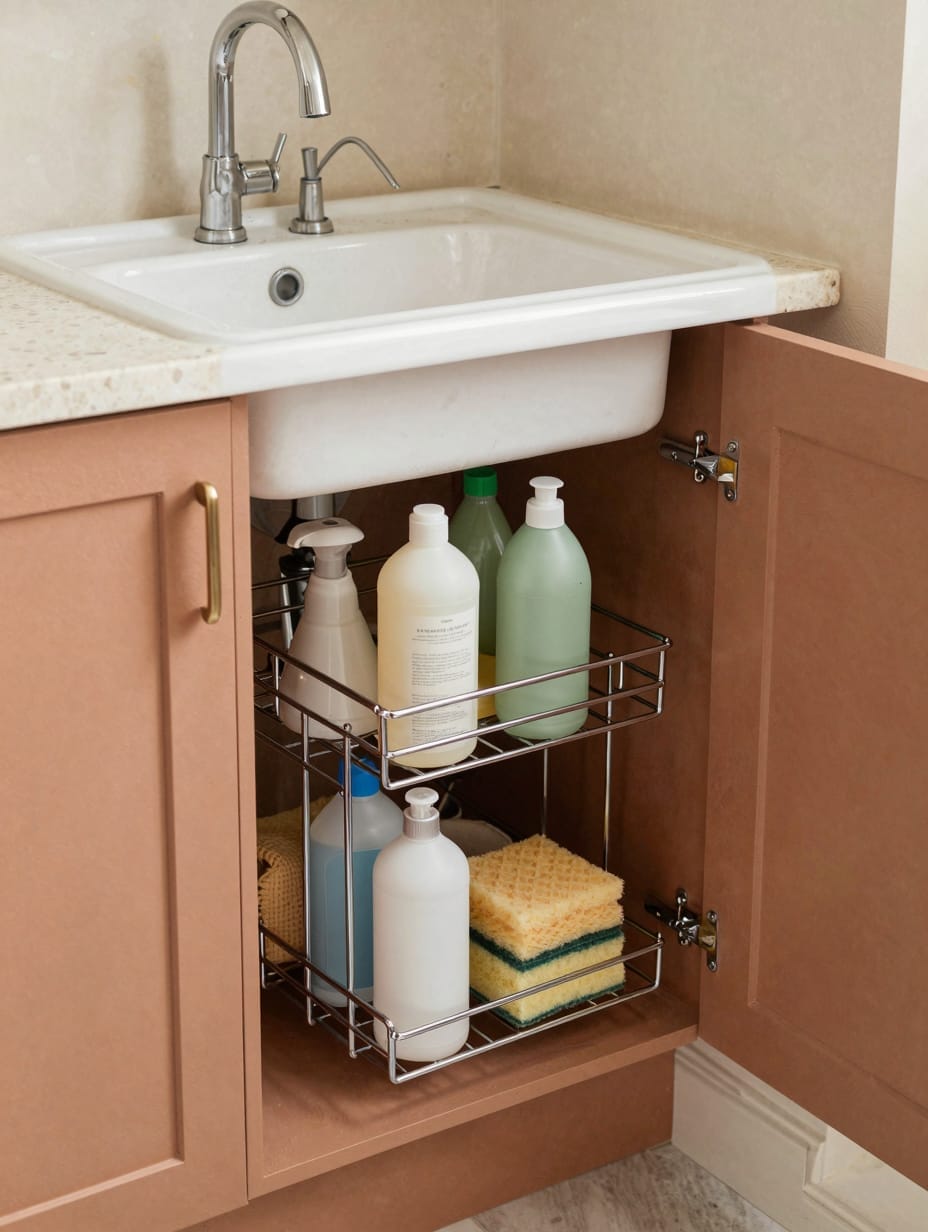
My previously cluttered under-sink cabinet is now a model of efficiency, thanks to a chrome pull-out two-tier organizer I installed, which keeps all my cleaning supplies neatly accessible.
Bottles of stain remover and my microfiber cloths are now perfectly arranged on both tiers, transforming a deep, dark cabinet into a highly functional and easily navigable storage zone.
How to Get This Look
- Measure the width, depth, and height of your under-sink cabinet precisely before selecting an organizer.
- Two-tier pull-out organizer, $30-$70 USD, choose stainless steel or chrome for rust resistance.
- Group similar items together, like spray bottles on one tier and sponges on another, for ultimate organization.
- Money-saving alternative: Utilize plastic dish bins or small crates you already own to create defined zones for items, costing nothing extra.
11. Clever Drying with a Wall-Mounted Rack
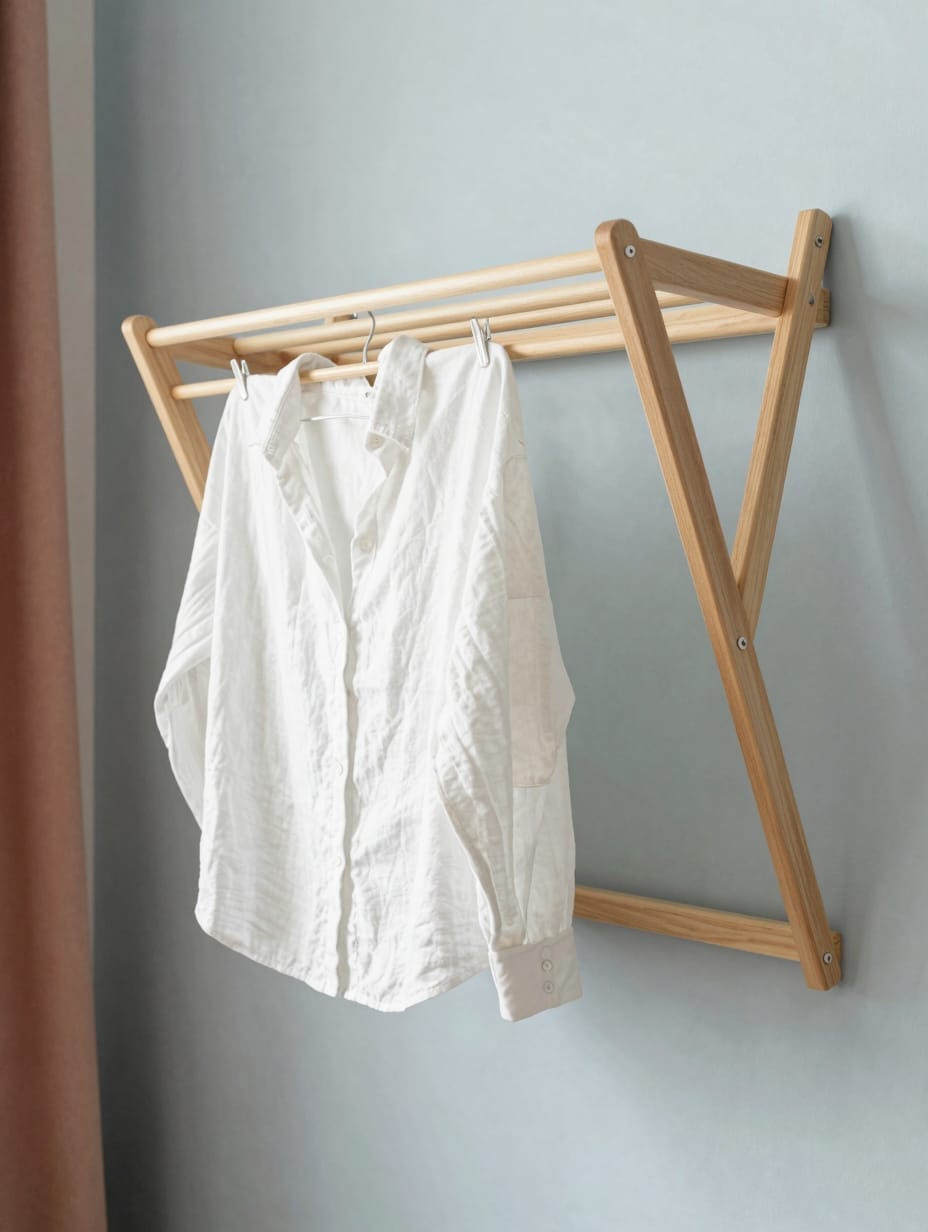
I built a sleek, foldable wall-mounted drying rack from light-colored pine dowels, and it’s been a game-changer for air-drying my delicate blouses without taking up any floor space.
When not in use, it folds flat against the wall, perfectly blending into the calm, pale blue backdrop of my laundry area, creating a serene and practical spot.
How to Get This Look
- Install the rack at a height that allows your longest garments to hang freely without touching the floor.
- Wooden dowels, $5-$15 USD each (for a set of 3-5), select hardwood for durability.
- Apply a moisture-resistant wood sealant to protect against humidity.
- Money-saving alternative: Repurpose an old towel rack or a series of strong hooks on the wall for a similar drying solution, costing under $10.
12. Elevate Sorting with Stylish Woven Laundry Baskets
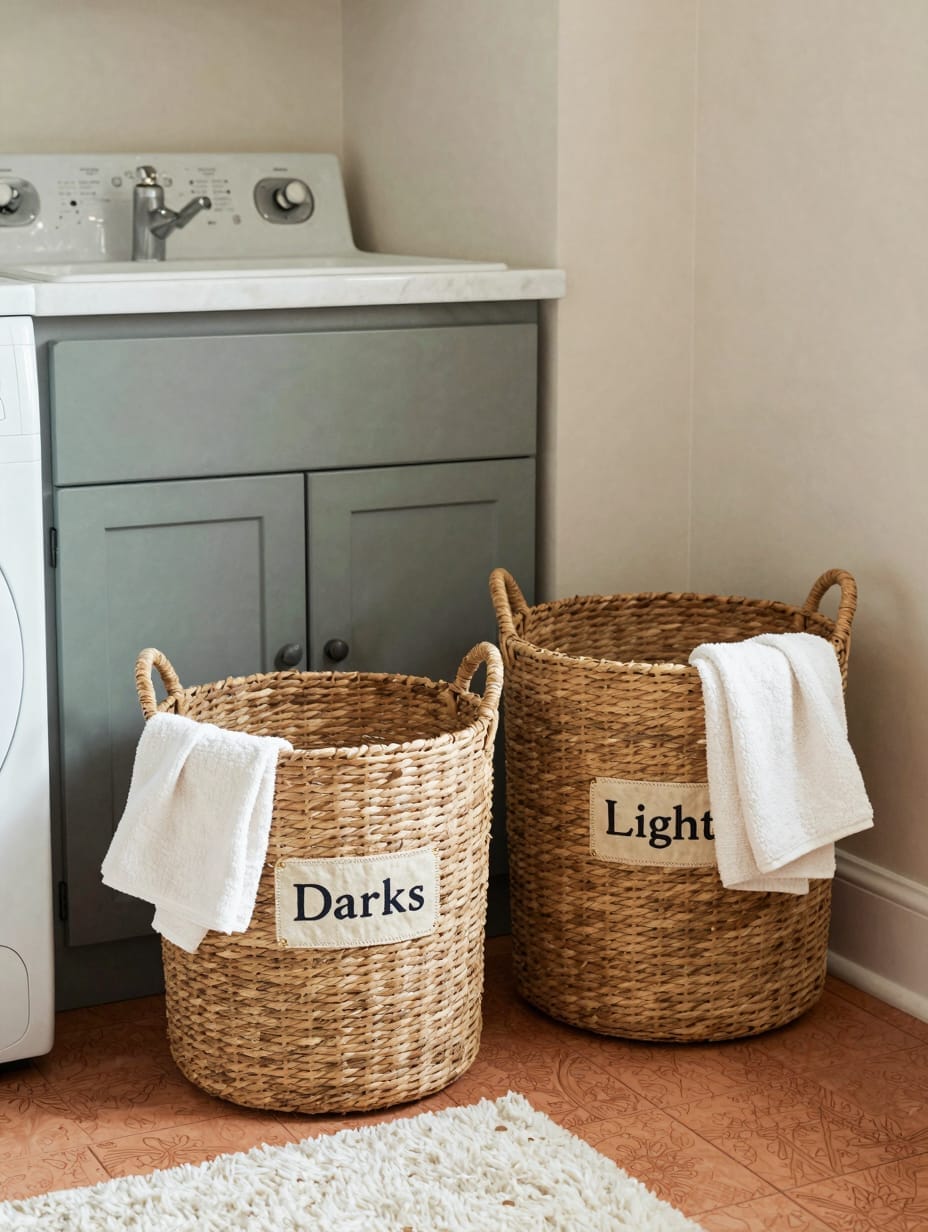
I invested in two large, round, natural woven laundry baskets, one for ‘Darks’ and one for ‘Lights,’ and they’ve made sorting not just practical but also genuinely stylish in my laundry room.
The organic texture of the baskets adds such a warm, inviting touch to the space, elevating them far beyond typical plastic hampers while keeping dirty clothes neatly contained.
How to Get This Look
- Choose baskets with sturdy handles for easy transport from room to laundry area.
- Large woven laundry baskets, $25-$60 USD each, opt for seagrass or cotton rope for a natural feel.
- Use simple iron-on labels or charming luggage tags to designate each basket’s purpose.
- Money-saving alternative: Use large, sturdy canvas tote bags, often found for under $10 each, for a flexible sorting solution.
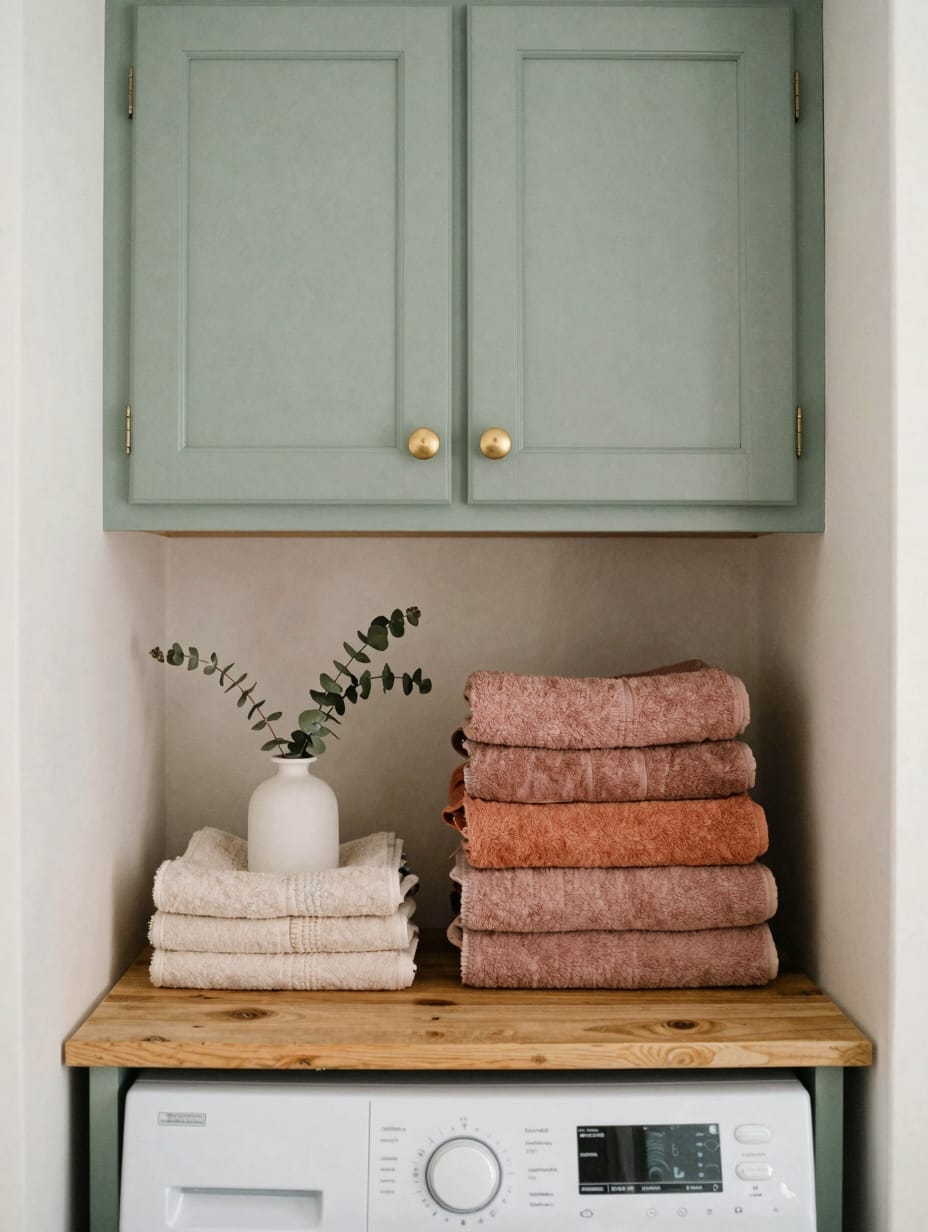
13. Maximize Overhead with Budget-Friendly Cabinets
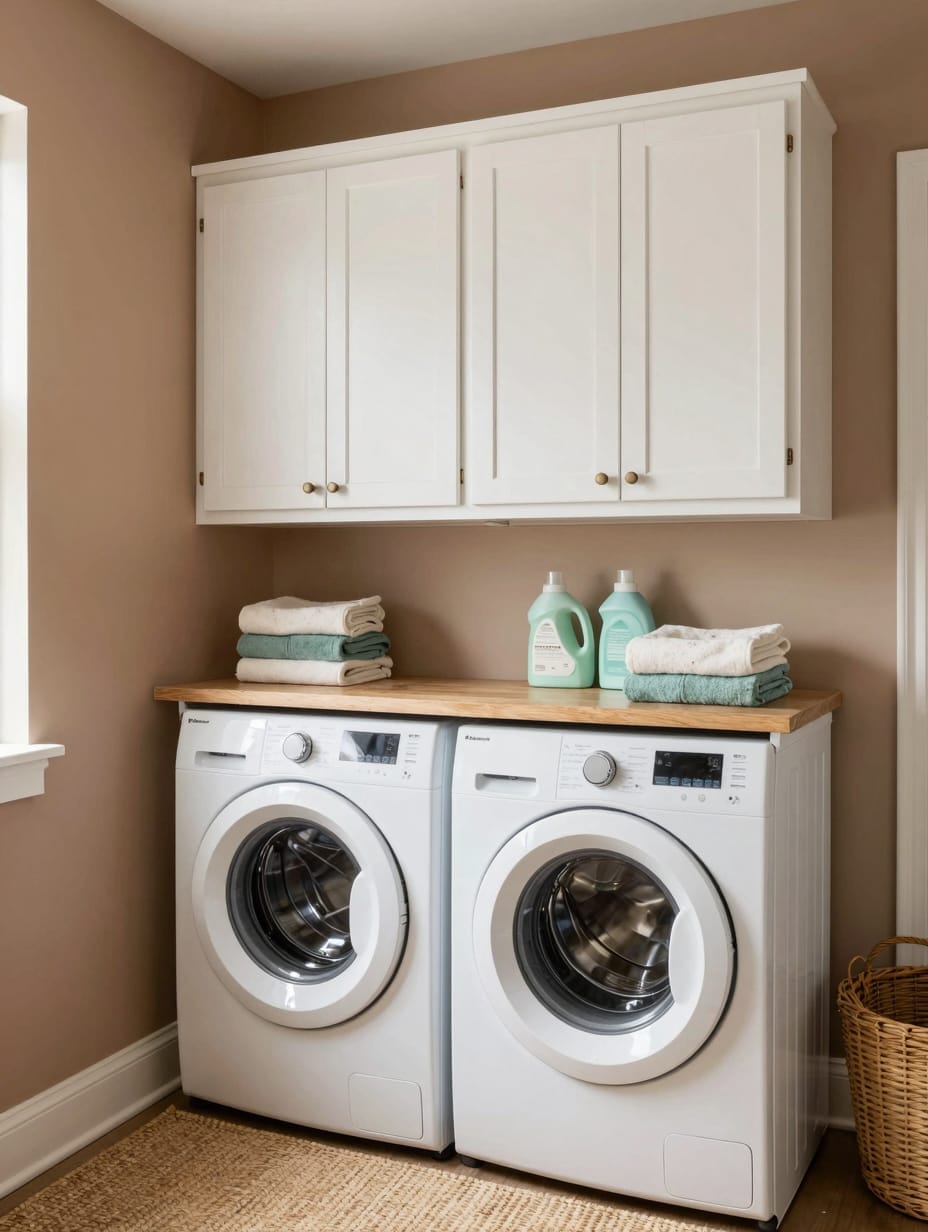
I installed two simple, white Shaker-style wall cabinets high above my washer and dryer, immediately adding significant storage for bulky items like my extra-large detergent tubs and seldom-used towels.
The brushed nickel handles I chose match my other fixtures and give these stock cabinets a custom, built-in feel, keeping my countertops wonderfully clear.
How to Get This Look
- Ensure cabinets are mounted securely into wall studs to safely support heavy laundry supplies.
- White wall cabinets, $50-$150 USD each, select pre-assembled options for easier installation.
- Store bulk laundry detergent and fabric softeners inside to declutter your surfaces.
- Money-saving alternative: Install open shelving using inexpensive lumber planks, costing under $30 for a similar storage volume.
14. Cohesive Style with a DIY Labeling System
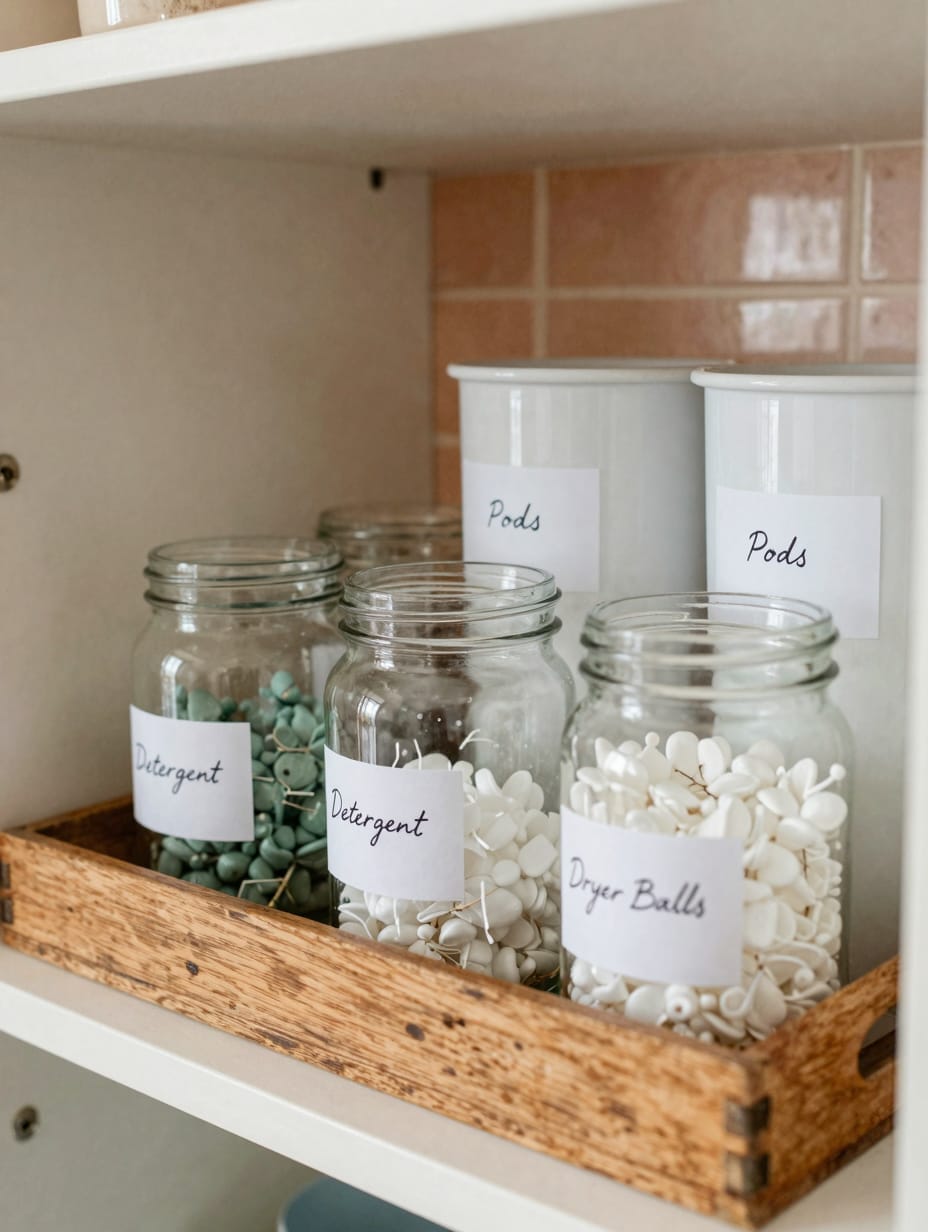
I created my own labeling system using clear glass jars and white ceramic containers for ‘Detergent,’ ‘Pods,’ and ‘Dryer Balls,’ and it made my entire shelf look so much more organized and high-end.
I used a fine-tipped chalk pen for elegant, handwritten script, which allowed me to personalize each label and achieve a perfectly cohesive aesthetic on a minimal budget.
How to Get This Look
- Choose containers of varying heights but consistent material (glass or ceramic) for visual interest and cohesion.
- Clear glass jars, $5-$15 USD each, look for wide-mouth designs for easy filling.
- Use a waterproof chalk pen or vinyl decals for durable, stylish labels.
- Money-saving alternative: Print attractive labels on regular paper and attach them with ribbon or twine to existing containers for a charming touch, costing pennies.
15. Upgrade Your Utility Sink with Simple Finishes
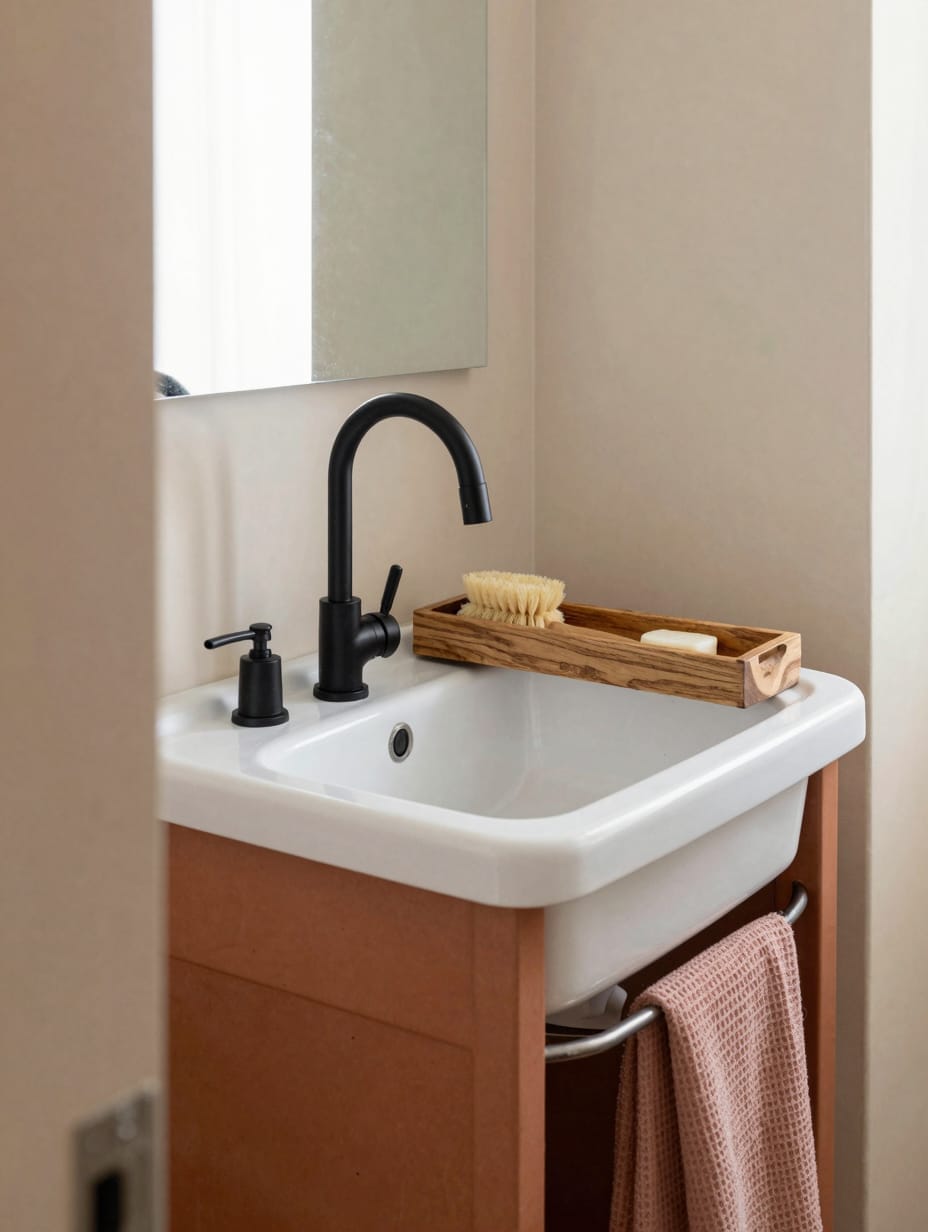
My basic white plastic utility sink got a dramatic, modern update when I replaced its old, leaky faucet with a sleek, new gooseneck faucet in matte black; it instantly elevated the entire area.
The dark finish contrasts beautifully with the white sink, and placing a small, dark-stained wooden caddy with a scrub brush beside it completes the polished, yet still highly functional, look.
How to Get This Look
- Measure the existing faucet’s hole configuration to ensure compatibility with your new fixture.
- Matte black gooseneck faucet, $40-$100 USD, select a single-handle design for ease of use.
- Add a small wooden caddy beside the sink for brushes and soap, choosing one with drainage.
- Money-saving alternative: Paint your existing faucet with a specialized metal spray paint, costing under $15, for a refreshed appearance.
16. Make an Impression with a Bold Accent Wall
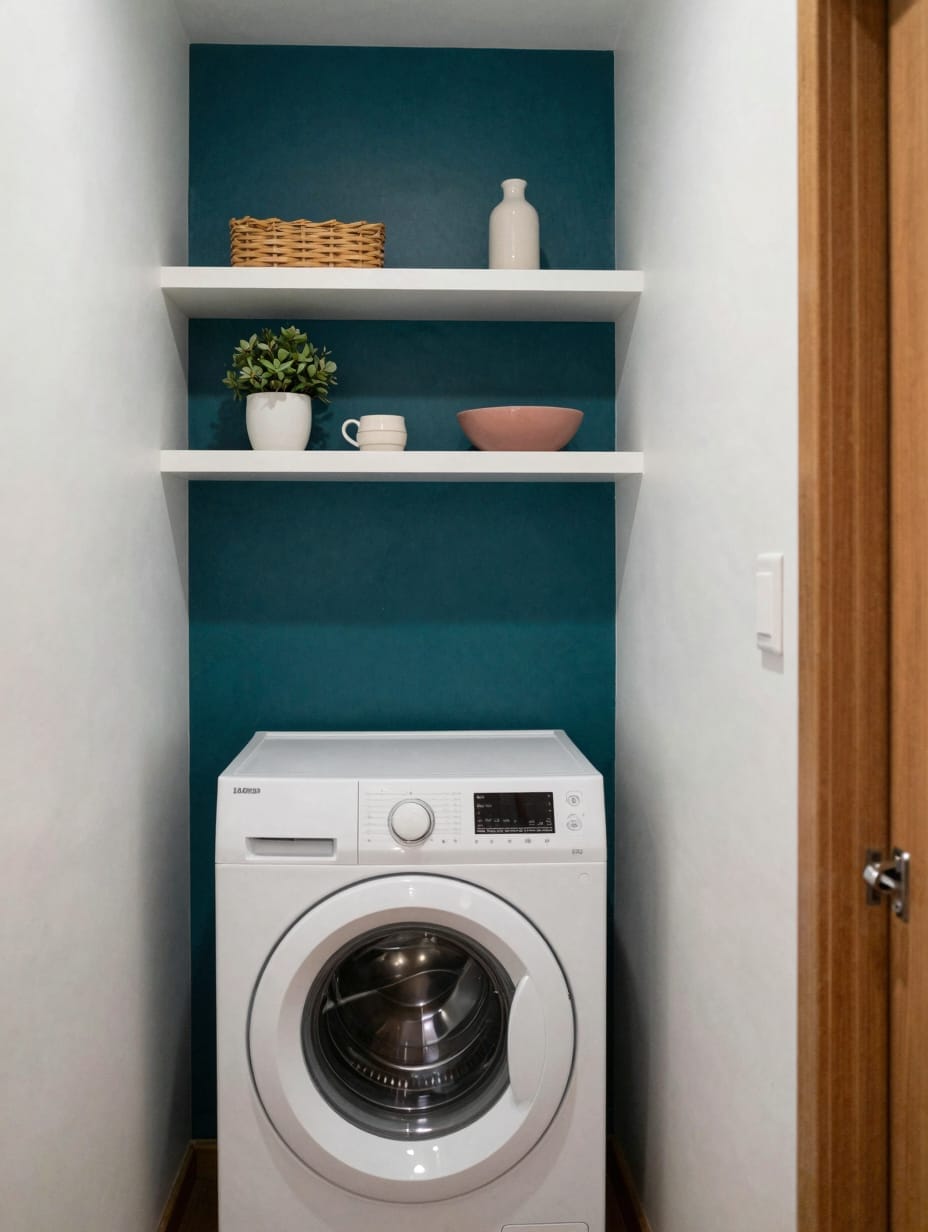
My small laundry room gained so much depth and personality when I painted one wall a vibrant, deep teal, making it a striking focal point behind my washer and dryer.
By keeping the remaining walls crisp white, the teal truly pops, proving how a single, carefully chosen color can dramatically transform a space affordably and infuse it with lively energy.
How to Get This Look
- Choose a wall that will be visible from the entrance to maximize the impact of the accent color.
- Deep teal interior paint, $20-$40 USD per quart, opt for a washable satin finish for easy maintenance.
- Use painter’s tape to create clean, sharp lines where the accent color meets the white walls.
- Money-saving alternative: Use a large piece of colorful fabric or a tapestry hung on the wall for a temporary accent, costing under $25.
17. Maximize Hidden Storage with Under-Counter Bins
I utilize the often-overlooked space beneath my laminate countertop by sliding in two large, attractive fabric storage bins, which perfectly fit the width and keep my seasonal linens neatly tucked away.
This uniform look contributes so much to a tidy appearance and makes incredibly efficient use of every inch, ensuring no space goes to waste in my clean and functional laundry area.
How to Get This Look
- Measure the exact height, width, and depth of the open space under your counter to find bins that fit snugly.
- Large fabric storage bins, $15-$30 USD each, choose a durable canvas or polyester blend.
- Select bins in a neutral color or subtle pattern to maintain a streamlined, uncluttered aesthetic.
- Money-saving alternative: Repurpose sturdy shopping bags or old pillowcases inside larger wire baskets you already own, costing nothing.
Loved these ideas? Save this post to Pinterest so you can come back to it later.
Simple Ways to Bring These Ideas to Life in Your Home
Embarking on a laundry room refresh doesn’t have to be daunting or expensive; it’s about making smart, impactful choices that align with your budget and lifestyle. I always start by decluttering, removing anything that doesn’t actively serve a purpose in the space, which immediately makes it feel lighter and more manageable. Then, I think about zones: a sorting zone, a washing zone, and a drying zone, making sure each has its dedicated supplies. Finally, I add touches of personality with things I love, whether it’s a small potted plant or a fun piece of art. Taking small steps is key, and you’ll be amazed at the transformation.
- Assess your current storage needs and identify the biggest pain points.
- Prioritize one or two impactful projects, like painting cabinets or adding shelves, rather than trying to do everything at once.
- Shop smart at thrift stores, discount retailers, or even for DIY materials like plywood.
- Incorporate existing items you already own, like baskets or jars, before buying new ones.
- Look for multi-functional items that can serve more than one purpose to maximize utility.
Frequently Asked Questions
How can I make my laundry room feel bigger without knocking down walls?
I’ve found that using light paint colors on walls, like a soft dove grey or crisp white, can instantly make a small laundry room feel more expansive. Incorporating reflective surfaces, such as a mirror or glossy tiles, also helps bounce light around. Using vertical storage solutions, like tall ladder shelves, draws the eye upward, enhancing the perception of height and space.
What’s the most budget-friendly way to add storage to a laundry room?
From my experience, the absolute best budget-friendly storage upgrade is installing inexpensive floating shelves above your machines. You can buy raw pine planks for $10-20 each, stain them yourself, and mount them with simple brackets. This instantly provides valuable space for detergents and folded linens without requiring costly cabinet installations.
Can I really transform my laundry room without major construction?
Absolutely! I’ve achieved dramatic transformations in my laundry space using only cosmetic changes. Think about painting existing cabinets, adding peel-and-stick backsplash tiles, or applying a bold wall decal. These surface-level updates require no demolition but offer incredible visual impact, making the space feel entirely new and refreshed with minimal effort.
Are DIY folding counters truly durable enough for daily use?
Yes, if constructed and sealed properly. When I built my plywood counter, I ensured I used sturdy mounting brackets, anchoring them into wall studs for strong support. Then, I applied three coats of a marine-grade polyurethane sealant; this created a waterproof and incredibly durable surface that withstands daily spills and heavy loads beautifully.
Common Myths About laundry room remodel
Myth: A laundry room remodel always involves significant construction and high costs.
Truth: Many people assume a “remodel” means ripping out walls and plumbing, but my experience proves otherwise. I’ve focused on surface-level changes like painting my old cabinets with Benjamin Moore’s “Chelsea Gray” or installing an affordable peel-and-stick backsplash. These budget-conscious updates deliver a fresh look and improved functionality for just a few hundred dollars, not thousands.
Myth: Small laundry rooms can’t be stylish or highly functional.
Truth: I used to believe this too, until I started embracing vertical space. My narrow laundry closet, which is only 30 inches wide, now boasts a wall-mounted drying rack and a slim ladder shelf, effectively doubling my storage and utility without feeling cramped. It’s all about smart product selection and strategic placement to maximize every inch, turning limitations into design opportunities.
laundry room remodel: Final Thoughts
Embracing a laundry room remodel means seeing potential in every corner, even on a tight budget. I’ve found that with a little creativity and a focus on practical solutions, this often-overlooked space can become just as charming and organized as any other room in your home. Remember, small changes like adding functional storage or a splash of color can make a huge difference in your daily routine and overall enjoyment of your utility space. Save this post to Pinterest 📌 and start building the apartment you actually want to come home to.